article

Thursday, April 28, 2011

Refresh a page in jQuery?

Refresh a page in jQuery?


<html>
<head>
<title>Refresh a page in jQuery</title>
<script src="http://ajax.googleapis.com/ajax/libs/jquery/1.4.2/jquery.min.js" type="text/javascript"></script>
</head>
<body>
<a href="#" id="RefreshPage">Refresh Page in jQuery</a>
<script type="text/javascript">
$('#RefreshPage').click(function() {
location.reload();
});
</script>
</body>
</html>

Thursday, April 21, 2011

Joomla - add extra fields in joomla registration

Joomla - add extra fields in joomla registration

LIST OF FILES NEED TO EDIT

1. libraries\joomla\database\table\user.php
add two extra fields like phone and website, let’s these fields as optional
put the follow lines before above lines or near line 116

var $params = null;

var $phone = null;
var $website = null;
var $address = null;
/**
* @param database A database connector object
*/
function __construct( &$db )
{
2. add alter your user table
ALTER TABLE jos_users ADD phone varchar(255) DEFAULT '' AFTER password;
ALTER TABLE jos_users ADD website varchar(255) DEFAULT '' AFTER phone;


3. G
o to administrator\components\com_users\views\user\tmpl
open file form.php and put the following lines after line 132 … just add as new row in table


<tr>
<td width="150" class="key">
<label for="phone">
<?php echo JText::_( 'Phone' ); ?>
</label>
</td>
<td>
<input type="text" name="phone" id="phone" class="inputbox" size="40" value="<?php echo $this->user->get('phone'); ?>" />
</td>
</tr>
<tr><td width="150" class="key">
<label for="website">
<?php echo JText::_( 'Website' ); ?>
</label>
</td>
<td>
<input type="text" name="website" id="website" class="inputbox" size="40" value="<?php echo $this->user->get('website'); ?>" />
</td>
</tr>

4. Goto administrator->site->User Manager


5. front end registration
components\com_user\views\register\tmpl\default.php for edit


<tr>

<td height="40">
<label id="phonemsg" for="phone">
<?php echo JText::_( 'Phone' ); ?>:
</label>
</td>
<td>
<input type="text" name="phone" id="phone" size="40" value="<?php echo $this->escape($this->user->get( 'phone' ));?>" class="inputbox" maxlength="50" /> *
</td>
</tr>
<tr>
<td height="40">
<label id="websitemsg" for="website">
<?php echo JText::_( 'Website' ); ?>:
</label>
</td>
<td>
<input type="text" name="website" id="website" size="40" value="<?php echo $this->escape($this->user->get( 'website' ));?>" class="inputbox" maxlength="50" /> *
</td>
</tr>


Copy that default.php file from components\com_user\views\register\tmpl and now go to your current template folder. copy all the php files from components\com_user\views\register\tmpl to templates\{your custom template name here}\html\com_user\register

Wednesday, April 13, 2011

Jquery Ajax Requests submit loading Image

Jquery Ajax Requests submit loading Image

show a loading image when an AJAX request


<script src="http://ajax.googleapis.com/ajax/libs/jquery/1.4.2/jquery.min.js" type="text/javascript"></script>
<script type="text/javascript">
$(document).ready(function () {
$('#loading')
.hide()
.ajaxStart(function() {
$(this).show();
})
.ajaxStop(function() {
$(this).hide();
});
$('#submit').click(function() {
$('.test_content').load('load_content.php');
return false;
});
});
</script>
<h4>Jquery Ajax Requests submit loading Image </h4>
<div class='test_content'></div>
<p><a id="submit" href="#">Submit</a></p>

<div id="loading">
<img src="ajax-loader.gif" />
</div>


//load_content.php
<?php
sleep(4);

echo '

This content was loaded from a PHP script.

';

?>

Thursday, March 31, 2011

CSS Login Form Design

CSS Login Form Design

A sample of CSS form login

Demo


http://dl.dropbox.com/u/7106563/r-ednalan/login_form.html


<style type="text/css">
body{background-color:#fff;margin: 40px;font-family:Arial, Lucida Grande, Verdana, Sans-serif;font-size:12px;color:#000;}
#content {margin: 0 auto;width: 350px;border:#ccc 1px solid;background-color:#fff;padding:20px 20px 12px 20px;-moz-border-radius:7px; -webkit-border-radius:7px;}
h1{font-weight:normal;font-size:20px;color:#aaaaaa;margin:0 0 4px 0;}
p{font-size: 20px;color: #dedede;}
a {color:#729e01;text-decoration:none;}
a:hover{color:#dedede;}
input.text{ border:#ccc 1px solid;-moz-border-radius:7px; -webkit-border-radius:7px;font-size: 20px;width:300px;}
.ptour_crtbtn{border:1px outset #ccc;padding:5px 2px 4px;color:#fff;min-width: 100px;text-align: center;cursor:pointer;background:#729e01;background:-webkit-gradient(linear, left top, left bottom,from(#a3d030),to(#729e01));background:-moz-linear-gradient(top,#a3d030,#729e01);background:-o-linear-gradient(top,#a3d030,#729e01);background:linear-gradient(top,#a3d030,#729e01);-moz-border-radius:7px; -webkit-border-radius:7px;
}
</style>
<div id="content">
<h1>Login Form</h1>
<form action="" method="POST">
<p><label style="display: block;">Email:</label><input class="text" type="text" name="username" /></p>
<p><label style="display: block;">Password:</label><input class="text" type="password" name="password" /></p>
<p><button class="ptour_crtbtn" name="login" type="submit">Login</button></p>
</form>
<p><a href="#">Forgot password?</a></p>
</div>

Friday, March 25, 2011

How to: Add a Share on facebook link to your WordPress blog

How to: Add a Share on facebook link to your WordPress blog

Paste the following code on your single.php file, within the loop:


<a href="http://www.facebook.com/sharer.php?u=<?php the_permalink();?>&t=<?php the_title(); ?>" target="blank">Share on Facebook</a>

Thursday, March 24, 2011

Font preview using Google font API

Font preview using Google font API

A sample of google font api font name Tangerine
Sample

<html>
<head>
<link rel="stylesheet" type="text/css" href="http://fonts.googleapis.com/css?family=Tangerine">
<style>
body {
font-family: 'Tangerine', serif;
font-size: 48px;
text-shadow: 4px 4px 4px #aaa;
}
</style>
</head>
<body>
<h1>http://r-ednalan.blogspot.com/</h1>
</body>


Visit the Google Font Directory

FORM Validators for web developers

1. Live Validation form

LiveValidation is a small open source javascript library for making client-side validation quick, easy, and powerful.

Example Demo

http://livevalidation.com/examples


2. MooTools FormCheck

FormCheck is a class that allows you to perform different tests on form to validate them before submission.


Demo

http://mootools.floor.ch/en/labs/


3. ProtoForm

ProtoForm is an unltra lightweight, unobtrusive cross-browser and very easy to customize form validation + submit with Ajax based on prototype.js framework.

Demo

http://cssrevolt.com/upload/files/protoform/

Tuesday, March 22, 2011

Implement a jQuery AJAX Login Form into a Modal Box using fancybox.net modal

Implement a jQuery AJAX Login Form into a Modal Box using fancybox.net modal box

Integrate an Jquery AJAX Login Form into a Modal Box using a fancybox modal box This will show you how to implement JQuery ajax using facybox.


//jquery ajax
<script type="text/javascript" src="http://ajax.googleapis.com/ajax/libs/jquery/1.4/jquery.min.js"></script>
<script type="text/javascript">
$(document).ready(function() {
$("#login_form").submit(function() {
var unameval = $("#username").val();
var pwordval = $("#password").val();
$.post("login.php", { username: unameval, //login.php
password: pwordval }, function(data) {
$("#status").html(data);
});
return false;
});
});
</script>


//fancybox javascript
<script type="text/javascript" src="./fancybox/jquery.mousewheel-3.0.4.pack.js"></script>
<script type="text/javascript" src="./fancybox/jquery.fancybox-1.3.4.pack.js"></script>
<link rel="stylesheet" type="text/css" href="./fancybox/jquery.fancybox-1.3.4.css" media="screen" />
<link rel="stylesheet" href="style.css" />
<script type="text/javascript">
$(document).ready(function() {

$("#various1").fancybox({
'titlePosition' : 'inside',
'transitionIn' : 'none',
'transitionOut' : 'none'
});


});
</script>

//CSS
<style type="text/css">
form.registration{
width:570px;
float:left;

}
form.registration fieldset{
border-top:0px solid #ccc;
border-left:0;
border-bottom:0;
border-right:0;
padding:6px;
margin:0px 20px 0px 0px;
}

form.registration label{
font-size: 20px;
width:190px;
float: left;
text-align: right;
color:#7F7F7F;
clear:left;
margin:10px 4px 0px 0px;
padding:0px;
}
form.registration .textboxinput{
font-family: Georgia;
font-size: 28px;
float:left;
width:280px;
border:1px solid #cccccc;
margin:2px 0px 2px 2px;
color:#00abdf;
height:32px;
padding:3px;
-moz-box-shadow: 0 1px 3px rgba(0,0,0,0.5);
-webkit-box-shadow: 0 1px 3px rgba(0,0,0,0.5);
-webkit-border-radius: 5px;
-moz-border-radius: 5px;
}


.button {
-moz-border-radius:5px;
-webkit-border-radius:5px;
border-radius:5px;
-moz-box-shadow:0 1px 3px rgba(0, 0, 0, 0.50);
-webkit-box-shadow:0 1px 3px rgba(0, 0, 0, 0.50);
box-shadow:0 1px 3px rgba(0, 0, 0, 0.50);
background:#222222 url(button-overlay.png) repeat-x;
border:1px solid rgba(0, 0, 0, 0.25);
color:#FFFFFF !important;
cursor:pointer;
display:inline-block;
font-size:13px;
font-weight:bold;
line-height:1;
overflow:visible;
padding:5px 15px 6px;
position:relative;
text-decoration:none;
text-shadow:0 -1px 1px rgba(0, 0, 0, 0.25);
width:auto;
text-align:center;
}
.button:hover {
background:#111111;
color:#FFFFFF;
}
.button:active {
background:#242424;
}

.orange.button {
background-color:#FF5C00;
}
.orange.button:hover {
background-color:#D45500;
}
.orange.button:active {
background-color:#fd762a;
}


.fail {
background-color: #FFECE6;
border: 1px solid #FF936F;
color: #842100;
background-image: url(delete00.png);
}
.fail {
background-repeat: no-repeat;
background-position: 10px center;
height: 20px;
text-transform: uppercase;
font-size: 11px;
line-height: 22px;
margin-bottom: 20px;
padding-top: 10px;
padding-right: 10px;
padding-bottom: 10px;
padding-left: 50px;

}
</style>
//form
<a id="various1" href="#inline1" title="">LOG IN</a>
<div style="display: none;">
<div id="inline1" style="width:565px;height:250px;overflow:auto;padding:10px">
<span ><b>Sign In</b></span>
<div id="flash" align="left" ></div>
<div id="status"></div>
<form id="login_form" class="registration" method="post">
<fieldset>
<label>Username </label>
<input class="textboxinput" type="text" id="username" name="username" maxlength="120" value=""/>
<label>Password </label>
<input class="textboxinput" type="password" id="password" name="password"/>
</fieldset>
<fieldset>
<div style="float:right;padding-right:52px;"><input type="submit" class="large button orange input" value="Sign In" /></div>
</fieldset>
</form>
</div>
</div>


//login.php
<?php
$username = $_POST['username'];
$password = $_POST['password'];

if ($username == "test" && $password == "test")
{
echo "<strong>Login succeeded!</strong>";
}
else
{
echo "<div class=\"fail\"><strong>Login failed! Please try again.</strong></div>";
}
?>


Download

http://dl.dropbox.com/u/3293191/JQUERY/login_modal.zip

Saturday, March 19, 2011

Wrapping Long URLs and Text Content with CSS

Wrapping Long URLs and Text Content with CSS

pre {
white-space: pre; /* CSS 2.0 */
white-space: pre-wrap; /* CSS 2.1 */
white-space: pre-line; /* CSS 3.0 */
white-space: -pre-wrap; /* Opera 4-6 */
white-space: -o-pre-wrap; /* Opera 7 */
white-space: -moz-pre-wrap; /* Mozilla */
white-space: -hp-pre-wrap; /* HP Printers */
word-wrap: break-word; /* IE 5+ */
}


<pre class="wrapped">Lorem ipsum dolor sit ames. Ut justo. Suspendisse potenti.</pre>

Sunday, March 6, 2011

Get Active/ Inactive/ Current tabs in Navigation Bar using PHP and jQuery

Get Active/ Inactive/ Current tabs in Navigation Bar using PHP and jQuery
php Code
Step 1: Get current page URL using PHP

$phpSelf = $_SERVER['REQUEST_URI'];

jQuery Code

Step 2: Check whether URL is similar to navigation bar button url, if they are similar we give it as the current active page,

< script type="text/javascript" >
$(document).ready(function(){

var root_url = "http://localhost";
var phpSelf = root_url+"<?php echo $phpSelf;?>"; $("#navigation li").each(function() {
var link = $(this).children("a").attr("href"); if(phpSelf == link){ $(this).addClass("active"); } }); }); < /script >

Change,
active to your active css class
http://localhost to website root directory

Displaying Number of Comments in your WordPress Blog

Displaying Number of Comments in your WordPress Blog

<?php
$numcomms = $wpdb->get_var("SELECT COUNT(*) FROM $wpdb->comments WHERE comment_approved = '1'");
if (0 < $numcomms) $numcomms = number_format($numcomms);
echo "There's ".$numcomms." total comments on my blog";
?>

Display Most Popular Posts in WordPress

Display Most Popular Posts in WordPress


<h2>Popular Posts</h2>
<ul>

<?php $result = $wpdb->get_results("SELECT
comment_count,ID,post_title FROM $wpdb->posts ORDER BY comment_count
DESC LIMIT 0 , 5");
foreach ($result as $post) {
setup_postdata($post);
$postid = $post->ID;
$title = $post->post_title;
$commentcount = $post->comment_count;
if ($commentcount != 0) { ?>

<li><a href="<?php echo get_permalink($postid); ?>" title="<?php echo $title ?>">
<?php echo $title ?></a> {<?php echo $commentcount ?>}</li>
<?php } } ?>
</ul>

Just change the 5 in line 3 to change the number of displayed popular posts

Thursday, March 3, 2011

php how to get tomorow date

php how to get tomorow date
Use the mktime function to create a timestamp for tomorrow. To go one day in the future we simply add one to the day
mktime(hour, minute, second, month, day, year, daylight savings time)


<?
$tomorrow = mktime(0, 0, 0, date("m"), date("d")+1, date("y"));
echo "Tomorrow is ".date("m/d/y", $tomorrow);
//out now date 03/03/11 tomorow is 03/04/11
?>

Monday, February 28, 2011

get the ID of the last insert post in WordPress

get the ID of the last insert post in WordPress

<div id="div1">
<?php
//insert new post
// Create post object
$my_post = array();
$my_post['post_title'] = 'Hello world';
$my_post['post_content'] = 'This is a sample post';
$my_post['post_status'] = 'published';
$my_post['post_author'] = 7; //the id of the author
$my_post['post_category'] = array(10,12); //the id's of the categories

// Insert the post into the database
$post_id = wp_insert_post( $my_post ); //store new post id into $post_id

//now add tags to new post
$tags = array('html', 'css', 'javascript');
wp_set_object_terms( $post_id, $tags, 'post_tag', true );

?>
</div>

Saturday, February 19, 2011

Write Better CSS

Write Better CSS

1. Single-line vs. Multi-line

multiple lines, like this:
.title {
font-size:14px;
line-height:20px;
color:blue;
}

Or on one or single line, like this:
.title {font-size:14px;line-height:20px;color:blue;}

2. Section Your File
comment above each section is all you need:
/*** Header ***/

3. Start With a Reset
* {margin:0;padding:0;}

4. Use Shorthand CSS
Shorthand CSS is combining a few related rules into one.
Example
.example {
background-color: blue;
background-image: url(images/blue-bg.jpg);
background-position: 100% 0;
background-repeat: no-repeat;
}

Shorthand
.example {background: blue url(images/blue-bg.jpg) 100% 0 no-repeat;}

5. Multiple Classes on One Element
The reason to do this is that you can define generic CSS styles that can be applied to a number of elements.
<p class="info left">Some example text in your info paragraph.</p>

6. Positioning Header Elements
#header {position:relative;width:960px;height:120px;}


Wednesday, February 9, 2011

Simple AJAX with JQuery

Simple AJAX with JQuery


<script type="text/javascript">
function register(){ //when the button is pressed, this function will be executed.
$.ajax({
type: "POST", // AJAX function
url: "submit_data.php", //Method
data: "username=" + document.getElementById("username").value +
"&email=" + document.getElementById("email").value, // executed when the button is pressed.
success: function(html){
$("#response").html(html); //response html output echo
}
});

}
</script>

<form action="" method="post">
Simple AJAX with JQuery
<p>
<label for="name">Name:</label><br />
<input type="text" name="username" id="name" size="25" />
</p>
<p>
<label for="email">Email:</label><br />
<input type="text" name="email" id="email" size="25" />
</p>
<p>
<input type="button" name="submit" id="submit" value="Subscribe" onclick="register()"/> //
</p>

</form>
<div id="response"></div> //The Response Div


submit_data.php
<?php
$db_host = 'localhost';
$db_user = 'user';
$db_pass = 'pass';
$db_name = 'db';
$Username = $_POST['username'];
$Email = $_POST['email'];
// DB
$connect = mysql_connect( $db_host, $db_user, $db_pass ) or die( mysql_error() );
$connection = $connect;
mysql_select_db( $db_name, $connect ) or die( mysql_error() );
// Inserting into DB
$qeuryInsert = mysql_query(" INSERT INTO `database` (`id`, `username`, `email`)
VALUES ( ``, `$Username`, `$Email`)
");
if ($qeuryInsert){
echo "You are now subscribed to our newsletter. Thank you!";
} else {
echo "Error!";
}

?>

Monday, February 7, 2011

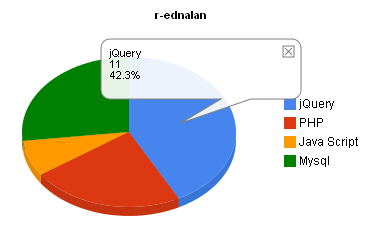
Draw Charts with Google Visualization API.

Draw Charts with Google Visualization API.

<script type='text/javascript' src='http://www.google.com/jsapi'></script>
<script type="text/javascript">
// Load the Visualization API and the piechart package. Draw Charts with Google Visualization API.
google.load('visualization', '1', {'packages':['piechart']});
// set API loaded.
google.setOnLoadCallback(drawChart);
// draws it.
function drawChart() {
var data = new google.visualization.DataTable();
data.addColumn('string', 'list');
data.addColumn('number', 'Pesentage');
data.addRows(5);
data.setValue(0, 0, 'jQuery');
data.setValue(0, 1, 11);
data.setValue(2, 0, 'PHP');
data.setValue(2, 1,6);
data.setValue(3, 0, 'Java Script');
data.setValue(3, 1, 2);
data.setValue(4, 0, 'Mysql');
data.setValue(4, 1, 7);
var chart = new google.visualization.PieChart(document.getElementById('2'));
chart.draw(data, {width: 400, height: 240, is3D: true, title: 'r-ednalan'});
}
</script>
<div id='2' style="float:left"></div>

Submit Form with jQuery and Ajax.

Submit Form with jQuery and Ajax.
submitting HTML form values without refreshing page using jQuery and Ajax.


<script type="text/javascript" src="http://ajax.googleapis.com/ajax/libs/jquery/1.3.0/jquery.min.js"></script>
<script type="text/javascript" >
$(function() {
$(".submit").click(function() {
var name = $("#name").val();
var username = $("#username").val();
var password = $("#password").val();
var dataString = 'name='+ name + '&username=' + username + '&password=' + password;

if(name=='' || username=='' || password=='')
{
$('.success').fadeOut(200).hide();
$('.error').fadeOut(200).show();
}
else
{
$.ajax({
type: "POST",
url: "insert.php",
data: dataString,
success: function(){

$('.success').fadeIn(200).show();
$('.error').fadeOut(200).hide();

}
});
}
return false;
});
});
</script>


<form method="post" name="form">
<input id="name" name="name" type="text" />
<input id="username" name="username" type="text" />
<input id="password" name="password" type="password" />

<input type="submit" value="Submit" class="submit"/>
<span class="error" style="display:none"> Please Enter Valid Data</span>
<span class="success" style="display:none"> Registration Successfully</span>
<div id="display" align="left">

///---Insert.php
<?php
if($_POST)
{
$name=$_POST['name'];
$username=$_POST['username'];
$password=$_POST['password'];
/* mysql_query("SQL insert statement......."); */
}else { }

?>

Sunday, February 6, 2011

Generate RSS Feed with PHP

Generate RSS Feed with PHP
<?php
include('db.php');
$sql = "SELECT * FROM site_data ORDER BY id DESC LIMIT 20";
$query = mysql_query($sql) or die(mysql_error());

header("Content-type: text/xml");

echo "<?xml version='1.0' encoding='UTF-8'?>
<rss version='2.0'>
<channel>
<title>r-ednalan.blogspot.com | Programming Blog </title>
<link>http://r-ednalan.blogspot.com</link>
<description>Programming Blog </description>
<language>en-us</language>";

while($row = mysql_fetch_array($query))
{
$title=$row['title'];
$link=$row['link'];
$description=$row['description'];

echo "<item>
<title>$title</title>
<link>$link</link>
<description>$description</description>
";
}
echo "</channel></rss>";
?>

Accordion Menu

Accordion Menu script
The following are Accordion Menu examples with full source code to get you started:

If you want to know more and download the source follow the link below

http://www.dynamicdrive.com/dynamicindex17/ddaccordionmenu.htm

Related Post