article
Tuesday, May 10, 2011
How to Log-in Multiple Users in SKYPE version 4.0
1. Create a new shortcut for starting a new Skype instance with a different Skype user account.
2. Open Windows Explorer and go to "C:\Program Files\Skype\Phone."
3. Right click on the Skype icon and select "Create Shortcut."
4. Right click on the new shortcut and select "Properties."
5. Append " /secondary" to "Target" to become '"C:\Program Files\Skype\Phone\Skype.exe" /secondary.'
6. Click OK to save the change.
7. Log on to a new created Skype account.
Thursday, April 8, 2010
How to add custom Seach google.com
1. Custom search URL http://www.google.com/cse/
2. start create a custom search engine
3. Fill Basic information fields
4. Select Search engines I've created
5. Select Control panel
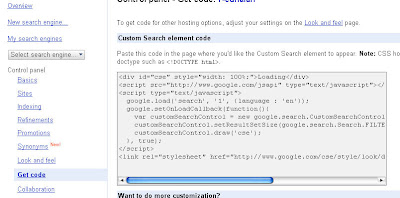
6. Get Code
7. Sample
Thursday, April 1, 2010
Block USB Devices
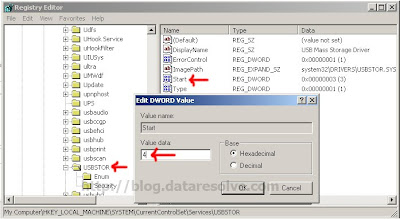
2. Go to HKEY_LOCAL_MACHINE\System\CurrentControlset\Services\USBStor
3. In the right pane, look for value Start and have value as 0000000(3)
4. Double click on that and change that value to 4.
Enable (Disabled Task manager)
1. Go to "Start" -> "Run" -> Write "Gpedit.msc" and press on "Enter" button.
2. Navigate to "User Configuration" -> "Administrative Templates" -> "System" -> "Ctrl+Alt+Del Options"
3. In the right side of the screen verity that "Remove Task Manager"" option set to "Disable" or "Not Configured".
4. Close "Gpedit.msc" MMC.
5. Go to "Start" -> "Run" -> Write "gpupdate /force" and press on "Enter" button.
How to change IP
1. Click on "Start" in the bottom left hand corner of screen
2. Click on "Run"
3. Type in "command" and hit okYou should now be at an MSDOS prompt screen.
4. Type "ipconfig /release" just like that, and hit "enter"
5. Type "exit" and leave the prompt
6. Right-click on "Network Places" or "My Network Places" on your desktop.
7. Click on "properties"You should now be on a screen with something titled "Local Area Connection", or something close to that, and, if you have a network hooked up, all of your other networks.
8. Right click on "Local Area Connection" and click "properties"
9. Double-click on the "Internet Protocol (TCP/IP)" from the list under the "General" tab
10. Click on "Use the following IP address" under the "General" tab
11. Create an IP address (It doesn't matter what it is. I just type 1 and 2 until i fill the area up).
12. Press "Tab" and it should automatically fill in the "Subnet Mask" section with default numbers.
13. Hit the "Ok" button here
14. Hit the "Ok" button againYou should now be back to the "Local Area Connection" screen.
15. Right-click back on "Local Area Connection" and go to properties again.
16. Go back to the "TCP/IP" settings
17. This time, select "Obtain an IP address automatically"tongue.gif
18. Hit "Ok"
19. Hit "Ok" again
How to Add a Paypal Donation Button?
1. Log in to your PayPal account.
2. Click Merchant Services.
3. Click Donations.
4. Complete the form with the details of your item and select the Donation button you wish to use. For assistance with this process, click More Resources in the upper right corner of this page.
5. In the Currency drop down box, select the type of currency you would like to receive your payments in.
6. If you need to specify additional details, click Add More Options and fill out the appropriate fields, otherwise click Create Button Now.
7. If you selected Add More Options, click Create Button Now.
8. Copy the HTML code into a text file in Notepad and save it. Click Done if you are finished creating buttons, or click on Create Another Button if you want to make additional buttons.
9. Login at Blogger.com.
10. Click on Layout link on Dashboard.
11. Click the Add page Element link in sidebar on the Page Elements subtab of Template tab.
12. Choose the Html/Javascript option in the popup window.
13. Paste the code from Paypal under the Contents window. Save.
14. Clear Cache and view Blog.
To Hide The Drives In Your Pc.
Wednesday, March 31, 2010
Change / Add Restrictions In Windows
1.Open RegEdit
2.Go to HKEY_CURRENT_USER\Software\Microsoft\CurrentVersion
\Policies
3.Go to the Explorer Key
4.Then right click on the right side pane and select "Create Dword".
Select appropriate value name from the list given below and enter 1 for enabling the value and 0 for disabling it
NoDeletePrinter - Disables Deletion of Printers
NoAddPrinter - Disables Addition of Printers
NoRun - Disables Run Command
NoSetFolders - Removes Folders from Settings on Start Menu
NoSetTaskbar - Removes Taskbar from Settings on Start Menu
NoFind - Removes the Find Command
NoDrives - Hides Drives in My Computers
NoNetHood - Hides the Network Neighborhood
NoDesktop - Hides all icons on the Desktop
NoClose - Disables Shutdown
NoSaveSettings - Don't save settings on exit
DisableRegistryTools - Disable Registry Editing Tools
NoRecentDocsMenu - Hides the Documents shortcut at the Start button
NoRecentDocsHistory- Clears history of Documents
NoFileMenu _ Hides the files Menu in Explorer
NoActiveDesktop - No Active Desktop
NoActiveDesktopChanges- No changes allowed
NoInternetIcon - No Internet Explorer Icon on the Desktop
NoFavoritesMenu - Hides the Favorites menu
NoChangeStartMenu _ Disables changes to the Start Menu
NoFolderOptions _ Hides the Folder Options in the Explorer
ClearRecentDocsOnExit - Empty the recent Docs folder on reboot
NoLogoff - Hides the Log Off .... in the Start Menu.
100 Keyboard Shortcuts (windows)
* CTRL+C (Copy)
* CTRL+X (Cut)
* CTRL+V (Paste)
* CTRL+Z (Undo)
* DELETE (Delete)
* SHIFT+DELETE (Delete the selected item permanently without placing the item in the Recycle Bin)
* CTRL while dragging an item (Copy the selected item)
* CTRL+SHIFT while dragging an item (Create a shortcut to the selected item)
* F2 key (Rename the selected item)
* CTRL+RIGHT ARROW (Move the insertion point to the beginning of the next word)
* CTRL+LEFT ARROW (Move the insertion point to the beginning of the previous word)
* CTRL+DOWN ARROW (Move the insertion point to the beginning of the next paragraph)
* CTRL+UP ARROW (Move the insertion point to the beginning of the previous paragraph)
* CTRL+SHIFT with any of the arrow keys (Highlight a block of text)
* SHIFT with any of the arrow keys (Select more than one item in a window or on the desktop, or select text in a document)
* CTRL+A (Select all)
* F3 key (Search for a file or a folder)
* ALT+ENTER (View the properties for the selected item)
* ALT+F4 (Close the active item, or quit the active program)
* ALT+ENTER (Display the properties of the selected object)
* ALT+SPACEBAR (Open the shortcut menu for the active window)
* CTRL+F4 (Close the active document in programs that enable you to have multiple documents open simultaneously)
* ALT+TAB (Switch between the open items)
* ALT+ESC (Cycle through items in the order that they had been opened)
* F6 key (Cycle through the screen elements in a window or on the desktop)
* F4 key (Display the Address bar list in My Computer or Windows Explorer)
* SHIFT+F10 (Display the shortcut menu for the selected item)
* ALT+SPACEBAR (Display the System menu for the active window)
* CTRL+ESC (Display the Start menu)
* ALT+Underlined letter in a menu name (Display the corresponding menu)
* Underlined letter in a command name on an open menu (Perform the corresponding command)
* F10 key (Activate the menu bar in the active program)
* RIGHT ARROW (Open the next menu to the right, or open a submenu)
* LEFT ARROW (Open the next menu to the left, or close a submenu)
* F5 key (Update the active window)
* BACKSPACE (View the folder one level up in My Computer or Windows Explorer)
* ESC (Cancel the current task)
* SHIFT when you insert a CD-ROM into the CD-ROM drive (Prevent the CD-ROM from automatically playing)
ialog Box Keyboard Shortcuts
* CTRL+TAB (Move forward through the tabs)
* CTRL+SHIFT+TAB (Move backward through the tabs)
* TAB (Move forward through the options)
* SHIFT+TAB (Move backward through the options)
* ALT+Underlined letter (Perform the corresponding command or select the corresponding option)
* ENTER (Perform the command for the active option or button)
* SPACEBAR (Select or clear the check box if the active option is a check box)
* Arrow keys (Select a button if the active option is a group of option buttons)
* F1 key (Display Help)
* F4 key (Display the items in the active list)
* BACKSPACE (Open a folder one level up if a folder is selected in the Save As or Open dialog box)
Increase Ur Harddisk Speed
Saturday, March 20, 2010
Boot your PC in less than 10 seconds
Before I proceed, may I ask for you to backup your data and registry first just to be safe. You are warned, use with caution.
How to bootup computer in 10 seconds lesser?
1) Press Windows Key and "R" to launch the run command.
2) Type "regedit" inside the input space.
3) Navigate to the registry key
HKEY_LOACAL_MECHINE\SYSTEM\CurrentControlSet\Control\ContentIndex
4) Locate the key"Startup Delay" and double click on it.
5) Select Decimal, and change the value to 40000
DONE
10 tricks to Speed up your PC
Here are 10 simple ways to speed your PC:
1. Using an Anti-Virus, Spyware and Adware removal program:
If you use Internet frequently, chances are that you pc is infected by any adware or spyware if you not using a good anti virus/anti-malware program. Most adware’s and spywares open multiple connections to access internet spreading infection all over the web. This may slow down your pc, other harmful viruses might crunch your memory and system resources mostly slowing down startup process. Therefore,
Use a good antivirus, adware, spyware removal Software.
Make sure you UPDATE it regularly.
Enable the auto update mode for better security.
Run regular scans (weekly scheduled scanning recommended).
2. Defragmenting Hard drives:
The files when moved or created on your PC are stored into small fragments randomly on your disk drive. When you open those files it takes time to gather all those chunks and put them back together to form that single file. When you defragment your drive all those scattered fragments are arranged properly on the drive thus loading application bit faster. There is a Disk Defragmenter utility in windows,
Open My Computer > Right click on the disk drive you want to defragment > Select Properties > Under Tools tab click Defragment Now. But i recommend Power Defragmenter a small free utility by sysinternals which is faster and with various options.
3. Clean Registry:
Windows registry is a database of information of all the files, folders and the windows configuration. This database grows as you use windows, can also become erroneous. Thus, it becomes necessary to clean and repair registry errors regularly. Use CCleaner, a tiny Freeware to scan and fix registry issues.
4. Delete Temporary, Junk and Obsolete files/Clear cache:
Clean all your drives for free space, i personally recommend keep atleast 20% of your drive space free. Also, you have to clear the windows TEMP files, the web browsers temporary files, caches files, etc. All web browsers has that option.CCleaner will be a good choice for the same, it will analyze and clean all unwanted internet files, Windows Explorer files and system files.
5. Check Disk for errors:
Scan your disk for errors regularly. There may be some lost fragments or links which may lead to error in application. Run Scandisk once a week to keep things running smoothly. the error checking utility in windows will scan and attempt to recover bad sectors. Open My Computer > Right click the drive > Properties > Tools > click Check Now Button. Else simply type chkdsk /r at the command prompt.
6. Remove Startup items:
Removing unwanted startup programs will speedup the windows boot process and your desktop will be ready quickly. some programs like Limewire or MSN messenger take time to load at startup, you can remove those and run them when needed.to remove Startup items: Start > Run > type msconfig > press OK. Now in the System Configuration Utility uncheck the unwanted programs (better Disable All).
7. Remove unnecessary Programs:
Remove those programs which you don’t use anymore. This will free disk space and even help windows perform better. Also, remove the windows unwanted components like Indexing services & Outlook Express from the Add/Remove windows programs.
8. Keep PC updated:
Look for regular updates, Enable Windows Updates, Updates includes major bugfixes which can be helpful. Look for new Service packs for better hardware compatibility. Update all device drivers, anti-virus programs and other applications. Hardware Manufactures keep updating their device drivers for better and smooth functioning. I have written earlier on a Free Software To Update Windows Device Drivers do read that.
9. Remove unwanted visual effects:
The animated windows and fading menus can slow down your pc unknowingly. You can remove those fading effects, Use windows classic style theme, remove the heavy graphic wallpaper(none), You can even lower the color quality( to medium 16-Bit) and lower the screen resolution. Lower the screen resolution, better the performance.
10.Use Lightweight programs:
Replace all those resource consuming programs and look for better alternatives, especially for those who have RAM less then 512 and an old PIII machine.
use Lightweight antivirus programs like Avira...the best i found, NOD32, AVG instead of Norton Antivirus.
This will really help you improve performance and helped me speed up my pc/computer.Try these out to improve your computer speed and performance.
Hey guys...if you have any additional tips to improve slow pc performance, then just mention it below in comments section.
command prompt chatting
if you want a private chat with a friend or client on you Network, you don't need to download msn or any fancy messenger program!
All you need is your friends IP address and Command Prompt.
Firstly, open Notepad and enter:
@echo off
:A
Cls
echo MESSENGER
set /p n=User:
set /p m=Message:
net send %n% %m%
Pause
Goto A
Now save this as "Messenger.bat". Open the .bat file and in Command Prompt you should see:
MESSENGER
User:
After "User" type the IP address of the computer you want to contact.
After this, you should see this:
Message:
Now type in the message you wish to send.
Before you press "Enter" it should look like this:
MESSENGER
User: 56.108.104.107
Message: Hi
Now all you need to do is press "Enter", and start chatting!
Ultimate Tips and TRICKS
1. Create file in MSDOS
open command prompt
type COPY CONfilename.ext
press enter.
press ctrl+z
press enter
for eg:
C:\COPY CON desktop.ini^z
it will appear like this abuv.
go to that folder n u find the file u juz created.
2. GET IMAGE IN YOUR DRIVE
Get background image in ur drive ---
open notepad-->paste this:
[{BE098140-A513-11D0-A3A4-00C04FD706EC}]iconarea_image=C:\WINDOWS\Web\Wallpaper\Bliss.bmpiconarea_text=0x00FFFFFF
then save this file as desktop.ini.
NOW save this file in starting of drive -- for eg:C:\
-------------------------------------------------------------------------------
to change the pic , change the path in 3rd line....of the file u made.....
3 FASTER FILE TRANSFER
Send Files to a folder in a single clickSend Files to a folder in a single clicksuppose ders a file xyz.jpg on your desktop and you want to send this file to my documents u right click on the file and goto " send to > My documents....
now if u want tat d "send to" option to display a folder "songs"(D:\songs) were u store all your songs do dis
goto this folder C:\Documents and Settings\Administrator\SendTo
and paste d shortcut of the folder (D:\songs)
now ull see d folder in d send to options
enjoy
4. INCREASE NET SPEED
Increase ur netspeed upto 20%Xp reserves 20% bandwith,to unreserve it,follow following steps:------------------------------------>>
1. Click Start
2. Run:"gpedit.msc"
3. Goto:>Local Computer Policy-------–>Computer Configuration-------–>Administrative Templates-------–>Network–>QOS Packet Scheduler-------–>Limit Reservable Bandwidth
4. Double click on Limit Reservable bandwidth
5. Select Enable
6. Change 20% to 0%
7. Click Apply
8. Close! and done
5. CREATE A SCARY VIRUS
Open notepad and type this:
lol=msgbox ("Warning a virus has been detected on your PC. Press YES to format your hard disk now or press NO to format your hard disk after system reboot",20,"Warning")
Then save it as Virus.VBS
and go to the folder that contains it and open it if a window pops out saying a virus has been detected it's working. Press yes or no to close the window and put it in the startup folder of the victim's account.On startup the window should appear.Note: This does not harm your computer as it does not contain virus.
6. Remove Recycle Bin Icon from Desktop
How to remove Recycle Bin Icon from Desktop
If using XP Pro
Go to START > RUN
Type GPEDIT.MSC
Navagate to USER CONFIGURATION >ADMINISTRATIVE TEMPLATES >Click on DESKTOP,
On the right hand pane find ” Remove Recycle Bin icon on the desktop ” , double left click on it to ENABLE it.
Sorted!
If using XP Home
Create or modify the following registry entry
HKEY_CURRENT_USER\Software\Microsoft\Windows\CurrentVersion\Explorer\HideDesktopIcons\NewStartPanel
{645FF040-5081-101B-9F08-00AA002F954E}
REG_DWORD
0×00000001
7. Reg Hack to Change the IE Title Forever
Change the following registry entry-
[HKEY_CURRENT_USER\Software\Microsoft\Internet Explorer\Main]
“Window Title”=”Insecure”
Replace the “Insecure” with what ever text you would like to have displayed in the Title bar of the Internet Explorer Windows.
8. DISABLING SCANDISK CHECK
When Windows is not shut down correctly, it will perform an AutoCheck
using CHKDSK on the next restart.
AutoCheck is executed after a short time delay. AutoCheck can be
disabled or delayed by tweaking a few Registry settings.
Run ‘Regedit’ from ‘Start Menu|Run...’
Go to ‘HKEY_LOCAL_MACHINE|SYSTE
M|CurrentControlSet|Control|Session
Manager’.
Create a new DWORD value, or
modify the existing value, called
“AutoChkTimeOut” and set it according
to the value data below.
Value Name: AutoChkTimeOut.
Data Type: REG_DWORD (DWORD Value).
Value Data: Time in Seconds or 0 to disable
(default = 10).
Exit your registry, you may need to
restart or log out of Windows for the
change to take effect.
9. REMOVE SHARED DOCUMENTS
Want to remove shared documents folder from My Computer window tip:
Some don't like my shared documents folder option. If you are one of that, here is a trick to remove it.Open registry editor by going to START-RUN and entering regedit.
Once in registry, navigate to key HKEY_LOCAL_MACHINE \ SOFTWARE \ Microsoft \ Windows \ CurrentVersion \ Explorer \ My Computer \ NameSpace \ DelegateFolders You must see a sub-key named {59031a47-3f72-44a7-89c5-5595fe6b30ee}. If you delete this key, you have effectively removed the my shared documents folder.
10 AUTO DELETE TEMPORARY FOLDER
First go into gpedit.msc
Next select -> Computer Configuration/Administrative Templates/Windows Components/Terminal Services/Temporary Folder
Then right click "Do Not Delete Temp Folder Upon Exit"
Go to properties and hit disable. Now next time Windows puts a temp file in that folder it will automatically delete it when its done! Note from Forum Admin: Remember, GPEDIT (Group Policy Editor) is only available in XP Pro.
12. DISPLAY MESSAGE ON STARTUP
Start regedit, if you are unfamiliar with regedit please see our FAQ.
Navigate to HKEY_LOCAL_MACHINE\SOFTWARE\Microsoft\Windows NT\CurrentVersion\Winlogon
Modify the key legalnoticecaption with what you want to name the window.
Modify the key legalnoticetext with what you want the window to say. Restart
13. REMOVING USERNAME N PIC 4M XP START MENU
Remove the Username and picture from Windows XP New Start Menu
The User account picture can be removed by turning off the Welcome Screen. Or, by switching to Windows Classic theme. Follow the method described in this article if you want to remove the username and picture from the Start Menu, without disabling the Welcome Screen and Windows XP Theme.
For those who want to remove the user name and user account picture from Start Menu, in order to have a blank blue panel at the top, try this:
Start Windows Explorer and go to this folder:
C:\Documents and Settings\All Users\Application Data\Microsoft\User Account Pictures
From that folder, rename the BMP file which corresponds to your user account.
( For example, if your username is Robert, rename Robert.bmp to old_Robert.bmp )
Next, rename the following folder:
C:\Documents and Settings\All Users\Application Data\Microsoft\User Account Pictures\Default Pictures
to something else, say...
C:\Documents and Settings\All Users\Application Data\Microsoft\User Account Pictures\No_Default Pictures
To remove the user name, follow these steps
Start regedit.exe and navigate to the this key:
HKEY_CURRENT_USER \ Software \ Microsoft\ Windows \ CurrentVersion \ Policies \ Explorer
In the right-pane, set NoUserNameInStartMenu value-data to 1
Close Regedit.exe and restart Windows.
You'll end up with a blue space at the top of the Start Menu.
To get back the username and the picture, reverse the above procedure.
For the New Start Menu, Windows XP looks for the .bmp file in the folder
C:\Documents and Settings\All Users\Application Data\Microsoft\User Account Pictures
If the file is not found, it takes a picture from the "Default Pictures" sub-folder. By renaming the .bmp and the "Default Pictures" folder, you're giving no chance for Windows to fetch an image for the Start Menu
14. SPEED UP ACROBAT READER
SPEED UP UR ACROBAT READER (ALMOST LIKE NOTEPAD)
Do u get irritated when acrobat reader takes 5/10 seconds to load when you want to open a pdf document. There is a way to speed up the loading.
1. Go to the installation folder of acrobat reader
(C:\program files\adobe\acrobat\reader\.. whatever)
2. Move all the files and folders from the "plugins" directory to the "Optional" directory. (I repeat.. cut and paste the files NOT copy & paste).
Also make sure that acrobat reader is not open else it will lock the files and not allow you to move the files).
Now your acrobat reader will load very fast
and almost as good as notepad..
15 SPEEDING UP SHUTDOWN
Start Regedit.
Navigate to HKEY_LOCAL_MACHINE/SYSTEM/CurrentControlSet/Control.
Click on the "Control" Folder.
Select "WaitToKillServiceTimeout"
Right click on it and select Modify.
Set it a value lower than 2000 (Mine is set to 200).
and !
Like previous versions of windows, it takes long time to restart or shutdown windows xp when the "Exit Windows" sound is enabled. to solve this problem you
must disable this useless sound. click start button then go to settings -> control panel -> Sound,Speech and Audio devices -> Sounds and Audio Devices -> Sounds, then under program events and windows menu click on "Exit Windows" sub-menu and highlight it.now from sounds you can select,choose "none" and then click apply and ok. now you can see some improvements when shutting down your system.
16. DELETE WIHTOUT SENDING TO RECYCLEBIN
You can delete files immediately, without having them move to the Recycle Bin first.
Go to the Start menu, select Run... and type 'gpedit.msc'; then select User Configuration, Administrative Templates, Windows Components, Windows Explorer and find the Do not move deleted files to the Recycle Bin setting. Set it. Poking around in gpedit will reveal a great many interface and system options, but take care -- some may stop your computer behaving as you wish. (Professional Edition only).
17. FORBIDDEN FOLDER NAMES
Try to create a folder in Windows with either of these names--
"con" or "nul" or "Aux" or "Lpt1".
Windows will not let u create ....
This s coz these refer 2 some well known ports....
-con corresponds to the console
-Lpt1 corresponds to printer and so on....
well dat was common but hw bt this ? Try these more
CON, PRN, AUX, CLOCK$, NUL, COM1, COM2, COM3, COM4, COM5, COM6, COM7, COM8, COM9, LPT1, LPT2, LPT3, LPT4, LPT5, LPT6, LPT7, LPT8, and LPT9.
18. SHORTCUT TO RESTART COMPUTER
You can restart a Windows XP Pro and Home machine easily by creating a shortcut with following path. (Assume you installed Windows XP on your C: Partition) "c:\windows\system32\shutdown.exe -r -f -t 00" -r is for restarting the computer. -f is to force close all programs without saving. -t 00 is used to restart in zero seconds. i.e. as soon as you D.Click on the shortcut. You can log off from a Windows XP Professional or Home edition by running "C:\windows\system32\shutdown.exe -l -f -t 00". Also you can shutdown a Windows XP Home or Professional edition by running "c:\windows\system32\shutdown.exe -s -f -t 00". You always have to turn from the CPU after running this command. (Same with AT and ATX powered machines.) If you want to turn down power of ATX machine automatically, run "c:\windows\system32\tsshutdn.exe 00 /POWERDOWN /DELAY:00" This is used to turn off a server. Even though your computer will be shutdown completely, this whole operation will take 30 seconds to finish. Even though you don't have networked computers attached to your computer, this works.
19. ADD PHOTO TO MY COMPUTER PROPERTIES
To do this:
1. Open Notepad.
2. Type the following:
[General]Manufacturer="your_name
Model=HP d530 SFF(DC578AV)
[Support Information]
Line1= Your Ph No
Line2= Your Address.....
3. Save as "oeminfo.ini" in the System32 folder.(Without Quote)
4. Create a bmp file(Your Photo) and save it the System32 folder as "oemlogo.bmp"(Without Quote).
5. Now Check your My Computer Properties.
20 LOCK FOLDER WITHOUT ANY SOFTWARE
Lock a folder without any software
Suppose you want to lock the folder games in d: which has the path D:\Games.In the same drive create a text file and type
ren games games.{21EC2020-3AEA-1069-A2DD-08002B30309D}
Now save this text file as loc.bat
create another text file and type in it
ren games.{21EC2020-3AEA-1069-A2DD-08002B30309D} games
Now save this text file as key.bat
Now you can see 2 batch files loc and key.Press loc and the folder games will change to control panel and you cannot view its contents.Press key and you will get back your original folder.
21. REMOVE SHUTDOWN OPTION
Click on start>run(win key+r)
Then tpye “regedit” there, this opens up the registry editor, now goto
HKEY_LOCAL_MACHINE>SOFTWARE>Microsoft>Windows>CurrentVersion>Explorer
Then set “NoClose”=”DWORD:1?
Disable Error Report In Windows
Microsoft’s Error Reporting in windows sometimes is disturbing, most of us don’t want to send that error report because it’s of no use.
There’s an easy way to disable Microsoft error report in windows.
Disable Microsoft Error report in Windows XP :
1) Open Control Panel (Start > Control Panel)
2) Open the Problem Reports & Solutions applet Under advanced options and disable error reporting.
Disable Microsoft Error report in Windows Vista :
1) Right click on my computer (Desktop) and click properties
2) Click the Advanced Tab
3) You’ll see a “Error reporting” button at the bottom, click it
4) Select Disable Error Reporting.
And you’re done….!
Computer Tips and Tricks
1. How to clean Windows XP ?
1. Click the "Start" menu button to open the Start menu.
2. Click "Run."
3. Type "regedit" into the text field and press "Enter."
4. Access the many different entries in your Windows XP registry. It is separated into primary sections: HKEY_CLASSES_ROOT, HKEY_CURRENT_USER, HKEY_LOCAL_MACHINE, HKEY_USERS and HKEY_CURRENT CONFIG. Each section contains a different set of entries related to different aspects of Windows XP operation.
5. Click on one of the plus-signs (+) next to one of the root directories, opening a more detailed list. This second level will have more directories to choose from, and will make it easier for you to find entries you need to clean the registry.
6. Delete entries in the registry that you know are either causing conflicts or are no longer necessary. Do this by pressing the "Delete" key, or by right-clicking on your mouse and choosing "Delete entry."
7. Invest in a third-party registry application to help you clean your Windows XP registry. Several programs are available that do the dirty work for you. Some even include backup capabilities to retrace their steps in the event of a critical error.
8. Clean your boot records by changing which programs load themselves at startup. Click through both the LOCAL_MACHINE and CURRENT_USER directories until you reach Software/Microsoft/Windows/Run and RunOnce. From here, you can clean out registry entries that are causing certain programs to run on startup.
2. How to reboot Windows XP ?
1. Search for the button on CPU Box.
2. There are usually two buttons- One for Switch ON/OFF the computer and second one for rebooting the computer.
3. Press the second button for rebooting and wait till the computer starts again.
3 How to uninstall Windows XP ?
How to Uninstall Windows XP: If upgraded your computer to Windows XP from a previous version of Windows, Windows Setup Wizard may have backed up your current operating system. (The windows backup files are named Backup.cab and Boot.cab and have been stored in C:\Undo directory, that's assuming that Windows is installed on your C:\ drive.) If it is, you may uninstall Windows XP and return your old Windows OS (operating system). Be sure to backup all of your data files before you start to uninstall Windows XP. Or you will be sorry.
Note: If you have made any changed your partitions or drives since installing Windows XP, you usually can't uninstall it.
Follow these steps to uninstall Windows XP!
1. Go to >Choose Start >Control Panel >Add or Remove Programs.
2. Look for Windows XP Uninstall, if Windows XP Uninstall appears in the Currently Installed Programs, then you can uninstall it.
3. Now click on Windows XP Uninstall. Additional information should appears.
4. Now click on the Change/Remove button. You should see the Uninstall Windows XP dialog box.
5. Now choose Uninstall Windows XP and click on Continue.
You need to follow all of the directions on your screen. After the uninstall process is finished, your computer restarts and runs your previous Windows OS (operating system).
Note: Uninstalling Windows Xp doesn't delete your all your data files. However, most programs that you have installed after you installed Windows XP probably won't work. All you have to do to fix this, just reinstall them again. If you have created any documents or files, they should still be stored in C:\Documents and Settings\username\.
4. How to repair Windows XP ?
How do you perform a reinstallation of Windows XP, sometimes called a repair installation?
Configure your computer to start from the CD-ROM drive. For more information about how to do this, refer to your computer's documentation or contact your computer manufacturer. Then insert your Windows XP Setup CD, and restart your computer.
1. When the Press any key to boot from CD message is displayed on your screen, press a key to start your computer from the Windows XP CD.
2. Press ENTER when you see the message To setup Windows XP now, and then press ENTER displayed on the Welcome to Setup screen.
3. Do not choose the option to press R to use the Recovery Console.
4. In the Windows XP Licensing Agreement, press F8 to agree to the license agreement.
5. Make sure that your current installation of Windows XP is selected in the box, and then press R to repair Windows XP.
6. Follow the instructions on the screen to complete Setup.
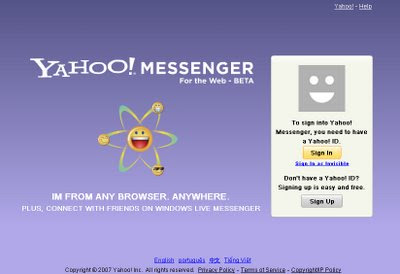
5. Yahoo Web Messenger - Use Yahoo Messenger
Click here to see the ** Web based Yahoo Messenger **
6. How to disable task manager in Windows Vista/ XP [Group policy/gpedit]
::Disable the Task Manager using Group Policy Editor::
• Start Group Policy Editor (Start > Run > "gpedit.msc")
• In the left panel, go to User Configuration > Administrative Templates > System > Ctrl+Alt+Del Options
• In the right panel, enable Remove Task Manager
• Select option Enabled and it will prevent users to monitor tasks and services running in the system.
7. Windows XP Task Manager Disabled By Virus / Administrator
You will get task manager disabled message in following two circumstances:
1. When you right click on task bar
2. When you run taskmgr.exe manually
So, why does this message comes?
There can be mainly two reasons:
1. Administrator disabled it manually.
2. Your computer might be affected by virus/malware.
If computer is affected by a virus, run an up-to-date anti virus scanner that will find out infected files if there are any.
After scanning for viruses, you can go through following process for enabling task manager-
For Windows XP Professional Users:
If you have Windows XP Professional, Click Start, then click Run and type in gpedit.msc:
And press OK. This runs the Group Policy Editor.
Once in the Group Policy Editor, expand in turn:
• User Configuration
• Administrative Templates
• System
• Ctrl+Alt+Del Options
You should see something much like this:
Double click on Remove Task Manager to change its setting:
It should be enough to click on Not Configured and then OK and Task Manager is available once again.
Note: This post helps to enable task manager in Windows Vista/ XP using Group policy/gpedit.
8. How to enable task manager in Windows Vista/ XP [Registry/regedit]
For Other Windows XP Home Version Users:
If you don't have Windows XP Professional, then you'll need to edit the registry manually.
Click Start, then click Run, type in regedit, and click on OK.
Expand these registry keys in turn:
• HKEY_CURRENT_USER
• Software
• Microsoft
• Windows
• CurrentVersion
• Policies
• System
You should see something similar to this:
Right Click on the DisableTaskMgr item:
Click on Delete, confirm that you want to delete, and Task Manager should be available once again.
If above changes won’t work, task manager might be disabled at domain level. In such a case, contact your system administrator.
Google Stuff
I shall discuss how one can use “index of” syntax to get a list links to webserver which has got directory browsing enabled.
This becomes an easy source for information gathering for a hacker. Imagine if the get hold of password files or others sensitive files which are not normally visible to the internet. Below given are few examples using which one can get access to many sensitive information much easily.
Index of /admin
Index of /passwd
Index of /password
Index of /mail
"Index of /" +passwd
"Index of /" +password.txt
"Index of /" +.htaccess
"Index of /secret"
"Index of /confidential"
"Index of /root"
"Index of /cgi-bin"
"Index of /credit-card"
"Index of /logs"
"Index of /config"
Looking for vulnerable sites or servers using “inurl:” or “allinurl:”
a. Using “allinurl:winnt/system32/” (without quotes) will list down all the links to the server which gives access to restricted directories like “system32” through web. If you are lucky enough then you might get access to the cmd.exe in the “system32” directory. Once you have the access to “cmd.exe” and are able to execute it then you can go ahead in further escalating your privileges over the server and compromise it.
b. Using “allinurl:wwwboard/passwd.txt”(without quotes) in the Google search will list down all the links to the server which are vulnerable to “WWWBoard Password vulnerability”.