article

Showing posts with label web-development (PHP). Show all posts

Tuesday, May 23, 2023

PHP Uploading multiple files

PHP Uploading multiple files

Bootstrap 5
https://getbootstrap.com/docs/5.0/getting-started/introduction/

index.php
//index.php
<?php require("script.php"); ?>
<!DOCTYPE html>
<html lang="en">
<head>
	<meta charset="UTF-8">
	<meta name="viewport" content="width=device-width, initial-scale=1.0">
	<title>PHP Uploading multiple files</title>
	<link href="https://cdn.jsdelivr.net/npm/bootstrap@5.0.2/dist/css/bootstrap.min.css" rel="stylesheet">
</head>
<body>
<div class="container">
	<h2>PHP Uploading multiple files</h2>
	<form action="" method="post" enctype="multipart/form-data">
	<div>
	  <label for="formFileLg" class="form-label">Select the files you want to upload</label>
	  <input class="form-control form-control-lg" id="formFileLg" type="file" name="files[]" multiple>
	</div>
	<br/>
	<button type="submit" class="btn btn-primary" name="upload">Upload files</button>
	</form>
</div>
</body>
</html>
script.php
//script.php
<?php 
	if(isset($_FILES['files'])){
		$folder = "uploads/";
		$names = $_FILES['files']['name']; 

		$tmp_names = $_FILES['files']['tmp_name']; 
		$upload_data = array_combine($tmp_names, $names);
		
		highlight_string("<?php " . var_export($upload_data, true) . ";?>");

		foreach ($upload_data as $temp_folder => $file) {
			move_uploaded_file($temp_folder, $folder.$file);
		}

	}	

Friday, July 1, 2022

PHP JSON File CRUD (Create Read Update and Delete)

PHP JSON File CRUD (Create Read Update and Delete)

Bootstrap 5
https://getbootstrap.com/docs/5.0/getting-started/introduction/
https://cdn.jsdelivr.net/npm/bootstrap@5.0.2/dist/css/bootstrap.min.css
index.php
//index.php
<!DOCTYPE html>
<html>
<head>
	<meta charset="utf-8">
	<title>PHP JSON File CRUD (Create Read Update and Delete)</title>
	<link rel="stylesheet" type="text/css" href="https://cdn.jsdelivr.net/npm/bootstrap@5.0.2/dist/css/bootstrap.min.css">
</head>
<body>
<div class="container">
    <h1 class="page-header text-center">PHP JSON File CRUD (Create Read Update and Delete)</h1>
    <div class="row">
        <div class="col-12">
			<a href="add.php" class="btn btn-primary">Add</a>
			<table class="table table-bordered table-striped" style="margin-top:20px;">
				<thead>
					<th>ID</th>
					<th>Firstname</th>
					<th>Lastname</th>
					<th>Address</th>
					<th>Action</th>
				</thead>
				<tbody>
					<?php
						//fetch data from json
						$data = file_get_contents('members.json');
						//decode into php array
						$data = json_decode($data);

						$index = 0;
						foreach($data as $row){
							echo "
								<tr>
									<td>".$row->id."</td>
									<td>".$row->firstname."</td>
									<td>".$row->lastname."</td>
									<td>".$row->address."</td>
									<td>
										<a href='edit.php?index=".$index."' class='btn btn-success btn-sm'>Edit</a>
										<a href='delete.php?index=".$index."' class='btn btn-danger btn-sm'>Delete</a>
									</td>
								</tr>
							";

							$index++;
						}
					?>
				</tbody>
            </table>
		</div>
	</div>
</div>
</body>
</html>
add.php
//add.php
<!DOCTYPE html>
<html>
<head>
	<meta charset="utf-8">
	<title>PHP JSON File CRUD (Create Read Update and Delete)</title>
	<link rel="stylesheet" type="text/css" href="https://cdn.jsdelivr.net/npm/bootstrap@5.0.2/dist/css/bootstrap.min.css">
</head>
<body>
<div class="container">
    <h1 class="page-header text-center">PHP JSON File CRUD (Create Read Update and Delete)</h1>
    <div class="row">
		<div class="col-1"></div>
        <div class="col-8"><a href="index.php">Back</a>
		<form method="POST">
			<div class="mb-3 row">
                <label class="col-sm-2 col-form-label">ID</label>
                <div class="col-sm-10">
                    <input type="text" class="form-control" id="id" name="id">
                </div>
            </div>
			<div class="mb-3 row">
                <label class="col-sm-2 col-form-label">Firstname</label>
                <div class="col-sm-10">
                    <input type="text" class="form-control" id="firstname" name="firstname">
                </div>
            </div>
			<div class="mb-3 row">
                <label class="col-sm-2 col-form-label">Lastname</label>
                <div class="col-sm-10">
                    <input type="text" class="form-control" id="lastname" name="lastname">
                </div>
            </div>
			<div class="mb-3 row">
                <label class="col-sm-2 col-form-label">Address</label>
                <div class="col-sm-10">
                    <input type="text" class="form-control" id="address" name="address">
                </div>
            </div>	

			<input type="submit" name="save" value="Save" class="btn btn-primary">
		</form>
		</div>
		<div class="col-5"></div>
	</div>
</div>	
<?php
	if(isset($_POST['save'])){
		//open the json file
		$data = file_get_contents('members.json');
		$data = json_decode($data);

		//data in out POST
		$input = array(
			'id' => $_POST['id'],
			'firstname' => $_POST['firstname'],
			'lastname' => $_POST['lastname'],
			'address' => $_POST['address']
		);

		//append the input to our array
		$data[] = $input;
		//encode back to json
		$data = json_encode($data, JSON_PRETTY_PRINT);
		file_put_contents('members.json', $data);

		header('location: index.php');
	}
?>
</body>
</html>
edit.php
//edit.php
<!DOCTYPE html>
<html>
<head>
	<meta charset="utf-8">
	<title>PHP JSON File CRUD (Create Read Update and Delete)</title>
	<link rel="stylesheet" type="text/css" href="https://cdn.jsdelivr.net/npm/bootstrap@5.0.2/dist/css/bootstrap.min.css">
</head>
<body>
<?php
	//get id from URL
	$index = $_GET['index'];

	//get json data
	$data = file_get_contents('members.json');
	$data_array = json_decode($data);

	//assign the data to selected index
	$row = $data_array[$index];

	if(isset($_POST['save'])){
		$input = array(
			'id' => $_POST['id'],
			'firstname' => $_POST['firstname'],
			'lastname' => $_POST['lastname'],
			'address' => $_POST['address'],
			'gender' => $_POST['gender']
		);

		//update the selected index
		$data_array[$index] = $input;

		//encode back to json
		$data = json_encode($data_array, JSON_PRETTY_PRINT);
		file_put_contents('members.json', $data);

		header('location: index.php');
	}
?>
<div class="container">
    <h1 class="page-header text-center">PHP JSON File CRUD (Create Read Update and Delete)</h1>
    <div class="row">
		<div class="col-1"></div>
        <div class="col-8"><a href="index.php">Back</a>
		<form method="POST">
			<div class="mb-3 row">
                <label class="col-sm-2 col-form-label">ID</label>
                <div class="col-sm-10">
                    <input type="text" class="form-control" id="id" name="id" value="<?php echo $row->id; ?>">
                </div>
            </div>
			<div class="mb-3 row">
                <label class="col-sm-2 col-form-label">Firstname</label>
                <div class="col-sm-10">
                    <input type="text" class="form-control" id="firstname" name="firstname" value="<?php echo $row->firstname; ?>">
                </div>
            </div>
			<div class="mb-3 row">
                <label class="col-sm-2 col-form-label">Lastname</label>
                <div class="col-sm-10">
                    <input type="text" class="form-control" id="lastname" name="lastname" value="<?php echo $row->lastname; ?>">
                </div>
            </div>
			<div class="mb-3 row">
                <label class="col-sm-2 col-form-label">Address</label>
                <div class="col-sm-10">
                    <input type="text" class="form-control" id="address" name="address" value="<?php echo $row->address; ?>">
                </div>
            </div>
			<input type="submit" name="save" value="Save" class="btn btn-primary">
		</form>
		</div>
		<div class="col-5"></div>
	</div>
</div>	
</body>
</html>
delete.php
//delete.php
<?php
	//get id
	$index = $_GET['index'];

	//fetch data from json
	$data = file_get_contents('members.json');
	$data = json_decode($data);

	//delete the row with the index
	unset($data[$index]);

	//encode back to json
	$data = json_encode($data, JSON_PRETTY_PRINT);
	file_put_contents('members.json', $data);

	header('location: index.php');
?>
members.json
//members.json
[
    {
        "id": "2",
        "firstname": "Ashton",
        "lastname": "Cox",
        "address": "San Francisco"
    },
    {
        "id": "3",
        "firstname": "Bradley",
        "lastname": "Greer",
        "address": "London"
    },
    {
        "id": "4",
        "firstname": "Brenden",
        "lastname": "Wagner",
        "address": "San Francisco"
    },
    {
        "id": "5",
        "firstname": "Cairocoders",
        "lastname": "Ednalan",
        "address": "Olongapo City"
    },
    {
        "id": "6",
        "firstname": "Clydety",
        "lastname": "Ednalan",
        "address": "Olongapo City",
        "gender": null
    }
]

Friday, April 29, 2022

How to get PHP Session Value in jQuery

How to get PHP Session Value in jQuery

Bootstrap 5
https://getbootstrap.com/docs/5.0/getting-started/introduction/
https://cdn.jsdelivr.net/npm/bootstrap@5.0.2/dist/css/bootstrap.min.css

Jquery
https://jquery.com/download/
CDN : jsDelivr CDN
https://www.jsdelivr.com/package/npm/jquery
https://cdn.jsdelivr.net/npm/jquery@3.6.0/dist/jquery.min.js

getssionjquery.php
//getssionjquery.php
<!DOCTYPE html>
<html>
<head>
	<title>How to get PHP Session Value in jQuery</title>
	<link rel="stylesheet" href="https://cdn.jsdelivr.net/npm/bootstrap@5.0.2/dist/css/bootstrap.min.css" />
	<script src="https://cdn.jsdelivr.net/npm/jquery@3.6.0/dist/jquery.min.js"></script>
</head>
<body>
<?php session_start(); ?>
<div class="container">
	<h1 class="page-header text-center">How to get PHP Session Value in jQuery</h1>
	<div class="row">
		<div class="col-6">
			<h3>Set Session Value</h3>
			<form method="POST" action="session.php">
				<input type="text" name="session_value" class="form-control" placeholder="Input Value" required>
				<div style="margin-top:10px;">
				<button type="submit" class="btn btn-primary">Set Value</button> <a href="unset.php" type="button" class="btn btn-danger">Unset Value</a>
				</div>
			</form>
 
			<button type="button" id="checkSession" class="btn btn-info" style="margin-top:30px;">Check Session in jQuery</button>
		</div>
	</div>
 
	<input type="hidden" value="<?php
		if(isset($_SESSION['value'])){
			echo $_SESSION['value'];
		} 
	?>" id="session">
</div>
<script>
$(document).ready(function(){
	//check session
	$('#checkSession').click(function(){
		var session = $('#session').val();
		if(session == ''){
			alert('Session not Set');
			console.log('Session not Set');
		}
		else{
			alert('Current Session Value: '+session);
			console.log(session);
		}
	});
});
</script>
</body>
</html>
session.php
//session.php
<?php
	session_start();
 
	$session_value=$_POST['session_value'];
	$_SESSION['value']=$session_value;
 
	header('location:getsessionjquery.php');
?>
unset.php
//unset.php
<?php
	session_start();
	unset($_SESSION['value']);
	header('location:getsessionjquery.php');
?>

Friday, April 15, 2022

Crop And Upload Image using PHP and JQuery Ajax - Croppie Image Cropper

Crop And Upload Image using PHP and JQuery Ajax - Croppie Image Cropper

Bootstrap 5
https://getbootstrap.com/docs/5.0/getting-started/introduction/
https://cdn.jsdelivr.net/npm/bootstrap@5.0.2/dist/css/bootstrap.min.css

Jquery
https://jquery.com/download/
CDN : jsDelivr CDN
https://www.jsdelivr.com/package/npm/jquery
https://cdn.jsdelivr.net/npm/jquery@3.6.0/dist/jquery.min.js

Croppie
Croppie is a fast, easy to use image cropping plugin with tons of configuration options!

https://foliotek.github.io/Croppie/
https://cdnjs.com/libraries/croppie
https://cdnjs.cloudflare.com/ajax/libs/croppie/2.6.5/croppie.css
index.php
//index.php
<html>  
  <head>  
    <title>Crop And Upload Image using PHP and JQuery Ajax - Croppie Image Cropper</title>  
    <link rel="stylesheet" href="https://cdn.jsdelivr.net/npm/bootstrap@5.0.2/dist/css/bootstrap.min.css" />
    <link rel="stylesheet" href="https://cdnjs.cloudflare.com/ajax/libs/croppie/2.6.5/croppie.css" />
	
	<script src="https://cdn.jsdelivr.net/npm/jquery@3.6.0/dist/jquery.min.js"></script> 
	<script src="https://cdnjs.cloudflare.com/ajax/libs/croppie/2.6.5/croppie.min.js"></script>
  </head>  
<body>  
<div class="container" style="margin-top:20px;padding:20px;">  
	<div class="card">
	  <div class="card-header">
		Crop And Upload Image using PHP and JQuery Ajax - Croppie Image Cropper
	  </div>
	  <div class="card-body">
		<h5 class="card-title">Select Image</h5>
		<input type="file" name="upload_image" id="upload_image" />       
	  </div>
	</div>

	<div class="card text-center" id="uploadimage" style='display:none'>
	  <div class="card-header">
		Upload & Crop Image
	  </div>
	  <div class="card-body">
		    <div id="image_demo" style="width:350px; margin-top:30px"></div>
            <div id="uploaded_image" style="width:350px; margin-top:30px;"></div>  
	  </div>
	  <div class="card-footer text-muted">
		<button class="crop_image">Crop & Upload Image</button>
	  </div>
	</div>
</div>
</body>  
</html>
 
<script>  
$(document).ready(function(){
 $image_crop = $('#image_demo').croppie({
    enableExif: true,
    viewport: {
      width:200,
      height:200,
      type:'circle' //circle
    },
    boundary:{
      width:300,
      height:300
    }
  });
  $('#upload_image').on('change', function(){
    var reader = new FileReader();
    reader.onload = function (event) {
      $image_crop.croppie('bind', {
        url: event.target.result
      }) 
    }
    reader.readAsDataURL(this.files[0]);
    $('#uploadimage').show();
  });
  $('.crop_image').click(function(event){
    $image_crop.croppie('result', {
      type: 'canvas',
      size: 'viewport'
    }).then(function(response){
      $.ajax({
        url:"upload.php",
        type: "POST",
        data:{"image": response},
        success:function(data)
        {
           $('#uploaded_image').html(data)
        }
      });
    })
  });
});  
</script>
upload.php
//upload.php
<?php
if(isset($_POST["image"]))
{
 $data = $_POST["image"];
 $image_array_1 = explode(";", $data);
 $image_array_2 = explode(",", $image_array_1[1]);
 $data = base64_decode($image_array_2[1]);
 $imageName = time() . '.png';
 file_put_contents($imageName, $data);
 echo '<img src="'.$imageName.'" class="img-thumbnail" />';
}
?>

Saturday, February 19, 2022

JavaScript PHP upload multiple files

JavaScript PHP upload multiple files

index.html
//index.html
<!DOCTYPE html>
<html>
<head>
	<title>JavaScript PHP upload multiple files</title>
</head>
<body>
	<div>
		<p><h1>JavaScript PHP upload multiple files<h1></p>
		<input type="file" name="files" id="files" multiple>
		<input type="button" id="btn_uploadfile" value="Upload" onclick="uploadFile();">
	</div>

<script type="text/javascript">
	function uploadFile() {

		var totalfiles = document.getElementById('files').files.length;
		
		if(totalfiles > 0 ){ 

			var formData = new FormData();
			
			// Read selected files
		   	for (var index = 0; index < totalfiles; index++) {
		      	formData.append("files[]", document.getElementById('files').files[index]);
		   	}

			var xhttp = new XMLHttpRequest();

			// Set POST method and ajax file path
			xhttp.open("POST", "ajaxfile.php", true);

			// call on request changes state
			xhttp.onreadystatechange = function() {
			    if (this.readyState == 4 && this.status == 200) {
			      	
			      	var response = this.responseText;

			      	alert(response + " File uploaded.");
			      	
			    }
			};
			
			// Send request with data
			xhttp.send(formData);

		}else{
			alert("Please select a file");
		}
		
	}
</script>
</body>
</html>
ajaxfile.php
//ajaxfile.php
<?php 
// Count total files
$countfiles = count($_FILES['files']['name']);

// Upload directory
$upload_location = "uploads/";
    
$count = 0;
for($i=0;$i<$countfiles;$i++){

	// File name
    $filename = $_FILES['files']['name'][$i];

    // File path
	$path = $upload_location.$filename;

    // file extension
	$file_extension = pathinfo($path, PATHINFO_EXTENSION);
	$file_extension = strtolower($file_extension);

	// Valid file extensions
	$valid_ext = array("pdf","doc","docx","jpg","png","jpeg");

	// Check extension
	if(in_array($file_extension,$valid_ext)){

		// Upload file
		if(move_uploaded_file($_FILES['files']['tmp_name'][$i],$path)){
		    $count += 1;
		}	
	}
                 
}

echo $count;
exit;

Monday, December 21, 2020

TinyMCE Upload Image with Jquery Ajax and PHP

TinyMCE Upload Image with Jquery Ajax and PHP

TinyMCE is a well known WYSIWYG HTML Editor which extensively used in web applications to create HTML contents. It supports text formatting, table insert, link insert, image insert and more features.

Download from website https://www.tiny.cloud/


tinymce_imageupload.php
//tinymce_imageupload.php
<!DOCTYPE html>
<html>
<head>
<meta http-equiv="Content-Type" content="text/html; charset=utf-8" />
<title>TinyMCE Upload Image with Jquery Ajax and PHP</title> 
<link rel="stylesheet" href="https://maxcdn.bootstrapcdn.com/bootstrap/3.3.5/css/bootstrap.min.css">
<script src="https://ajax.googleapis.com/ajax/libs/jquery/2.1.3/jquery.min.js"></script>
<script src="https://maxcdn.bootstrapcdn.com/bootstrap/3.3.5/js/bootstrap.min.js"></script>
<link href="https://stackpath.bootstrapcdn.com/font-awesome/4.7.0/css/font-awesome.min.css" rel="stylesheet">
</head>
<body class="">
<div class="container">	
	<div class="row">	
		<h2>TinyMCE Upload Image with Jquery Ajax and PHP</h2>				
		<form id="posts" name="posts" method="post">
			<textarea name="message" id="message"></textarea><br>				
		</form>		
	</div>	
</div>
<script src="tinymce/tinymce.min.js"></script>
<script>
tinymce.init({
	selector: "textarea",
	plugins: "code",
	toolbar: "undo redo | bold italic | alignleft aligncenter alignright alignjustify | bullist numlist outdent indent | link code image_upload",
	menubar:false,
    statusbar: false,
	content_style: ".mce-content-body {font-size:15px;font-family:Arial,sans-serif;}",
	height: 400,
	setup: function(ed) {
		
		var fileInput = $('<input id="tinymce-uploader" type="file" name="pic" accept="image/*" style="display:none">');
		$(ed.getElement()).parent().append(fileInput);
		
		fileInput.on("change",function(){			
			var file = this.files[0];
			var reader = new FileReader();			
			var formData = new FormData();
			var files = file;
			formData.append("file",files);
			formData.append('filetype', 'image');				
			jQuery.ajax({
				url: "tinymce_upload.php",
				type: "post",
				data: formData,
				contentType: false,
				processData: false,
				async: false,
				success: function(response){
					var fileName = response;
					if(fileName) {
						ed.insertContent('<img src="upload/'+fileName+'"/>');
					}
				}
			});		
			reader.readAsDataURL(file);	 
		});		
		
		ed.addButton('image_upload', {
			tooltip: 'Upload Image',
			icon: 'image',
			onclick: function () {
				fileInput.trigger('click');
			}
		});
	}
});
</script>
</body>
</html>
tinymce_upload.php
//tinymce_upload.php
<?php
$fileName = $_FILES['file']['name'];
$fileType = $_POST['filetype'];
if($fileType == 'image'){
  $validExtension = array('png','jpeg','jpg');
}
$uploadDir = "upload/".$fileName;
$fileExtension = pathinfo($uploadDir, PATHINFO_EXTENSION);
$fileExtension = strtolower($fileExtension);
if(in_array($fileExtension, $validExtension)){
   if(move_uploaded_file($_FILES['file']['tmp_name'],$uploadDir)){ 
    echo $fileName;
  }
}
?>

Sunday, October 18, 2020

How to upload and resize image in PHP

How to upload and resize image in PHP
upload_resize.html
//upload_resize.html
<!DOCTYPE html>
<html>
<head>
<title>How to upload and resize image in PHP</title>
<link href="https://maxcdn.bootstrapcdn.com/bootstrap/3.3.0/css/bootstrap.min.css" rel="stylesheet" id="bootstrap-css">
<script src="https://maxcdn.bootstrapcdn.com/bootstrap/3.3.0/js/bootstrap.min.js"></script>
<script src="https://code.jquery.com/jquery-1.11.1.min.js"></script>
<script>
$(document).ready( function() {
		function readURL(input) {
		    if (input.files && input.files[0]) {
		        var reader = new FileReader();
		        reader.onload = function (e) {
		            $('#img-upload').attr('src', e.target.result);
		        }
		        reader.readAsDataURL(input.files[0]);
		    }
		}
		$("#imgInp").change(function(){
		    readURL(this);
		}); 	
});
</script>
</head>
<body>
<style>
.btn-file {
    position: relative;
    overflow: hidden;
}
.btn-file input[type=file] {
    position: absolute;
    top: 0;
    right: 0;
    min-width: 100%;
    min-height: 100%;
    font-size: 100px;
    text-align: right;
    filter: alpha(opacity=0);
    opacity: 0;
    outline: none;
    background: white;
    cursor: inherit;
    display: block;
}
#img-upload{
    width: 100%;
}
</style>
<div class="container">
<div class="col-md-6"><p><h3>How to upload and resize image in PHP</h3></p>
	<form action="upload.php" method="post" enctype="multipart/form-data">
    <div class="form-group">
        <label>Upload Image</label>
        <div class="input-group">
            <span class="input-group-btn">
                <span class="btn btn-default btn-file">
                    Browse <input type="file" name="image" id="imgInp">
                </span>
            </span>
            <input type="text" class="form-control" readonly>
        </div>
        <img id='img-upload'/>
    </div>
	<div class="form-group">
	<input type="submit" name="submit" value="Submit" class="btn btn-primary"/>
	</div>
	</form>
</div>
</div>
</body>
</html>
upload.php
//upload.php
<?php
if(isset($_POST["submit"])) {
    if(is_array($_FILES)) {
        $file = $_FILES['image']['tmp_name']; 
        $sourceProperties = getimagesize($file);
        $fileNewName = time();
        $folderPath = "upload/";
        $ext = pathinfo($_FILES['image']['name'], PATHINFO_EXTENSION);
        $imageType = $sourceProperties[2];
        switch ($imageType) {
            case IMAGETYPE_PNG:
                $imageResourceId = imagecreatefrompng($file); 
                $targetLayer = imageResize($imageResourceId,$sourceProperties[0],$sourceProperties[1]);
                imagepng($targetLayer,$folderPath. $fileNewName. "_thump.". $ext);
                break;
            case IMAGETYPE_GIF:
                $imageResourceId = imagecreatefromgif($file); 
                $targetLayer = imageResize($imageResourceId,$sourceProperties[0],$sourceProperties[1]);
                imagegif($targetLayer,$folderPath. $fileNewName. "_thump.". $ext);
                break;
            case IMAGETYPE_JPEG:
                $imageResourceId = imagecreatefromjpeg($file); 
                $targetLayer = imageResize($imageResourceId,$sourceProperties[0],$sourceProperties[1]);
                imagejpeg($targetLayer,$folderPath. $fileNewName. "_thump.". $ext);
                break;
            default:
                echo "Invalid Image type.";
                exit;
                break;
        }
        move_uploaded_file($file, $folderPath. $fileNewName. ".". $ext);
        echo "Image Resize Successfully.";
    }
}
function imageResize($imageResourceId,$width,$height) {
    $targetWidth =340;
    $targetHeight =339;
    $targetLayer=imagecreatetruecolor($targetWidth,$targetHeight);
    imagecopyresampled($targetLayer,$imageResourceId,0,0,0,0,$targetWidth,$targetHeight, $width,$height);
    return $targetLayer;
}
?>

Monday, January 6, 2020

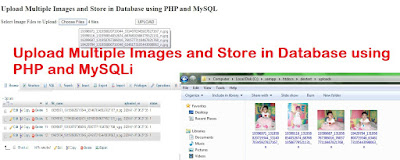
Upload Multiple Images and Store in Database using PHP and MySQLi

Upload Multiple Images and Store in Database using PHP and MySQLi
CREATE TABLE `images` (
  `id` int(11) NOT NULL,
  `file_name` varchar(255) COLLATE utf8_unicode_ci NOT NULL,
  `uploaded_on` datetime NOT NULL,
  `status` enum('1','0') COLLATE utf8_unicode_ci NOT NULL DEFAULT '1'
) ENGINE=InnoDB DEFAULT CHARSET=utf8 COLLATE=utf8_unicode_ci;

ALTER TABLE `images`
  ADD PRIMARY KEY (`id`);
  
ALTER TABLE `images`
  MODIFY `id` int(11) NOT NULL AUTO_INCREMENT, AUTO_INCREMENT=13;
<!DOCTYPE html>
<html>
<head> 
<meta charset="utf-8">
<meta name="viewport" content="width=device-width, initial-scale=1.0">
<title>Upload Multiple Images and Store in Database using PHP and MySQL</title> 
</head>
<body>
<?php
// Database configuration
$dbHost     = "localhost";
$dbUsername = "root";
$dbPassword = "";
$dbName     = "testingdb";

// Create database connection
$db = new mysqli($dbHost, $dbUsername, $dbPassword, $dbName);

// Check connection
if ($db->connect_error) {
    die("Connection failed: " . $db->connect_error);
}

if(isset($_POST['submit'])){
    // File upload configuration
    $targetDir = "uploads/";
    $allowTypes = array('jpg','png','jpeg','gif');
    
    $statusMsg = $errorMsg = $insertValuesSQL = $errorUpload = $errorUploadType = '';
    if(!empty(array_filter($_FILES['files']['name']))){
        foreach($_FILES['files']['name'] as $key=>$val){
            // File upload path
            $fileName = basename($_FILES['files']['name'][$key]);
            $targetFilePath = $targetDir . $fileName;
            
            // Check whether file type is valid
            $fileType = pathinfo($targetFilePath,PATHINFO_EXTENSION);
            if(in_array($fileType, $allowTypes)){
                // Upload file to server
                if(move_uploaded_file($_FILES["files"]["tmp_name"][$key], $targetFilePath)){
                    // Image db insert sql
                    $insertValuesSQL .= "('".$fileName."', NOW()),";
                }else{
                    $errorUpload .= $_FILES['files']['name'][$key].', ';
                }
            }else{
                $errorUploadType .= $_FILES['files']['name'][$key].', ';
            }
        }
        
        if(!empty($insertValuesSQL)){
            $insertValuesSQL = trim($insertValuesSQL,',');
            // Insert image file name into database
            $insert = $db->query("INSERT INTO images (file_name, uploaded_on) VALUES $insertValuesSQL");
            if($insert){
                $errorUpload = !empty($errorUpload)?'Upload Error: '.$errorUpload:'';
                $errorUploadType = !empty($errorUploadType)?'File Type Error: '.$errorUploadType:'';
                $errorMsg = !empty($errorUpload)?'<br/>'.$errorUpload.'<br/>'.$errorUploadType:'<br/>'.$errorUploadType;
                $statusMsg = "Files are uploaded successfully.".$errorMsg;
            }else{
                $statusMsg = "Sorry, there was an error uploading your file.";
            }
        }
    }else{
        $statusMsg = 'Please select a file to upload.';
    }
    
    // Display status message
    echo $statusMsg;
}
?>
  <p><h2>Upload Multiple Images and Store in Database using PHP and MySQLi</h2></p>
            <form action="" method="post" enctype="multipart/form-data">
    Select Image Files to Upload:
    <input type="file" name="files[]" multiple >
    <input type="submit" name="submit" value="UPLOAD">
   </form>

</body>
</html>

Friday, January 3, 2020

Send Email with Attachment on Form Submission using PHP

Send Email with Attachment on Form Submission using PHP
<!DOCTYPE html>
<html>
<head> 
<meta charset="utf-8">
<meta name="viewport" content="width=device-width, initial-scale=1.0">
<title>Send Email with Attachment on Form Submission using PHP</title> 
<link rel="stylesheet" href="https://maxcdn.bootstrapcdn.com/bootstrap/3.3.6/css/bootstrap.min.css" />  
<script src="https://maxcdn.bootstrapcdn.com/bootstrap/3.3.6/js/bootstrap.min.js"></script>  
<script src="https://ajax.googleapis.com/ajax/libs/jquery/3.4.1/jquery.min.js"></script>
<style>.btn-danger {width:100%;}.btn-success {width:100%;}</style>
</head>
<body>
<?php
$postData = $uploadedFile = $statusMsg = '';
if(isset($_POST['submit'])){
    // Get the submitted form data
    $postData = $_POST;
    $email = $_POST['email'];
    $name = $_POST['name'];
    $subject = $_POST['subject'];
    $message = $_POST['message'];
    // Check whether submitted data is not empty
    if(!empty($email) && !empty($name) && !empty($subject) && !empty($message)){
        // Validate email
        if(filter_var($email, FILTER_VALIDATE_EMAIL) === false){
            $statusMsg = '<p class="btn btn-danger">Please enter your valid email.</p>';
        }else{
            $uploadStatus = 1;
            
            // Upload attachment file
            if(!empty($_FILES["attachment"]["name"])){
                
                // File path config
                $targetDir = "uploads/";
                $fileName = basename($_FILES["attachment"]["name"]);
                $targetFilePath = $targetDir . $fileName;
                $fileType = pathinfo($targetFilePath,PATHINFO_EXTENSION);
                
                // Allow certain file formats
                $allowTypes = array('pdf', 'doc', 'docx', 'jpg', 'png', 'jpeg');
                if(in_array($fileType, $allowTypes)){
                    // Upload file to the server
                    if(move_uploaded_file($_FILES["attachment"]["tmp_name"], $targetFilePath)){
                        $uploadedFile = $targetFilePath;
                    }else{
                        $uploadStatus = 0;
                        $statusMsg = "<p class='btn btn-danger'>Sorry, there was an error uploading your file.</p>";
                    }
                }else{
                    $uploadStatus = 0;
                    $statusMsg = '<p class="btn btn-danger">Sorry, only PDF, DOC, JPG, JPEG, & PNG files are allowed to upload.</p>';
                }
            }
   if($uploadStatus == 1){
                // Recipient
                $toEmail = $email;

                // Sender
                $from = 'raizen02102020@gmail.com';
                $fromName = 'Tutorial101 dot blogspot com';
                
                // Subject
                $emailSubject = 'Contact Request Submitted by '.$name;
                // Message 
                $htmlContent = '<h2>Contact Request Submitted</h2>
                    <p><b>Name:</b> '.$name.'</p>
                    <p><b>Email:</b> '.$email.'</p>
                    <p><b>Subject:</b> '.$subject.'</p>
                    <p><b>Message:</b><br/>'.$message.'</p>';
     
                // Header for sender info
                $headers = "From: $fromName"." <".$from.">";
    
                if(!empty($uploadedFile) && file_exists($uploadedFile)){
                    // Boundary 
                    $semi_rand = md5(time()); 
                    $mime_boundary = "==Multipart_Boundary_x{$semi_rand}x"; 
                    
                    // Headers for attachment 
                    $headers .= "\nMIME-Version: 1.0\n" . "Content-Type: multipart/mixed;\n" . " boundary=\"{$mime_boundary}\""; 
                    
                    // Multipart boundary 
                    $message = "--{$mime_boundary}\n" . "Content-Type: text/html; charset=\"UTF-8\"\n" .
                    "Content-Transfer-Encoding: 7bit\n\n" . $htmlContent . "\n\n"; 
                    
                    // Preparing attachment
                    if(is_file($uploadedFile)){
                        $message .= "--{$mime_boundary}\n";
                        $fp =    @fopen($uploadedFile,"rb");
                        $data =  @fread($fp,filesize($uploadedFile));
                        @fclose($fp);
                        $data = chunk_split(base64_encode($data));
                        $message .= "Content-Type: application/octet-stream; name=\"".basename($uploadedFile)."\"\n" . 
                        "Content-Description: ".basename($uploadedFile)."\n" .
                        "Content-Disposition: attachment;\n" . " filename=\"".basename($uploadedFile)."\"; size=".filesize($uploadedFile).";\n" . 
                        "Content-Transfer-Encoding: base64\n\n" . $data . "\n\n";
                    }
                    
                    $message .= "--{$mime_boundary}--";
                    $returnpath = "-f" . $email;
                    
                    // Send email
                    $mail = mail($toEmail, $emailSubject, $message, $headers, $returnpath);
                    
                    // Delete attachment file from the server
                    @unlink($uploadedFile);
                }else{
                     // Set content-type header for sending HTML email
                    $headers .= "\r\n". "MIME-Version: 1.0";
                    $headers .= "\r\n". "Content-type:text/html;charset=UTF-8";
                    
                    // Send email
                    $mail = mail($toEmail, $emailSubject, $htmlContent, $headers); 
                }
                // If mail sent
                if($mail){
                    $statusMsg = '<p class="btn btn-success">Your contact request has been submitted successfully !</p>';
                    
                    $postData = '';
                }else{
                    $statusMsg = '<p class="btn btn-danger">Your contact request submission failed, please try again.</p>';
                }
            }

  } 
        
    }else{
        $statusMsg = '<p class="btn btn-danger">Please fill all the fields.</p>';
    }
}
?>
<div class="container">
    <div class="row">
  <p><h2>Send Email with Attachment on Form Submission using PHP</h2></p>
  <p><h3>Contact Us</h3></p>
        <div class="col-md-8">
            <div class="well well-sm">
    <!-- Display submission status -->
    <?php if(!empty($statusMsg)){ ?>
     <p class="statusMsg"><?php echo $statusMsg; ?></p>
    <?php } ?>
                <form method="post" action="" enctype="multipart/form-data" autocomplete="off" class="animate-form">
                <div class="row">
                    <div class="col-md-6">
                        <div class="form-group">
                            <label for="name">Name</label>
       <input type="text" name="name" class="form-control" value="<?php echo !empty($postData['name'])?$postData['name']:''; ?>" placeholder="Enter name" required="required" />
                         </div>
                        <div class="form-group">
                            <label for="email">Email Address</label>
                            <div class="input-group">
                                <span class="input-group-addon"><span class="glyphicon glyphicon-envelope"></span></span>
                                <input type="email" name="email" class="form-control" placeholder="Enter email" required="required" /></div>
                        </div>
                        <div class="form-group">
                            <label for="subject">Subject</label>
                            <input type="text" name="subject" class="form-control" value="<?php echo !empty($postData['subject'])?$postData['subject']:''; ?>" placeholder="Subject" required=""/>
                        </div>
      <div class="form-group">
                            <input type="file" name="attachment" class="form-control">
                        </div>     
                    </div>
                    <div class="col-md-6">
                        <div class="form-group">
                            <label for="name">Message</label>
                            <textarea name="message" class="form-control" rows="11" cols="25" placeholder="Write your message here"/>
       <?php echo !empty($postData['message'])?$postData['message']:''; ?></textarea>
                        </div>
                    </div>
                    <div class="col-md-12">
      <input type="submit" name="submit" class="btn btn-primary pull-right" value="Send Message">
                    </div>
                </div>
                </form>
     <p style="font-size: 13px;margin-top: 5px;color: #F44949;">For testing purpose, the email will be sent to your given email address.</p>
            </div>
        </div>
        <div class="col-md-4">
            <form>
            <legend><span class="glyphicon glyphicon-globe"></span> Our office</legend>
            <address>
                <strong>Twitter, Inc.</strong><br>
                795 Folsom Ave, Suite 600<br>
                San Francisco, CA 94107<br>
                <abbr title="Phone">
                    P:</abbr>
                (123) 456-7890
            </address>
            <address>
                <strong>Full Name</strong><br>
                <a href="mailto:#">first.last@example.com</a>
            </address>
            </form>
        </div>
    </div>
</div>
</body>
</html>

Sunday, December 15, 2019

Upload Multiple Images without Page Refresh using jQuery Ajax and PHP

Upload Multiple Images without Page Refresh using jQuery Ajax and PHP
<!DOCTYPE html>
<html>
<head>
 <title>Upload Multiple Images without Page Refresh using jQuery Ajax and PHP</title>
<link rel="stylesheet" href="https://maxcdn.bootstrapcdn.com/bootstrap/3.3.6/css/bootstrap.min.css" />  
<script src="https://maxcdn.bootstrapcdn.com/bootstrap/3.3.6/js/bootstrap.min.js"></script>  
<script src="https://ajax.googleapis.com/ajax/libs/jquery/3.4.1/jquery.min.js"></script>
<style>
.gallery ul, .gallery ol, .gallery li {
 margin: 0;
 padding: 0;
 list-style: none;
}
.upload-div{
 margin-bottom:20px;
}
#uploadStatus{
 padding: 10px 20px;
    margin-top: 10px;
 font-size:18px;
}
.gallery{
 width:100%;
 float:left;
}
.gallery ul{
 margin:0;
 padding:0;
 list-style-type:none;
}
.gallery ul li{
 padding:7px;
 border:2px solid #ccc;
 float:left;
 margin:10px 7px;
 background:none;
 width:auto;
 height:auto;
}
.gallery img{
 width:250px;
}
</style>
</head>
<body>
<div class="container">
<h2>Upload Multiple Images without Page Refresh using jQuery Ajax and PHP</h2>
    <div class="row">
        <div class="col-lg-12">
  <div class="upload-div">
   <!-- File upload form -->
   <form id="uploadForm" method="post" enctype="multipart/form-data" class="form-inline" >
    <div class="form-group">
                      <label>Choose Images: </label>
                      <input type="file" name="images[]" id="fileInput" class="form-control" multiple >
                 </div>
                 <input type="submit" name="submit" class="btn btn-success" value="UPLOAD"/>
             </form>
  </div>

  <!-- Display upload status -->
  <div id="uploadStatus"></div>
  <!-- Gallery view of uploaded images --> 
  <div class="gallery"></div>
  </div>
 </div>
</div>
<script>
$(document).ready(function(){
    // File upload via Ajax
    $("#uploadForm").on('submit', function(e){
        e.preventDefault();
        $.ajax({
            type: 'POST',
            url: 'upload.php',
            data: new FormData(this),
            contentType: false,
            cache: false,
            processData:false,
            beforeSend: function(){
                $('#uploadStatus').html('<img src="img/loader.gif"/>');
            },
            error:function(){
                $('#uploadStatus').html('<span style="color:#EA4335;">Images upload failed, please try again.<span>');
            },
            success: function(data){
                $('#uploadForm')[0].reset();
                $('#uploadStatus').html('<span style="color:#28A74B;">Images uploaded successfully.<span>');
                $('.gallery').html(data);
            }
        });
    });

 // File type validation
    $("#fileInput").change(function(){
        var fileLength = this.files.length;
        var match= ["image/jpeg","image/png","image/jpg","image/gif"];
        var i;
        for(i = 0; i < fileLength; i++){ 
            var file = this.files[i];
            var imagefile = file.type;
            if(!((imagefile==match[0]) || (imagefile==match[1]) || (imagefile==match[2]) || (imagefile==match[3]))){
                alert('Please select a valid image file (JPEG/JPG/PNG/GIF).');
                $("#fileInput").val('');
                return false;
            }
        }
    });
});
</script>
</body>
</html>
<?php
if(!empty($_FILES['images'])){
    // File upload configuration
    $targetDir = "uploads/";
    $allowTypes = array('jpg','png','jpeg','gif');
    
    $images_arr = array();
    foreach($_FILES['images']['name'] as $key=>$val){
        $image_name = $_FILES['images']['name'][$key];
        $tmp_name   = $_FILES['images']['tmp_name'][$key];
        $size       = $_FILES['images']['size'][$key];
        $type       = $_FILES['images']['type'][$key];
        $error      = $_FILES['images']['error'][$key];
        
        // File upload path
        $fileName = basename($_FILES['images']['name'][$key]);
        $targetFilePath = $targetDir . $fileName;
        
        // Check whether file type is valid
        $fileType = pathinfo($targetFilePath,PATHINFO_EXTENSION);
        if(in_array($fileType, $allowTypes)){    
            // Store images on the server
            if(move_uploaded_file($_FILES['images']['tmp_name'][$key],$targetFilePath)){
                $images_arr[] = $targetFilePath;
            }
        }
    }
 
    // Generate gallery view of the images
    if(!empty($images_arr)){ ?>
        <ul>
        <?php foreach($images_arr as $image_src){ ?>
            <li><img src="<?php echo $image_src; ?>" alt=""></li>
        <?php } ?>
        </ul>
    <?php }
    
}
?>

Friday, December 13, 2019

Upload and Add Watermark to Image using PHP

Upload and Add Watermark to Image using PHP
<!DOCTYPE html>
<html>
<head>
 <title>Upload and Add Watermark to Image using PHP</title>
<link rel="stylesheet" href="https://maxcdn.bootstrapcdn.com/bootstrap/3.3.6/css/bootstrap.min.css" />  
<script src="https://maxcdn.bootstrapcdn.com/bootstrap/3.3.6/js/bootstrap.min.js"></script>  
<script src="https://ajax.googleapis.com/ajax/libs/jquery/3.4.1/jquery.min.js"></script>
</head>
<body>
<style>
.gallery{
 width: 100%;
 text-align: center;
}
h5{
 color: #545353;
    font-size: 18px;
    text-transform: uppercase;
    background: #edeaea;
    padding: 7px 5px 4px 5px;
    margin-top: 20px;
}
.gallery img{
 max-width: 100%;
 padding: 10px;
}
</style>
<?php 
// Path configuration 
$targetDir = "uploads/"; 
$watermarkImagePath = 'img/tutorial101-blogspot-logo.png'; 

$statusMsg = '';
$showwatermark = '';
if(isset($_POST["submit"])){ 
    if(!empty($_FILES["file"]["name"])){ 
        // File upload path 
        $fileName = basename($_FILES["file"]["name"]); 
        $targetFilePath = $targetDir . $fileName; 
        $fileType = pathinfo($targetFilePath,PATHINFO_EXTENSION); 
  
        // Allow certain file formats 
        $allowTypes = array('jpg','png','jpeg'); 
  if(in_array($fileType, $allowTypes)){ 
            // Upload file to the server 
            if(move_uploaded_file($_FILES["file"]["tmp_name"], $targetFilePath)){ 
                // Load the stamp and the photo to apply the watermark to 
                $watermarkImg = imagecreatefrompng($watermarkImagePath); 
                switch($fileType){ 
                    case 'jpg': 
                        $im = imagecreatefromjpeg($targetFilePath); 
                        break; 
                    case 'jpeg': 
                        $im = imagecreatefromjpeg($targetFilePath); 
                        break; 
                    case 'png': 
                        $im = imagecreatefrompng($targetFilePath); 
                        break; 
                    default: 
                        $im = imagecreatefromjpeg($targetFilePath); 
                } 
                 
                // Set the margins for the watermark 
                $marge_right = 10; 
                $marge_bottom = 10; 
                 
                // Get the height/width of the watermark image 
                $sx = imagesx($watermarkImg); 
                $sy = imagesy($watermarkImg); 
                 
                // Copy the watermark image onto our photo using the margin offsets and  
                // the photo width to calculate the positioning of the watermark. 
                imagecopy($im, $watermarkImg, imagesx($im) - $sx - $marge_right, imagesy($im) - $sy - $marge_bottom, 0, 0, imagesx($watermarkImg), imagesy($watermarkImg)); 
                 
                // Save image and free memory 
                imagepng($im, $targetFilePath); 
                imagedestroy($im); 
     
                if(file_exists($targetFilePath)){ 
                    $statusMsg = "The image with watermark has been uploaded successfully."; 
     $showwatermark = '<h5>Watermarked Image</h5>
     <div class="gallery">
      <img src="uploads/'.$fileName.'" alt="">
     </div>';
                }else{ 
                    $statusMsg = "Image upload failed, please try again."; 
                }  
            }else{ 
                $statusMsg = "Sorry, there was an error uploading your file."; 
            } 
        }else{ 
            $statusMsg = 'Sorry, only JPG, JPEG, and PNG files are allowed to upload.'; 
        } 
    }else{ 
        $statusMsg = 'Please select a file to upload.'; 
    } 
} 
?>
<div class="container">
 <h2>Upload and Add Watermark to Image using PHP</h2>
    <div class="row">
        <div class="col-lg-12">
            <div>
    <!-- Image upload form -->
    <form action="" method="post" enctype="multipart/form-data" class="form-inline">
     <div class="form-group">
      <label for="file">Select Image File to Upload:</label>
      <input type="file" name="file" class="form-control">
     </div>
     <input type="submit" name="submit" value="Upload" class="btn btn-success">
    </form>
    <?php echo "<p><h4>".$statusMsg."</h4></p>";
    echo $showwatermark;
     ?>
                  
            </div>
        </div>
    </div>

</div>
</body>
</html>

Thursday, December 5, 2019

Create a Progress Bar Data Insert using PHP Mysqli bootstrap and Jquery Ajax

Create a Progress Bar Data Insert using PHP Mysqli bootstrap and Jquery Ajax
<!DOCTYPE html>
<html>
 <head>
  <title>Create a Progress Bar Data Insert using PHP Mysqli bootstrap and Jquery Ajax</title>  
    <script src="https://ajax.googleapis.com/ajax/libs/jquery/3.1.0/jquery.min.js"></script>
  <link rel="stylesheet" href="https://maxcdn.bootstrapcdn.com/bootstrap/3.3.6/css/bootstrap.min.css" />
  <script src="https://maxcdn.bootstrapcdn.com/bootstrap/3.3.7/js/bootstrap.min.js"></script>
<script>
 $(document).ready(function(){
 $('#sample_form').on('submit', function(event){
   event.preventDefault();
   var count_error = 0;

   if($('#username').val() == '')
   {
    $('#first_name_error').text('User Name is required');
    count_error++;
   }
   else
   {
    $('#first_name_error').text('');
   }

   if($('#useremail').val() == '')
   {
    $('#last_name_error').text('Email is required');
    count_error++;
   }
   else
   {
    $('#last_name_error').text('');
   }

   if(count_error == 0)
   {
    $.ajax({
   url:"ajax_progressbar.php",
   method:"POST",
   data:$(this).serialize(),
   beforeSend:function()
   {
    $('#save').attr('disabled', 'disabled');
    $('#process').css('display', 'block');
   },
   success:function(data)
   { 
    var percentage = 0;

    var timer = setInterval(function(){
     percentage = percentage + 20;
     progress_bar_process(percentage, timer,data);
    }, 1000);
   }
  })
   }
   else
   {
    return false;
   }
   
  });
  
  function progress_bar_process(percentage, timer,data)
  {
 $('.progress-bar').css('width', percentage + '%');
 if(percentage > 100)
 {
  clearInterval(timer);
  $('#sample_form')[0].reset();
  $('#process').css('display', 'none');
  $('.progress-bar').css('width', '0%');
  $('#save').attr('disabled', false);
  $('#success_message').html(data);
  setTimeout(function(){
   $('#success_message').html('');
  }, 5000);
 }
  }
  
 });
</script>
 </head>
 <body>
  <br />
  <br />
  <div class="container">
   <h1 align="center">Create a Progress Bar Data Insert using PHP Mysqli bootstrap and Jquery Ajax</h1>
   <br />
   <div class="panel panel-default">
    <div class="panel-heading">
     <h3 class="panel-title">Registration</h3>
    </div>
      <div class="panel-body">
       <span id="success_message"></span>
       <form method="post" id="sample_form">
     <div class="form-group">
        <label>User Name</label>
         <input type="text" name="username" id="username" class="form-control" />
         <span id="first_name_error" class="text-danger"></span>
        </div>
  <div class="form-group">
         <label>Email</label>
         <input type="text" name="useremail" id="useremail" class="form-control" />
         <span id="last_name_error" class="text-danger"></span>
        </div>
  <div class="form-group" align="center">
         <input type="submit" name="save" id="save" class="btn btn-info" value="Save" />
        </div>
       </form>
       <div class="form-group" id="process" style="display:none;">
        <div class="progress">
       <div class="progress-bar progress-bar-striped active bg-success" role="progressbar" aria-valuemin="0" aria-valuemax="100" style=""></div>
      </div>
       </div>
      </div>
     </div>
  </div>
 </body>
</html>
//ajax_progressbar.php
<?php
include"dbcon.php"; 
if(isset($_POST["username"]))
{
  $username  = $_POST["username"];
  $useremail  = $_POST["useremail"];
  $sql = "INSERT INTO tbl_user (username, useremail) VALUES ('".$username."','".$useremail."')";
    if ($conn->query($sql) === TRUE) {
     echo "<div class='alert alert-success'>New record created successfully</div>";
     $conn->close();
    } else {
    echo "Error: " . $sql . "<br>" . $conn->error."";
    }
}
?>
//dbcon.php
<?php
$conn = new mysqli('localhost','root','','testingdb');
if ($conn->connect_error) {
    die('Error : ('. $conn->connect_errno .') '. $conn->connect_error);
}
?>

Tuesday, February 5, 2019

How to create WordPress plugins with Shortcode Ajax

How to create WordPress plugins with Shortcode Ajax

1. Create folder name wp-content\plugins\"myplugins_shortcode_ajax"
2. Add index.php file wp-content\plugins\myplugins_shortcode_ajax\index.php
3. Add code index.php
//index.php
<?php
/**
* Plugin Name: Shortcode ajax
* Plugin URI: https://tutorial101.blogspot.com/
* Description: How to add a form to a shortcode in WordPress (using PHP and Ajax)
* Version: 1.0
* Author: Cairocoders
* Author URI: http://tutorial101.blogspot.com/
**/
$ajaxpostExample = new ajaxpostExample(); 
class ajaxpostExample {
 public function __construct() {
        $this->attach_actions();
  $this->attach_shortcodes();
    }
 function attach_actions() {
        add_action('wp_ajax_nopriv_ajax_do_something', array($this, 'do_something_serverside'));
        add_action('wp_ajax_ajax_do_something', array($this, 'do_something_serverside')); /* notice green_do_something appended to action name of wp_ajax_ */
        add_action('wp_enqueue_scripts', array($this, 'theme_enqueue_styles'), 99999);
    }
 function theme_enqueue_styles() {
        //include the js
  wp_enqueue_script('ajaxsample_script', plugin_dir_url(__FILE__) . 'js/ajax_call_to_handle_form_submit.js', array('jquery'));
  wp_enqueue_style('handlecss',  plugin_dir_url(__FILE__) . 'css/ajaxshortcodestyle.css');
  // in JavaScript, object properties are accessed as ajax_object.ajax_url, ajax_object.we_value
  // Register the script
  //wp_localize_script( $handle, $name, $data );
  wp_localize_script('ajaxsample_script', 'ajax_object', array('ajax_url' => admin_url('admin-ajax.php'), 'we_value' => 1234));
 }
 function do_something_serverside() {
  global $wpdb;
  // output to ajax call   
  $txtname = $_POST['txtname'];
  $txtemail = $_POST['txtemail'];
  $txtsubject = $_POST['txtsubject'];
  $txtmessage = $_POST['txtmessage'];
  if ($txtname=='' OR $txtemail==''){
   echo "false"; 
  }else{ 
   echo "true";
  }
  //insert to a custom database table
  $wpdb->insert("test", array(
   "contactname" => $txtname
  ));
        die();
    }
 function attach_shortcodes() {
        add_shortcode('shortcode_ajax_form', array($this, 'shortcode_with_form_code')); //<p>[shortcode_ajax_form]</p>
    }
    function shortcode_with_form_code($atts, $content = null) {
        if ($this->formOk()) {
            return " <div>thanks your form has been submitted</div>";
        } else {
            return $this->show_form();
        }
    }
 function show_form() {
        $form = '<div class="well"><div id="display_rec"></div>
        <form id="green_form" action="">
          Name:<br>
          <input type="text" name="txtname" class="form-control" value="">
          <br>
          Email Address:<br>
          <input type="text" name="txtemail" class="form-control" value="">
    <br>
          Subject:<br>
          <input type="text" name="txtsubject" class="form-control" value="">
    <br>
          Message:<br>
          <textarea name="txtmessage" class="form-control" rows="5" cols="25" required="required" placeholder="Message"></textarea>
          <br>
          <br>
          <input type="submit" class="btn-primary" value="Submit" >
        </form></div>';
        return $form;
    }
 function formOk(){
        return false; 
    }
} 
4. Create folder name for js file wp-content\plugins\myplugins_shortcode_ajax\js\ajax_call_to_handle_form_submit.js then add this code
jQuery( document ).ready(function() {
    // Handler for .ready() called.
    //
    jQuery(function(){
  jQuery("#green_form").submit(function(event){
   event.preventDefault();
            var formOk = true;
            // do js validation 
   jQuery.ajax({
    url:ajax_object.ajax_url,
                type:'POST',
                data: jQuery(this).serialize() + "&action=ajax_do_something", //wp_ajax_nopriv_ajax_do_something, wp_ajax_ajax_do_something
    success:function(response){ 
     if(response=="true"){
                       //alert('success'); 
        jQuery("#display_rec").html("<div class='success'><p>Message Success Sent</p></div>")
                    }else{
                        jQuery("#display_rec").html("<div class='fail'>Please input required fields.</div>")
                        //alert('Please input required fields.'); 
                    } 
                }
   });
  }); 
    });
});
5. css code wp-content\plugins\myplugins_shortcode_ajax\css\ajaxshortcodestyle.css
.form-control {
    display: block;
    width: 100%;
    height: 34px;
    padding: 6px 12px;
    font-size: 14px;
    line-height: 1.428571429;
    color: #555;
    background-color: #fff;
    background-image: none;
    border: 1px solid #ccc;
    border-radius: 4px;
    transition: border-color ease-in-out .15s,box-shadow ease-in-out .15s;
}
.btn-primary {
    color: #fff;
    background-color: #428bca;
    border-color: #357ebd;
}
.well {
    padding: 19px;
    margin-bottom: 20px;
    background-color: #428bca;
    border: 1px solid #357ebd;color:#fff;
    border-radius: 4px;
    -webkit-box-shadow: inset 0 1px 1px rgba(0,0,0,.05);
    box-shadow: inset 0 1px 1px rgba(0,0,0,.05);
}
.success, .fail, .information, .attention {
 background-repeat: no-repeat;
 background-position: 10px center;
 height: 40px;
 font-size: 11px;
 line-height: 22px;
 margin-bottom: 20px;
 padding-top: 10px;
 padding-right: 10px;
 padding-bottom: 10px;
 padding-left: 50px;
 
}
/* Succes Notification Box */
.success     {
 background-color: #EBF8D6;
 border: 1px solid #A6DD88;
 color: #539B2D;
 background-image: url(../images/accept00.png);
}
/* Failure Notification Box */
.fail      {
 background-color: #FFECE6;
 border: 1px solid #FF936F;
 color: #842100;
 background-image: url(../images/delete00.png);
}
/* Information Notification Box */
.information    {
 background-color: #D3EEF1;
 border: 1px solid #81CDD8;
 color: #369CAB;
 background-image: url(../images/info0000.png);
}
/* Attention Notification Box */
.attention   {
 background-color: #FFFBCC;
 border: 1px solid #FFF35E;
 color: #C69E00;
 background-image: url(../images/warning0.png);
}
6. Shortcode [shortcode_ajax_form]

Monday, February 4, 2019

How to create wodpress plugins and shortcodes 11 example from simple to complex

How to create wodpress plugins and shortcodes 11 example from simple to complex

List of tutorial
1. How to create contact form with submit mail
2. How to insert record post database table
3. How to insert shortcode google ads
4. How to list recent post
5. How to list recent post in shortcode parameters
6. How to list recent post in content shortcode
7. How to enabling shortcodes in widgets
8. Display wordpress menu in shortcode
9. How to insert A Google Maps shortcode
10. How to embed pdf
11. How to Displaying database table data in shortcodes

A standard header is introduced below to establish your plugin’s presence.
<?php
/**
* Plugin Name: My Plugin Name
* Plugin URI: http://mypluginuri.com/
* Description: A brief description about your plugin.
* Version: 1.0 or whatever version of the plugin (pretty self explanatory)
* Author: Plugin Author's Name
* Author URI: Author's website
* License: A "Slug" license name e.g. GPL12
*/
Create folder under plugins folder wp-content\plugins\myplugins_with_shortcode folder name myplugins_with_shortcode and create php file index.php file
2. Add the code below wp-content\plugins\myplugins_with_shortcode\index.php
<?php
/**
* Plugin Name: Custom Plugins with shortcode
* Plugin URI: https://tutorial101.blogspot.com/
* Description: A custom plugin and shortcode for example.
* Version: 1.0
* Author: Cairocoders
* Author URI: http://tutorial101.blogspot.com/
**/
//first example how to create contact form with submit mail
function form_creation(){
 //add submit 
 if (isset( $_POST['cmdsubmit'])) {
        $txtname = $_POST['txtname'];
        $txtemail = $_POST['txtemail'];
        $message = $_POST['message'];
  $msg = "Name: $txtname <br/>Email: $txtemail <br/>Message: $message <br/>";
    // send email
  mail("someone@example.com","My subject",$msg);
    }
 $form .= '<div class="well"><p><h5>Simple Contact Form</h5></p><form method = "post">
 Name: <input type="text" name="txtname" class="form-control"><br>
 Email: <input type="email" name="txtemail" class="form-control"><br>
 Message: <textarea name="message" class="form-control"> Enter text here…</textarea><br/>
 <input type="submit" name="cmdsubmit"> '.$msg.'
 </form></div>';
 return "$form";
}
add_shortcode("testform", "form_creation"); //add code //<p>[testform]</p>
//add css file
function wpse_89494_enqueue_scripts() {
 wp_enqueue_style('handlecss',  plugin_dir_url(__FILE__) . 'css/ajaxshortcodestyle.css');
}
//second example how to insert to post
function input_fields( $atts ) {
 //add submit
 if ( isset( $_POST['gg'] ) ) {
        $post = array(
            'post_content' => $_POST['content'], 
   'post_status' => 'publish',
            'post_title'   => $_POST['title']
        );
  // Insert the post into the database
        wp_insert_post($post); //https://developer.wordpress.org/reference/functions/wp_insert_post/
    }
    $formpost .= '<form method = "post">
        Post title : <input type="text" name="title"><br/>
        Post Contents : <input type="text" name="content"></br/>
        <input type="submit" name="gg">
    </form>';
 return "$formpost";
}
add_shortcode( 'add_fields', 'input_fields' );
//third example shortcode google ads
function get_adsense($atts) {
    return '<script async src="//pagead2.googlesyndication.com/pagead/js/adsbygoogle.js"></script>
<!-- WordPress hosting -->
<ins class="adsbygoogle"
     style="display:inline-block;width:728px;height:90px"
     data-ad-client="ca-pub-0327511395451286"
     data-ad-slot="6566424785"></ins>
<script>
(adsbygoogle = window.adsbygoogle || []).push({});
</script>';
}
add_shortcode('adsense', 'get_adsense');
//4th example how to list recent post
function recent_posts_function() {
   query_posts(array('orderby' => 'date', 'order' => 'DESC' , 'showposts' => 1));
   if (have_posts()) :
      while (have_posts()) : the_post();
         $return_string = '<a href="'.get_permalink().'">'.get_the_title().'</a>';
      endwhile;
   endif;
   wp_reset_query();
   return $return_string;
}
add_shortcode('recent_posts', 'recent_posts_function');
//5 example SHORTCODE PARAMETERS
function recent_posts_function2($atts){
   extract(shortcode_atts(array(
      'posts' => 1,
   ), $atts));
   $return_string = '<ul>';
   query_posts(array('orderby' => 'date', 'order' => 'DESC' , 'showposts' => $posts));
   if (have_posts()) :
      while (have_posts()) : the_post();
         $return_string .= '<li><a href="'.get_permalink().'">'.get_the_title().'</a></li>';
      endwhile;
   endif;
   $return_string .= '</ul>';
   wp_reset_query();
   return $return_string;
}
add_shortcode('recent_posts2', 'recent_posts_function2'); 
//6 example CONTENT IN SHORTCODE [recent-posts posts="5"]This is the list heading[/recent-posts]
function recent_posts_function3($atts, $content = null) {
   extract(shortcode_atts(array(
      'posts' => 1,
   ), $atts));
   $return_string = '<h3>'.$content.'</h3>';
   $return_string .= '<ul>';
   query_posts(array('orderby' => 'date', 'order' => 'DESC' , 'showposts' => $posts));
   if (have_posts()) :
      while (have_posts()) : the_post();
         $return_string .= '<li><a href="'.get_permalink().'">'.get_the_title().'</a></li>';
      endwhile;
   endif;
   $return_string .= '</ul>';
   wp_reset_query();
   return $return_string;
}
add_shortcode('recent_posts3', 'recent_posts_function3');
//7 example ENABLING SHORTCODES IN WIDGETS
add_filter('widget_text', 'do_shortcode');

//8 example WORDPRESS MENU
function menu_function($atts, $content = null) {
   extract(
      shortcode_atts(
         array( 'name' => null, ),
         $atts
      )
   );
   return wp_nav_menu(
      array(
          'menu' => $name,
          'echo' => false
          )
   );
}
add_shortcode('menu', 'menu_function');
//9 example A Google Maps shortcode
function googlemap_function($atts, $content = null) {
   extract(shortcode_atts(array(
      "width" => '640',
      "height" => '480',
      "src" => ’
   ), $atts));
   return '<iframe width="'.$width.'" height="'.$height.'" src="'.$src.'&output=embed" ></iframe>';
}
add_shortcode("googlemap", "googlemap_function");

//10 example PDF EMBEDDING
function pdf_function($attr, $url) {
   extract(shortcode_atts(array(
       'width' => '640',
       'height' => '480'
   ), $attr));
   return '<iframe src="http://docs.google.com/viewer?url=' . $url . '&embedded=true" style="width:' .$width. '; height:' .$height. ';">Your browser does not support iframes</iframe>';
}
add_shortcode('pdf', 'pdf_function'); 
// last 11 example Displaying database table data in shortcodes
function listpost_func()
{
 global $wpdb;
    $postshow .= '<div class="recent-posts">';
 $sql_post = $wpdb->get_results("SELECT * FROM wp_posts WHERE post_status='publish'");
 foreach ($sql_post as $rows_post) 
 {
  $post_title = $rows_post->post_title;  
   $postshow .= '<h6>'.$post_title.'</h6>';
 }
    $postshow .= '</div>';
 return "$postshow";
}
add_shortcode( 'listpost', 'listpost_func' ); 
css code wp-content\plugins\myplugins_with_shortcode\css\ajaxshortcodestyle.css
.form-control {
    display: block;
    width: 100%;
    height: 34px;
    padding: 6px 12px;
    font-size: 14px;
    line-height: 1.428571429;
    color: #555;
    background-color: #fff;
    background-image: none;
    border: 1px solid #ccc;
    border-radius: 4px;
    transition: border-color ease-in-out .15s,box-shadow ease-in-out .15s;
}
.btn-primary {
    color: #fff;
    background-color: #428bca;
    border-color: #357ebd;
}
.well {
    padding: 19px;
    margin-bottom: 20px;
    background-color: #428bca;
    border: 1px solid #357ebd;color:#fff;
    border-radius: 4px;
    -webkit-box-shadow: inset 0 1px 1px rgba(0,0,0,.05);
    box-shadow: inset 0 1px 1px rgba(0,0,0,.05);
}

Saturday, October 6, 2018

Jquery/Ajax Delete Records show loading image

Jquery/Ajax Delete Records show loading image


<!DOCTYPE html>
<html>
<head>
<meta charset="utf-8">
<meta name="viewport" content="width=device-width, initial-scale=1.0">
<title>Jquery Ajax Mysql Delete Records show loading image</title>
<script src="https://ajax.googleapis.com/ajax/libs/jquery/3.2.0/jquery.min.js"></script>
<link href="http://maxcdn.bootstrapcdn.com/bootstrap/3.3.0/css/bootstrap.min.css" rel="stylesheet" id="bootstrap-css">
<script src="http://getbootstrap.com/dist/js/bootstrap.min.js"></script>
<script type="text/javascript">
$(document).ready(function() {
$('#load').hide();
});
$(function() {
 $(".delete").click(function() {
  $('#load').fadeIn();
  var id = $(this).attr("id");
  var string = 'id='+ id ;
  $.ajax({
   type: "POST",
   url: "delete.php",
   data: string,
   cache: false,
   success: function(msg){
   $('#load').fadeOut();
   $("#status").html(msg);
   }
  });
  $(this).parents(".record").animate({ backgroundColor: "#fbc7c7" }, "fast")
  .animate({ opacity: "hide" }, "slow");
  return false;
 });
});
</script>
<style>
#hor-minimalist-a
{
font-family: "Lucida Sans Unicode", "Lucida Grande", Sans-Serif;
font-size: 12px;
background: #fff;
border-collapse: collapse;
text-align: left;
}
#hor-minimalist-a th
{
font-size: 14px;
font-weight: normal;
color: #039;
padding: 10px 8px;
border-bottom: 2px solid #6678b1;
}
#hor-minimalist-a td
{
color: #669;
}
#hor-minimalist-a tbody tr:hover td
{
color: #009;
}
#load {
color:#999;
font-size:18px;
font-weight:300;
}
</style>
</head>
<body>
<div class="container">
 <div class="row">
        <div class="col-md-12">
  <div class="table-responsive">
  
  
<h3>Jquery/Ajax Delete Records Bootstrap for Datatable</h3>
<div id="load" align="left"><img src="img/loader.gif" width="28" height="28" align="absmiddle"/> Loading...</div>
<div id="status"></div>
<table id="hor-minimalist-a" summary="Employee Pay Sheet" class="table table-bordred table-striped">
<thead>
 <tr>
    <th scope="col">Employee</th>
       <th scope="col">Salary</th>
       <th scope="col">Bonus</th>
       <th scope="col">Supervisor</th>
       <th scope="col">Action</th>
   </tr>
</thead>
<tr class="record">
    <td>Stephen C. Cox</td>
       <td>$300</td>
       <td>$50</td>
       <td>Bob</td>
       <td>
  <p><button id="1" class="Edit btn btn-primary btn-xs"><span class="glyphicon glyphicon-pencil"></span></button>
  <button id="1" class="delete btn btn-danger btn-xs"><span class="glyphicon glyphicon-trash"></span></button></p>
    </td>
</tr>
<tr class="record">
    <td>Josephin Tan</td>
       <td>$150</td>
       <td>$400</td>
       <td>Annie</td>
<td><p><button id="2" class="Edit btn btn-primary btn-xs"><span class="glyphicon glyphicon-pencil"></span></button>
<button id="2" class="delete btn btn-danger btn-xs"><span class="glyphicon glyphicon-trash"></span></button></p>
</td>
   </tr>
<tr class="record">
    <td>Caite Ednalan</td>
       <td>$450</td>
       <td>$300</td>
       <td>Batosai</td>
<td><p><button id="7" class="Edit btn btn-primary btn-xs"><span class="glyphicon glyphicon-pencil"></span></button>
<button id="7" class="delete btn btn-danger btn-xs"><span class="glyphicon glyphicon-trash"></span></button></p>
</td>
   </tr>
</table>
<div class="clearfix"></div>
<ul class="pagination pull-right">
  <li class="disabled"><a href="#"><span class="glyphicon glyphicon-chevron-left"></span></a></li>
  <li class="active"><a href="#">1</a></li>
  <li><a href="#">2</a></li>
  <li><a href="#">3</a></li>
  <li><a href="#">4</a></li>
  <li><a href="#">5</a></li>
  <li><a href="#"><span class="glyphicon glyphicon-chevron-right"></span></a></li>
</ul>
  </div>
  </div>
 </div>
</div>
</body>
</html>
//delete.php
<?php
$host = "localhost";
$username_ = "root";
$password = "";
$databasename = "testingdb";
$connect = mysql_connect($host, $username_, $password) or die("Opps some thing went wrong");
mysql_select_db($databasename, $connect) or die("Opps some thing went wrong");

 $id_post = $_POST['id'];
 $sql_user = mysql_query("SELECT * FROM users WHERE id='$id_post'") or die('Invalid query: ' . mysql_error());;
 if(mysql_num_rows($sql_user))
 {
   $sql = "Delete from users WHERE id='$id_post'";
   mysql_query( $sql);
  echo "<div class='btn btn-danger' style='width:100%;'>Record succesfully deleted</div>";
 }else{
  echo "<div class='btn btn-primary' style='width:100%;'>No records found</div>";
 } 

?>

Friday, August 17, 2018

Ajax Login with jquery

Ajax Login with jquery mysql and bootstrap

<!DOCTYPE html>
<html>
<head>
<meta charset="utf-8">
<meta name="viewport" content="width=device-width, initial-scale=1.0">
<title>Ajax Login with jquery mysql and bootstrap</title>
<script src="https://ajax.googleapis.com/ajax/libs/jquery/3.2.0/jquery.min.js"></script>
<script>
$(document).ready(function(){
 $("#rolling").slideDown('slow');
});
$(document).ready(function(){
  $("#submit").click(function(){
     if($("#uname").val()=="" || $("#pass").val()=="") {
   $(".display").fadeTo('slow','0.99');
   $("msg").hide();
   $(".display").fadeIn('slow',function(){$(".display").html("<span id='error'>Please enter username and password</span>");});
   return false;
     }else{
    $(".display").html('<span class="normal"><img src="img/loader.gif"></span>');
    var uname = $("#uname").val();
    var pass = $("#pass").val();
     $.getJSON("server.php",{username:uname,password:pass},function(json)
     {
      // Parse JSON data if json.response.error = 1 then login successfull
      if(json.response.error == "1")
      {
       $(".display").css('background','#CBF8AF');
       $(".display").css('border-bottom','4px solid #109601');
       data = "<span id='msg'>Welcome "+uname+"</span>";
       window.location.href = "theme_profile.html";
       /*
     login successfull, write code to Show next page here 
       */
      }
      // Login failed
      else
      {
       $(".display").css('background','#FFD9D9');
       $(".display").css('border-bottom','4px solid #FC2607');
       data = "<span id='error'>Error check username and password?</span>";
      }
       $(".display").fadeTo('slow','0.99');
       $(".display").fadeIn('slow',function(){$(".display").html("<span id='msg'>"+data+"</span>");});
     });
    return false;
   }
  });
   $("#uname").focus(function(){
    $(".display").fadeTo('slow','0.0',function(){$(".display").html('');});
   });
   $("#pass").focus(function(){
    $(".display").fadeTo('slow','0.0',function(){$(".display").html('');});
   });
});
</script>
<link href="https://maxcdn.bootstrapcdn.com/bootstrap/4.1.1/css/bootstrap.min.css" rel="stylesheet" id="bootstrap-css">
<script src="https://maxcdn.bootstrapcdn.com/bootstrap/4.1.1/js/bootstrap.min.js"></script>
<!--Fontawesome CDN-->
<link rel="stylesheet" href="https://use.fontawesome.com/releases/v5.3.1/css/all.css">
</head>
<body>
<div class="container">
 <div class="d-flex justify-content-center h-100">
  <div class="card" id="rolling">
   <div class="card-header">
    <h3>Sign In</h3><span id="msg"></span>
    <div class="d-flex justify-content-end social_icon">
     <span><i class="fab fa-facebook-square"></i></span>
     <span><i class="fab fa-google-plus-square"></i></span>
     <span><i class="fab fa-twitter-square"></i></span>
    </div><p class="display"></p> <span id="msg"></span>
   </div>
   <div class="card-body">
   <form name="test" id="test" method="POST">
     <div class="input-group form-group">
      <div class="input-group-prepend">
       <span class="input-group-text"><i class="fas fa-user"></i></span>
      </div>
      <input type="text" name="uname" id="uname" class="form-control" placeholder="username">
     </div>
     <div class="input-group form-group">
      <div class="input-group-prepend">
       <span class="input-group-text"><i class="fas fa-key"></i></span>
      </div>
      <input type="password" name="pass" id="pass" class="form-control" placeholder="password">
     </div>
     <div class="row align-items-center remember">
      <input type="checkbox">Remember Me
     </div>
     <div class="form-group">
      <input type="submit" Value="Login" class="btn float-right login_btn" id="submit">
     </div>
    </form> 
    </div>
     <div class="card-footer">
    <div class="d-flex justify-content-center links">
     Don't have an account?<a href="#">Sign Up</a>
    </div>
    <div class="d-flex justify-content-center">
     <a href="#">Forgot your password?</a>
    </div>
   </div> 
   </div>
  </div>
 </div>
</div>
<style>
@import url('https://fonts.googleapis.com/css?family=Numans');

html,body{
background-image: url('http://getwallpapers.com/wallpaper/full/a/5/d/544750.jpg');
background-size: cover;
background-repeat: no-repeat;
height: 100%;
font-family: 'Numans', sans-serif;
}
.container{
height: 100%;
align-content: center;
}
.card{
height: 370px;
margin-top: auto;
margin-bottom: auto;
width: 400px;
background-color: rgba(0,0,0,0.5) !important;
}
.social_icon span{
font-size: 60px;
margin-left: 10px;
color: #FFC312;
}
.social_icon span:hover{
color: white;
cursor: pointer;
}
.card-header h3{
color: white;
}
.social_icon{
position: absolute;
right: 20px;
top: -45px;
}
.input-group-prepend span{
width: 50px;
background-color: #FFC312;
color: black;
border:0 !important;
}
input:focus{
outline: 0 0 0 0  !important;
box-shadow: 0 0 0 0 !important;
}
.remember{
color: white;
}
.display {color:#fff;}
.remember input
{
width: 20px;
height: 20px;
margin-left: 15px;
margin-right: 5px;
}
.login_btn{
color: black;
background-color: #FFC312;
width: 100px;
}
.login_btn:hover{
color: black;
background-color: white;
}
.links{
color: white;
}
.links a{
margin-left: 4px;
}
</style>
</body>
</html>
//server.php
<?php
$host = "localhost";
$username_ = "root";
$passworddb = "";
$databasename = "testingdb";
$connect = mysql_connect($host, $username_, $passworddb) or die("Opps some thing went wrong");
mysql_select_db($databasename, $connect) or die("Opps some thing went wrong");
$username = $_GET['username'];
$pass = $_GET['password'];
$password = md5($pass);
$sql_check = mysql_query("SELECT * FROM users WHERE username='$username' AND password='$password'") or die('Invalid query: ' . mysql_error());;
if(mysql_num_rows($sql_check))
{
 echo '{"response":{"error": "1"}}'; // login successfull
}
else
{
  echo '{"response":{"error": "0"}}'; //failed
}
?>

Friday, August 3, 2018

Ajax File Upload with Progress Bar using PHP JQuery

Ajax File Upload with Progress Bar using PHP JQuery


Index.html


<!DOCTYPE html>
 <html>
 <head>
  <title></title>
  <link href="css/bootstrap.min.css" rel="stylesheet" />
  <script src="js/jquery-1.10.2.min.js"></script>
  <script src="js/bootstrap.min.js"></script>
  <script src="js/jquery.form.js"></script>
 </head>
 <body>
  <div class="container">
   <br />
   <h3 align="center">Ajax File Upload Progress Bar using PHP JQuery</h3>
   <br />
   <div class="panel panel-default">
    <div class="panel-heading"><b>Ajax File Upload Progress Bar using PHP JQuery</b></div>
    <div class="panel-body">
     <form id="uploadImage" action="upload.php" method="post">
      <div class="form-group">
       <label>File Upload</label>
       <input type="file" name="uploadFile" id="uploadFile" accept=".jpg, .png" />
      </div>
      <div class="form-group">
       <input type="submit" id="uploadSubmit" value="Upload" class="btn btn-info" />
      </div>
      <div class="progress">
       <div class="progress-bar" role="progressbar" aria-valuenow="0" aria-valuemin="0" aria-valuemax="100"></div>
      </div>
      <div id="targetLayer" style="display:none;"></div>
     </form>
     <div id="loader-icon" style="display:none;"><img src="loader.gif" /></div>
    </div>
   </div>
  </div>
 </body>
</html>

<script>
$(document).ready(function(){
 $('#uploadImage').submit(function(event){
  if($('#uploadFile').val())
  {
   event.preventDefault();
   $('#loader-icon').show();
   $('#targetLayer').hide();
   $(this).ajaxSubmit({
    target: '#targetLayer',
    beforeSubmit:function(){
     $('.progress-bar').width('50%');
    },
    uploadProgress: function(event, position, total, percentageComplete)
    {
     $('.progress-bar').animate({
      width: percentageComplete + '%'
     }, {
      duration: 1000
     });
    },
    success:function(){
     $('#loader-icon').hide();
     $('#targetLayer').show();
    },
    resetForm: true
   });
  }
  return false;
 });
});
</script>
upload.php
<?php
//upload.php
if(!empty($_FILES))
{
 if(is_uploaded_file($_FILES['uploadFile']['tmp_name']))
 {
  sleep(1);
  $source_path = $_FILES['uploadFile']['tmp_name'];
  $target_path = 'upload/' . $_FILES['uploadFile']['name'];
  if(move_uploaded_file($source_path, $target_path))
  {
   echo '<img src="'.$target_path.'" class="img-thumbnail" width="300" height="250" />';
  }
 }
}
?>


Download Source Code https://bit.ly/2UX6wZi

Related Post