article

Thursday, March 31, 2011

CSS Login Form Design

CSS Login Form Design

A sample of CSS form login

Demo


http://dl.dropbox.com/u/7106563/r-ednalan/login_form.html


<style type="text/css">
body{background-color:#fff;margin: 40px;font-family:Arial, Lucida Grande, Verdana, Sans-serif;font-size:12px;color:#000;}
#content {margin: 0 auto;width: 350px;border:#ccc 1px solid;background-color:#fff;padding:20px 20px 12px 20px;-moz-border-radius:7px; -webkit-border-radius:7px;}
h1{font-weight:normal;font-size:20px;color:#aaaaaa;margin:0 0 4px 0;}
p{font-size: 20px;color: #dedede;}
a {color:#729e01;text-decoration:none;}
a:hover{color:#dedede;}
input.text{ border:#ccc 1px solid;-moz-border-radius:7px; -webkit-border-radius:7px;font-size: 20px;width:300px;}
.ptour_crtbtn{border:1px outset #ccc;padding:5px 2px 4px;color:#fff;min-width: 100px;text-align: center;cursor:pointer;background:#729e01;background:-webkit-gradient(linear, left top, left bottom,from(#a3d030),to(#729e01));background:-moz-linear-gradient(top,#a3d030,#729e01);background:-o-linear-gradient(top,#a3d030,#729e01);background:linear-gradient(top,#a3d030,#729e01);-moz-border-radius:7px; -webkit-border-radius:7px;
}
</style>
<div id="content">
<h1>Login Form</h1>
<form action="" method="POST">
<p><label style="display: block;">Email:</label><input class="text" type="text" name="username" /></p>
<p><label style="display: block;">Password:</label><input class="text" type="password" name="password" /></p>
<p><button class="ptour_crtbtn" name="login" type="submit">Login</button></p>
</form>
<p><a href="#">Forgot password?</a></p>
</div>

Friday, March 25, 2011

How to: Add a Share on facebook link to your WordPress blog

How to: Add a Share on facebook link to your WordPress blog

Paste the following code on your single.php file, within the loop:


<a href="http://www.facebook.com/sharer.php?u=<?php the_permalink();?>&t=<?php the_title(); ?>" target="blank">Share on Facebook</a>

Thursday, March 24, 2011

Font preview using Google font API

Font preview using Google font API

A sample of google font api font name Tangerine
Sample

<html>
<head>
<link rel="stylesheet" type="text/css" href="http://fonts.googleapis.com/css?family=Tangerine">
<style>
body {
font-family: 'Tangerine', serif;
font-size: 48px;
text-shadow: 4px 4px 4px #aaa;
}
</style>
</head>
<body>
<h1>http://r-ednalan.blogspot.com/</h1>
</body>


Visit the Google Font Directory

FORM Validators for web developers

1. Live Validation form

LiveValidation is a small open source javascript library for making client-side validation quick, easy, and powerful.

Example Demo

http://livevalidation.com/examples


2. MooTools FormCheck

FormCheck is a class that allows you to perform different tests on form to validate them before submission.


Demo

http://mootools.floor.ch/en/labs/


3. ProtoForm

ProtoForm is an unltra lightweight, unobtrusive cross-browser and very easy to customize form validation + submit with Ajax based on prototype.js framework.

Demo

http://cssrevolt.com/upload/files/protoform/

Tuesday, March 22, 2011

Implement a jQuery AJAX Login Form into a Modal Box using fancybox.net modal

Implement a jQuery AJAX Login Form into a Modal Box using fancybox.net modal box

Integrate an Jquery AJAX Login Form into a Modal Box using a fancybox modal box This will show you how to implement JQuery ajax using facybox.


//jquery ajax
<script type="text/javascript" src="http://ajax.googleapis.com/ajax/libs/jquery/1.4/jquery.min.js"></script>
<script type="text/javascript">
$(document).ready(function() {
$("#login_form").submit(function() {
var unameval = $("#username").val();
var pwordval = $("#password").val();
$.post("login.php", { username: unameval, //login.php
password: pwordval }, function(data) {
$("#status").html(data);
});
return false;
});
});
</script>


//fancybox javascript
<script type="text/javascript" src="./fancybox/jquery.mousewheel-3.0.4.pack.js"></script>
<script type="text/javascript" src="./fancybox/jquery.fancybox-1.3.4.pack.js"></script>
<link rel="stylesheet" type="text/css" href="./fancybox/jquery.fancybox-1.3.4.css" media="screen" />
<link rel="stylesheet" href="style.css" />
<script type="text/javascript">
$(document).ready(function() {

$("#various1").fancybox({
'titlePosition' : 'inside',
'transitionIn' : 'none',
'transitionOut' : 'none'
});


});
</script>

//CSS
<style type="text/css">
form.registration{
width:570px;
float:left;

}
form.registration fieldset{
border-top:0px solid #ccc;
border-left:0;
border-bottom:0;
border-right:0;
padding:6px;
margin:0px 20px 0px 0px;
}

form.registration label{
font-size: 20px;
width:190px;
float: left;
text-align: right;
color:#7F7F7F;
clear:left;
margin:10px 4px 0px 0px;
padding:0px;
}
form.registration .textboxinput{
font-family: Georgia;
font-size: 28px;
float:left;
width:280px;
border:1px solid #cccccc;
margin:2px 0px 2px 2px;
color:#00abdf;
height:32px;
padding:3px;
-moz-box-shadow: 0 1px 3px rgba(0,0,0,0.5);
-webkit-box-shadow: 0 1px 3px rgba(0,0,0,0.5);
-webkit-border-radius: 5px;
-moz-border-radius: 5px;
}


.button {
-moz-border-radius:5px;
-webkit-border-radius:5px;
border-radius:5px;
-moz-box-shadow:0 1px 3px rgba(0, 0, 0, 0.50);
-webkit-box-shadow:0 1px 3px rgba(0, 0, 0, 0.50);
box-shadow:0 1px 3px rgba(0, 0, 0, 0.50);
background:#222222 url(button-overlay.png) repeat-x;
border:1px solid rgba(0, 0, 0, 0.25);
color:#FFFFFF !important;
cursor:pointer;
display:inline-block;
font-size:13px;
font-weight:bold;
line-height:1;
overflow:visible;
padding:5px 15px 6px;
position:relative;
text-decoration:none;
text-shadow:0 -1px 1px rgba(0, 0, 0, 0.25);
width:auto;
text-align:center;
}
.button:hover {
background:#111111;
color:#FFFFFF;
}
.button:active {
background:#242424;
}

.orange.button {
background-color:#FF5C00;
}
.orange.button:hover {
background-color:#D45500;
}
.orange.button:active {
background-color:#fd762a;
}


.fail {
background-color: #FFECE6;
border: 1px solid #FF936F;
color: #842100;
background-image: url(delete00.png);
}
.fail {
background-repeat: no-repeat;
background-position: 10px center;
height: 20px;
text-transform: uppercase;
font-size: 11px;
line-height: 22px;
margin-bottom: 20px;
padding-top: 10px;
padding-right: 10px;
padding-bottom: 10px;
padding-left: 50px;

}
</style>
//form
<a id="various1" href="#inline1" title="">LOG IN</a>
<div style="display: none;">
<div id="inline1" style="width:565px;height:250px;overflow:auto;padding:10px">
<span ><b>Sign In</b></span>
<div id="flash" align="left" ></div>
<div id="status"></div>
<form id="login_form" class="registration" method="post">
<fieldset>
<label>Username </label>
<input class="textboxinput" type="text" id="username" name="username" maxlength="120" value=""/>
<label>Password </label>
<input class="textboxinput" type="password" id="password" name="password"/>
</fieldset>
<fieldset>
<div style="float:right;padding-right:52px;"><input type="submit" class="large button orange input" value="Sign In" /></div>
</fieldset>
</form>
</div>
</div>


//login.php
<?php
$username = $_POST['username'];
$password = $_POST['password'];

if ($username == "test" && $password == "test")
{
echo "<strong>Login succeeded!</strong>";
}
else
{
echo "<div class=\"fail\"><strong>Login failed! Please try again.</strong></div>";
}
?>


Download

http://dl.dropbox.com/u/3293191/JQUERY/login_modal.zip

Saturday, March 19, 2011

Wrapping Long URLs and Text Content with CSS

Wrapping Long URLs and Text Content with CSS

pre {
white-space: pre; /* CSS 2.0 */
white-space: pre-wrap; /* CSS 2.1 */
white-space: pre-line; /* CSS 3.0 */
white-space: -pre-wrap; /* Opera 4-6 */
white-space: -o-pre-wrap; /* Opera 7 */
white-space: -moz-pre-wrap; /* Mozilla */
white-space: -hp-pre-wrap; /* HP Printers */
word-wrap: break-word; /* IE 5+ */
}


<pre class="wrapped">Lorem ipsum dolor sit ames. Ut justo. Suspendisse potenti.</pre>

Sunday, March 6, 2011

Get Active/ Inactive/ Current tabs in Navigation Bar using PHP and jQuery

Get Active/ Inactive/ Current tabs in Navigation Bar using PHP and jQuery
php Code
Step 1: Get current page URL using PHP

$phpSelf = $_SERVER['REQUEST_URI'];

jQuery Code

Step 2: Check whether URL is similar to navigation bar button url, if they are similar we give it as the current active page,

< script type="text/javascript" >
$(document).ready(function(){

var root_url = "http://localhost";
var phpSelf = root_url+"<?php echo $phpSelf;?>"; $("#navigation li").each(function() {
var link = $(this).children("a").attr("href"); if(phpSelf == link){ $(this).addClass("active"); } }); }); < /script >

Change,
active to your active css class
http://localhost to website root directory

Displaying Number of Comments in your WordPress Blog

Displaying Number of Comments in your WordPress Blog

<?php
$numcomms = $wpdb->get_var("SELECT COUNT(*) FROM $wpdb->comments WHERE comment_approved = '1'");
if (0 < $numcomms) $numcomms = number_format($numcomms);
echo "There's ".$numcomms." total comments on my blog";
?>

Display Most Popular Posts in WordPress

Display Most Popular Posts in WordPress


<h2>Popular Posts</h2>
<ul>

<?php $result = $wpdb->get_results("SELECT
comment_count,ID,post_title FROM $wpdb->posts ORDER BY comment_count
DESC LIMIT 0 , 5");
foreach ($result as $post) {
setup_postdata($post);
$postid = $post->ID;
$title = $post->post_title;
$commentcount = $post->comment_count;
if ($commentcount != 0) { ?>

<li><a href="<?php echo get_permalink($postid); ?>" title="<?php echo $title ?>">
<?php echo $title ?></a> {<?php echo $commentcount ?>}</li>
<?php } } ?>
</ul>

Just change the 5 in line 3 to change the number of displayed popular posts

Thursday, March 3, 2011

php how to get tomorow date

php how to get tomorow date
Use the mktime function to create a timestamp for tomorrow. To go one day in the future we simply add one to the day
mktime(hour, minute, second, month, day, year, daylight savings time)


<?
$tomorrow = mktime(0, 0, 0, date("m"), date("d")+1, date("y"));
echo "Tomorrow is ".date("m/d/y", $tomorrow);
//out now date 03/03/11 tomorow is 03/04/11
?>

Monday, February 28, 2011

get the ID of the last insert post in WordPress

get the ID of the last insert post in WordPress

<div id="div1">
<?php
//insert new post
// Create post object
$my_post = array();
$my_post['post_title'] = 'Hello world';
$my_post['post_content'] = 'This is a sample post';
$my_post['post_status'] = 'published';
$my_post['post_author'] = 7; //the id of the author
$my_post['post_category'] = array(10,12); //the id's of the categories

// Insert the post into the database
$post_id = wp_insert_post( $my_post ); //store new post id into $post_id

//now add tags to new post
$tags = array('html', 'css', 'javascript');
wp_set_object_terms( $post_id, $tags, 'post_tag', true );

?>
</div>

Saturday, February 19, 2011

Write Better CSS

Write Better CSS

1. Single-line vs. Multi-line

multiple lines, like this:
.title {
font-size:14px;
line-height:20px;
color:blue;
}

Or on one or single line, like this:
.title {font-size:14px;line-height:20px;color:blue;}

2. Section Your File
comment above each section is all you need:
/*** Header ***/

3. Start With a Reset
* {margin:0;padding:0;}

4. Use Shorthand CSS
Shorthand CSS is combining a few related rules into one.
Example
.example {
background-color: blue;
background-image: url(images/blue-bg.jpg);
background-position: 100% 0;
background-repeat: no-repeat;
}

Shorthand
.example {background: blue url(images/blue-bg.jpg) 100% 0 no-repeat;}

5. Multiple Classes on One Element
The reason to do this is that you can define generic CSS styles that can be applied to a number of elements.
<p class="info left">Some example text in your info paragraph.</p>

6. Positioning Header Elements
#header {position:relative;width:960px;height:120px;}


Wednesday, February 9, 2011

Simple AJAX with JQuery

Simple AJAX with JQuery


<script type="text/javascript">
function register(){ //when the button is pressed, this function will be executed.
$.ajax({
type: "POST", // AJAX function
url: "submit_data.php", //Method
data: "username=" + document.getElementById("username").value +
"&email=" + document.getElementById("email").value, // executed when the button is pressed.
success: function(html){
$("#response").html(html); //response html output echo
}
});

}
</script>

<form action="" method="post">
Simple AJAX with JQuery
<p>
<label for="name">Name:</label><br />
<input type="text" name="username" id="name" size="25" />
</p>
<p>
<label for="email">Email:</label><br />
<input type="text" name="email" id="email" size="25" />
</p>
<p>
<input type="button" name="submit" id="submit" value="Subscribe" onclick="register()"/> //
</p>

</form>
<div id="response"></div> //The Response Div


submit_data.php
<?php
$db_host = 'localhost';
$db_user = 'user';
$db_pass = 'pass';
$db_name = 'db';
$Username = $_POST['username'];
$Email = $_POST['email'];
// DB
$connect = mysql_connect( $db_host, $db_user, $db_pass ) or die( mysql_error() );
$connection = $connect;
mysql_select_db( $db_name, $connect ) or die( mysql_error() );
// Inserting into DB
$qeuryInsert = mysql_query(" INSERT INTO `database` (`id`, `username`, `email`)
VALUES ( ``, `$Username`, `$Email`)
");
if ($qeuryInsert){
echo "You are now subscribed to our newsletter. Thank you!";
} else {
echo "Error!";
}

?>

Monday, February 7, 2011

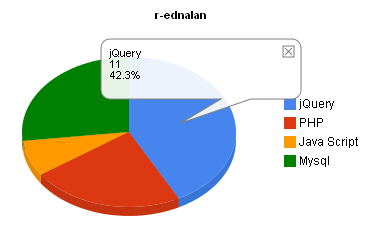
Draw Charts with Google Visualization API.

Draw Charts with Google Visualization API.

<script type='text/javascript' src='http://www.google.com/jsapi'></script>
<script type="text/javascript">
// Load the Visualization API and the piechart package. Draw Charts with Google Visualization API.
google.load('visualization', '1', {'packages':['piechart']});
// set API loaded.
google.setOnLoadCallback(drawChart);
// draws it.
function drawChart() {
var data = new google.visualization.DataTable();
data.addColumn('string', 'list');
data.addColumn('number', 'Pesentage');
data.addRows(5);
data.setValue(0, 0, 'jQuery');
data.setValue(0, 1, 11);
data.setValue(2, 0, 'PHP');
data.setValue(2, 1,6);
data.setValue(3, 0, 'Java Script');
data.setValue(3, 1, 2);
data.setValue(4, 0, 'Mysql');
data.setValue(4, 1, 7);
var chart = new google.visualization.PieChart(document.getElementById('2'));
chart.draw(data, {width: 400, height: 240, is3D: true, title: 'r-ednalan'});
}
</script>
<div id='2' style="float:left"></div>

Submit Form with jQuery and Ajax.

Submit Form with jQuery and Ajax.
submitting HTML form values without refreshing page using jQuery and Ajax.


<script type="text/javascript" src="http://ajax.googleapis.com/ajax/libs/jquery/1.3.0/jquery.min.js"></script>
<script type="text/javascript" >
$(function() {
$(".submit").click(function() {
var name = $("#name").val();
var username = $("#username").val();
var password = $("#password").val();
var dataString = 'name='+ name + '&username=' + username + '&password=' + password;

if(name=='' || username=='' || password=='')
{
$('.success').fadeOut(200).hide();
$('.error').fadeOut(200).show();
}
else
{
$.ajax({
type: "POST",
url: "insert.php",
data: dataString,
success: function(){

$('.success').fadeIn(200).show();
$('.error').fadeOut(200).hide();

}
});
}
return false;
});
});
</script>


<form method="post" name="form">
<input id="name" name="name" type="text" />
<input id="username" name="username" type="text" />
<input id="password" name="password" type="password" />

<input type="submit" value="Submit" class="submit"/>
<span class="error" style="display:none"> Please Enter Valid Data</span>
<span class="success" style="display:none"> Registration Successfully</span>
<div id="display" align="left">

///---Insert.php
<?php
if($_POST)
{
$name=$_POST['name'];
$username=$_POST['username'];
$password=$_POST['password'];
/* mysql_query("SQL insert statement......."); */
}else { }

?>

Sunday, February 6, 2011

Generate RSS Feed with PHP

Generate RSS Feed with PHP
<?php
include('db.php');
$sql = "SELECT * FROM site_data ORDER BY id DESC LIMIT 20";
$query = mysql_query($sql) or die(mysql_error());

header("Content-type: text/xml");

echo "<?xml version='1.0' encoding='UTF-8'?>
<rss version='2.0'>
<channel>
<title>r-ednalan.blogspot.com | Programming Blog </title>
<link>http://r-ednalan.blogspot.com</link>
<description>Programming Blog </description>
<language>en-us</language>";

while($row = mysql_fetch_array($query))
{
$title=$row['title'];
$link=$row['link'];
$description=$row['description'];

echo "<item>
<title>$title</title>
<link>$link</link>
<description>$description</description>
";
}
echo "</channel></rss>";
?>

Accordion Menu

Accordion Menu script
The following are Accordion Menu examples with full source code to get you started:

If you want to know more and download the source follow the link below

http://www.dynamicdrive.com/dynamicindex17/ddaccordionmenu.htm

Saturday, February 5, 2011

javascript Accept terms

javascript Accept terms
before submitting the form you must accept term and condition
<script>
var checkobj
function agreesubmit(el){
checkobj=el
if (document.all||document.getElementById){
for (i=0;i<checkobj.form.length;i++){
var tempobj=checkobj.form.elements[i]
if(tempobj.type.toLowerCase()=="submit")
tempobj.disabled=!checkobj.checked
}
}
}

function defaultagree(el){
if (!document.all&&!document.getElementById){
if (window.checkobj&&checkobj.checked)
return true
else{
alert("Please read/accept terms to submit form")
return false
}
}
}
document.forms.agreeform.agreecheck.checked=false
</script>
<form name="agreeform" onSubmit="return defaultagree(this)">
<input name="agreecheck" type="checkbox" onClick="agreesubmit(this)"><b>I agree to the above terms</b><br>
<input type="Submit" value="Submit!" disabled>
</form>

Demo

http://dl.dropbox.com/u/3293191/r-ednalan/accept_term.html

javascript Email Validation

javascript Email Validation

<script type="text/javascript">
var emailfilter=/^\w+[\+\.\w-]*@([\w-]+\.)*\w+[\w-]*\.([a-z]{2,4}|\d+)$/i
function checkmail(e){
var returnval=emailfilter.test(e.value)
if (returnval==false){
alert("Please enter a valid email address.")
e.select()
}
return returnval
}
</script>

<form>
<input name="myemail" type="text" style="width: 270px"> <input type="submit" onClick="return checkmail(this.form.myemail)" value="Submit" />
</form>

Demo

http://dl.dropbox.com/u/3293191/r-ednalan/email_validation.html

Create Css Search Box

Create Css Search Box


<style>
#searchwrapper {
width:310px; /*follow your image's size*/
height:40px;/*follow your image's size*/
background-image:url(searchbox.jpg);
background-repeat:no-repeat; /*important*/
padding:0px;
margin:0px;
position:relative; /*important*/
}
#searchwrapper form { display:inline ; }
.searchbox {
border:0px; /*important*/
background-color:transparent; /*important*/
position:absolute; /*important*/
top:4px;
left:9px;
width:256px;
height:28px;
}
.searchbox_submit {
border:0px; /*important*/
background-color:transparent; /*important*/
position:absolute; /*important*/
top:4px;
left:265px;
width:32px;
height:28px;
}
</style>
<div id="searchwrapper">
<form action="">
<input type="text" class="searchbox" name="s" value="" />
<input type="submit" class="searchbox_submit" value="" />
</form>
</div>

Related Post