article

Sunday, April 18, 2021

Live Editable Table using Jquery Ajax PHP and Mysqli

Live Editable Table using Jquery Ajax PHP and Mysqli

CREATE TABLE `users` (
  `id` int(11) NOT NULL,
  `username` varchar(255) NOT NULL,
  `name` varchar(255) NOT NULL
) ENGINE=MyISAM DEFAULT CHARSET=latin1;

INSERT INTO `users` (`id`, `username`, `name`) VALUES
(8, 'Batosai23', 'Batosai Ednalan'),
(9, 'caite', 'Caite Ednalan'),
(11, 'NarutoUzumaki', 'Naruto Uzumaki'),
(12, 'SasukeUchiha', 'Sasuke Uchiha');

ALTER TABLE `users`
  ADD PRIMARY KEY (`id`);

ALTER TABLE `users`
  MODIFY `id` int(11) NOT NULL AUTO_INCREMENT, AUTO_INCREMENT=21;


index.php
//index.php
<!doctype html>
<html>
<head>
<title>Live Editable Table using Jquery Ajax PHP and Mysqli</title>
<link rel="stylesheet" href="https://maxcdn.bootstrapcdn.com/bootstrap/3.3.6/css/bootstrap.min.css" />	
<script src="https://ajax.googleapis.com/ajax/libs/jquery/3.1.0/jquery.min.js"></script>
<script type='text/javascript'>
$(document).ready(function(){
 
 // Show Input element
 $('.edit').click(function(){
  $('.txtedit').hide();
  $(this).next('.txtedit').show().focus();
  $(this).hide();
 });

 // Save data
 $(".txtedit").focusout(function(){
  
  // Get edit id, field name and value
  var id = this.id;
  var split_id = id.split("_");
  var field_name = split_id[0];
  var edit_id = split_id[1];
  var value = $(this).val();
  
  // Hide Input element
  $(this).hide();

  // Hide and Change Text of the container with input elmeent
  $(this).prev('.edit').show();
  $(this).prev('.edit').text(value);

  $.ajax({
   url: 'update.php',
   type: 'post',
   data: { field:field_name, value:value, id:edit_id },
   success:function(response){
      if(response == 1){ 
         console.log('Save successfully'); 
      }else{ 
         console.log("Not saved.");  
      }
   }
  });
 
 });

});
</script>
</head>
<body >
<div class="container" >
    <div class="row" style="padding:50px;">
		<p><h1>Live Editable Table using Jquery Ajax PHP and Mysqli</h1></p>
		<table width='100%' border='0'>
		 <tr>
		  <th width='10%'>No</th>
		  <th width='40%'>Username</th>
		  <th width='40%'>Name</th>
		 </tr>
		 <?php 
		 include('dbcon.php');
		 $count = 1;
		 $query = $conn->query("SELECT * FROM users order by id");
		 while ($row = $query ->fetch_object()) {
		  $id = $row->id;
		  $username = $row->username;
		  $name = $row->name;
		 ?>
		 <tr>
		  <td><?php echo $count; ?></td>
		  <td> 
			<div class='edit' > <?php echo $username; ?></div> 
			<input type='text' class='txtedit' value='<?php echo $username; ?>' id='username_<?php echo $id; ?>' >
		  </td>
		  <td> 
		   <div class='edit' ><?php echo $name; ?> </div> 
		   <input type='text' class='txtedit' value='<?php echo $name; ?>' id='name_<?php echo $id; ?>' >
		  </td>
		 </tr>
		 <?php
		 $count ++;
		 }
		 ?> 
		</table>
   </div>
</div>
<style>
.edit{
 width: 100%;
 height: 25px;
}
.editMode{
 border: 1px solid black;
}
table {
 border:3px solid lavender;
 border-radius:3px;
}
table tr:nth-child(1){
 background-color:dodgerblue;
}
table tr:nth-child(1) th{
 color:white;
 padding:10px 0px;
 letter-spacing: 1px;
}
table td{
 padding:10px;
}
table tr:nth-child(even){
 background-color:lavender;
 color:black;
}
.txtedit{
 display: none;
 width: 99%;
 height: 30px;
}
</style>
</body>
</html>
update.php
//update.php
<?php
include('dbcon.php');
if(isset($_POST['field']) && isset($_POST['value']) && isset($_POST['id'])){
   $field = $_POST['field'];
   $value = $_POST['value'];
   $editid = $_POST['id'];

	$sql = "UPDATE users SET ".$field."='".$value."' WHERE id = $editid"; 
    $update = $conn->query($sql); 

   echo 1;
}else{
   echo 0;
}
exit;
?>
dbcon.php
//dbcon.php
<?php
$conn = new mysqli('localhost','root','','testingdb');
if ($conn->connect_error) {
    die('Error : ('. $conn->connect_errno .') '. $conn->connect_error);
}
?>

Saturday, April 17, 2021

Like Unlike using Python Flask Mysql and jQuery AJAX

Like Unlike using Python Flask Mysql and jQuery AJAX 

CREATE TABLE `posts` (
  `id` int(11) NOT NULL,
  `title` varchar(100) NOT NULL,
  `content` text NOT NULL,
  `link` varchar(255) NOT NULL,
  `timestamp` timestamp NOT NULL DEFAULT CURRENT_TIMESTAMP ON UPDATE CURRENT_TIMESTAMP
) ENGINE=InnoDB DEFAULT CHARSET=latin1;


INSERT INTO `posts` (`id`, `title`, `content`, `link`, `timestamp`) VALUES
(4, 'What is AngularJS', 'AngularJS is a JavaScript MVC framework  developed by Google that lets you build well structured, easily testable,  declarative and maintainable front-end applications which provides solutions to  standard infrastructure concerns.', 'link-5', '2021-03-20 16:00:00'),
(5, 'What is MongoDB', 'It is a quick tutorial on MongoDB and how you can install it on your Windows OS. We will also learn some basic commands in MongoDB for example, creating and dropping a Database, Creation of a collection and some more operations related to the collection.', 'link-6', '2021-03-21 16:00:00'),
(6, 'Python Flask Load content Dynamically in Bootstrap Modal with Jquery AJAX and Mysqldb', 'Python Flask Load content Dynamically in Bootstrap Modal with Jquery AJAX and Mysqldb', 'link-6', '2021-03-20 16:00:00'),
(7, 'AutoComplete Textbox with Image using jQuery Ajax PHP Mysql and JqueryUI', 'AutoComplete Textbox with Image using jQuery Ajax PHP Mysql and JqueryUI', 'link-7', '2021-03-14 16:00:00'),
(8, 'PHP Mysql Registration Form Validation using jqBootstrapValidation with Jquery Ajax', 'PHP Mysql Registration Form Validation using jqBootstrapValidation with Jquery Ajax', 'link-8', '2021-03-20 16:00:00'),
(9, 'Python Flask Registration Form Validation using jqBootstrapValidation with Jquery Ajax and Mysql', 'Python Flask Registration Form Validation using jqBootstrapValidation with Jquery Ajax and Mysql', 'link-9', '2021-03-19 16:00:00'),
(10, 'Displaying Popups data on mouse hover using Jquery Ajax and PHP Mysql database', 'Displaying Popups data on mouse hover using Jquery Ajax and PHP Mysql database', 'link-10', '2021-03-15 16:00:00'),
(11, 'Displaying Popups data on mouse hover using Jquery Ajax and Python Flask Mysql database', 'Displaying Popups data on mouse hover using Jquery Ajax and Python Flask Mysql database', 'link-11', '2021-03-14 16:00:00');


ALTER TABLE `posts`
  ADD PRIMARY KEY (`id`);

ALTER TABLE `posts`
  MODIFY `id` int(11) NOT NULL AUTO_INCREMENT, AUTO_INCREMENT=12;

CREATE TABLE `like_unlike` (
  `id` int(11) NOT NULL,
  `userid` int(11) NOT NULL,
  `postid` int(11) NOT NULL,
  `type` int(2) NOT NULL,
  `timestamp` timestamp NOT NULL DEFAULT CURRENT_TIMESTAMP ON UPDATE CURRENT_TIMESTAMP
) ENGINE=InnoDB DEFAULT CHARSET=latin1;

ALTER TABLE `like_unlike`
  ADD PRIMARY KEY (`id`);

ALTER TABLE `like_unlike`
  MODIFY `id` int(11) NOT NULL AUTO_INCREMENT, AUTO_INCREMENT=1;
app.py
 
#app.py
from flask import Flask, request, render_template, jsonify
from flaskext.mysql import MySQL #pip install flask-mysql
import pymysql
 
app = Flask(__name__)
   
mysql = MySQL()
  
app.config['MYSQL_DATABASE_USER'] = 'root'
app.config['MYSQL_DATABASE_PASSWORD'] = ''
app.config['MYSQL_DATABASE_DB'] = 'testingdb'
app.config['MYSQL_DATABASE_HOST'] = 'localhost'
mysql.init_app(app)
 
@app.route('/')
def home():
    try:
        conn = mysql.connect()
        cursor = conn.cursor(pymysql.cursors.DictCursor)
        cursor.execute("SELECT * from posts")
        postslist = cursor.fetchall()
        userid = 5
        postArray = []
        for row in postslist:
            postid = row['id']
            type = -1
            #print(postid)
            cursor.execute("SELECT count(*) as cntStatus,type FROM like_unlike WHERE userid=%s AND postid=%s", (userid, postid))
            rs1 = cursor.fetchone()
            count_status = rs1['cntStatus']
            #print(count_status)
            if count_status > 0:
                type = rs1['type']

            cursor.execute("SELECT COUNT(*) AS cntLikes FROM like_unlike WHERE type=1 and postid=%s", postid)
            rs2 = cursor.fetchone()
            total_likes = rs2['cntLikes']
            #print(total_likes)

            cursor.execute("SELECT COUNT(*) AS cntUnlikes FROM like_unlike WHERE type=0 and postid=%s", postid)
            rs3 = cursor.fetchone()
            total_unlikes = rs3['cntUnlikes']
            #print(total_unlikes)

            if type == 1:
                txtcolor = 'color: #ffa449;'  
            else:
                txtcolor = ''  

            if type == 0:
                txtcolor2 = 'color: #ffa449;'  
            else:
                txtcolor2 = ''

            postObj = {
                    'id': row['id'],
                    'title': row['title'],
                    'content': row['content'],
                    'total_likes': total_likes,
                    'total_unlikes': total_unlikes,
                    'txtcolor': txtcolor,
                    'txtcolor2': txtcolor2}
            postArray.append(postObj)
        return render_template('index.html',postall=postArray)
    except Exception as e:
        print(e)
    finally:
        cursor.close() 
        conn.close()

@app.route("/likeunlike",methods=["POST","GET"])
def likeunlike():
    try:
        conn = mysql.connect()
        cursor = conn.cursor(pymysql.cursors.DictCursor)
        if request.method == 'POST':
            userid = 7
            postid = request.form['postid'] 
            type = request.form['type']
            #print(postid)
            #print(type)
            cursor.execute("SELECT COUNT(*) AS cntpost FROM like_unlike WHERE postid=%s AND userid=%s", (postid, userid))
            rscount = cursor.fetchone()
            count = rscount['cntpost']
            #print(count)

            if count == 0:
                sql = "INSERT INTO like_unlike(userid,postid,type) VALUES(%s, %s, %s)"
                data = (userid, postid, type)
                conn = mysql.connect()
                cursor = conn.cursor()
                cursor.execute(sql, data)
                conn.commit()

                cur = conn.cursor(pymysql.cursors.DictCursor)
                cur.execute("SELECT COUNT(*) AS cntLike FROM like_unlike WHERE type=1 AND postid=%s",postid)
                rscounttotal = cur.fetchone()
                countlike = rscounttotal['cntLike']
                #print(countlike)

                cur = conn.cursor(pymysql.cursors.DictCursor)
                cur.execute("SELECT COUNT(*) AS cntUnlike FROM like_unlike WHERE type=0 AND postid=%s",postid)
                rscounttotalunlike = cur.fetchone()
                countUnlike = rscounttotalunlike['cntUnlike']
                #print(countUnlike)

                totallikeajax = countlike
                totalunlikeajax = countUnlike
            else:
                sql = "UPDATE like_unlike SET type=%s WHERE userid=%s AND postid=%s"
                data = (type, userid, postid)
                conn = mysql.connect()
                cursor = conn.cursor()
                cursor.execute(sql, data)
                conn.commit()

                cur = conn.cursor(pymysql.cursors.DictCursor)
                cur.execute("SELECT COUNT(*) AS cntLike FROM like_unlike WHERE type=1 AND postid=%s",postid)
                rscounttotal = cur.fetchone()
                countlike = rscounttotal['cntLike']
                #print(countlike)

                cur = conn.cursor(pymysql.cursors.DictCursor)
                cur.execute("SELECT COUNT(*) AS cntUnlike FROM like_unlike WHERE type=0 AND postid=%s",postid)
                rscounttotalunlike = cur.fetchone()
                countUnlike = rscounttotalunlike['cntUnlike']
                #print(countUnlike)
                
                totallikeajax = countlike
                totalunlikeajax = countUnlike
        return jsonify({"likes":totallikeajax,"unlikes":totalunlikeajax})
    except Exception as e:
        print(e)
    finally:
        cursor.close() 
        conn.close()

        
if __name__ == "__main__":
    app.run()
templates/index.html
//templates/index.html
<!doctype html>
<html>
<head>
<title>Like Unlike using Python Flask Mysql and jQuery AJAX</title>
<link rel="stylesheet" href="https://maxcdn.bootstrapcdn.com/bootstrap/3.3.6/css/bootstrap.min.css" />	
<script src="https://ajax.googleapis.com/ajax/libs/jquery/3.1.0/jquery.min.js"></script>
<script type='text/javascript'>
$(document).ready(function(){
    $(".like, .unlike").click(function(){
        var id = this.id;   
        var split_id = id.split("_");
        var text = split_id[0];
        var postid = split_id[1]; 
        var type = 0;
        if(text == "like"){
            type = 1;
        }else{
            type = 0;
        }
        $.ajax({
            url: '/likeunlike',
            type: 'post',
            data: {postid:postid,type:type},
            dataType: 'json',
            success: function(data){
                var likes = data['likes'];
                var unlikes = data['unlikes'];
                $("#likes_"+postid).text(likes);       
                $("#unlikes_"+postid).text(unlikes);   
                if(type == 1){
                    $("#like_"+postid).css("color","#ffa449");
                    $("#unlike_"+postid).css("color","lightseagreen");
                }
                if(type == 0){
                    $("#unlike_"+postid).css("color","#ffa449");
                    $("#like_"+postid).css("color","lightseagreen");
                }
            }
        });
    });
});
</script>
</head>
<body >
<div class="container" >
    <div class="row" style="padding:50px;">
		<p><h1>Like Unlike using Python Flask Mysql and jQuery AJAX</h1></p>
        <div class="content">
          {% for row in postall %}  
                    <div class="post">
                        <h1>{{row.title}}</h1>
                        <div class="post-text">
                          {{row.content}}
                        </div>
                        <div class="post-action">
                            <input type="button" value="Like" id="like_{{row.id}}" class="like" style="{{row.txtcolor}}" /> (<span id="likes_{{row.id}}">{{row.total_likes}}</span>) 
                            <input type="button" value="Unlike" id="unlike_{{row.id}}" class="unlike" style="{{row.txtcolor2}}"/> (<span id="unlikes_{{row.id}}">{{row.total_unlikes}}</span>)
                        </div>
                    </div>
            {% endfor %}   
        </div>
   </div>
</div>
<style>
.content{
    border: 0px solid black;
    border-radius: 3px;
    padding: 5px;
    margin: 0 auto;
    width: 70%;
}
.post{
    border-bottom: 1px solid black;
    padding: 10px;
    margin-top: 10px;
    margin-bottom: 10px;
}
.post:last-child{
    border: 0;
}
.post h1{
    font-weight: normal;
    font-size: 30px;
}
.post-text{
    letter-spacing: 1px;
    font-size: 15px;
    font-family: serif;
    color: gray;
    text-align: justify;
}
.post-action{
    margin-top: 15px;
    margin-bottom: 15px;
}
.like,.unlike{
    border: 0;
    background: none;
    letter-spacing: 1px;
    color: lightseagreen;
}
.like,.unlike:hover{
    cursor: pointer;
}
</style>
</body>
</html>

Like Unlike using PHP Mysqli and jQuery AJAX

Like Unlike using PHP Mysqli and jQuery AJAX

CREATE TABLE `posts` (
  `id` int(11) NOT NULL,
  `title` varchar(100) NOT NULL,
  `content` text NOT NULL,
  `link` varchar(255) NOT NULL,
  `timestamp` timestamp NOT NULL DEFAULT CURRENT_TIMESTAMP ON UPDATE CURRENT_TIMESTAMP
) ENGINE=InnoDB DEFAULT CHARSET=latin1;


INSERT INTO `posts` (`id`, `title`, `content`, `link`, `timestamp`) VALUES
(4, 'What is AngularJS', 'AngularJS is a JavaScript MVC framework  developed by Google that lets you build well structured, easily testable,  declarative and maintainable front-end applications which provides solutions to  standard infrastructure concerns.', 'link-5', '2021-03-20 16:00:00'),
(5, 'What is MongoDB', 'It is a quick tutorial on MongoDB and how you can install it on your Windows OS. We will also learn some basic commands in MongoDB for example, creating and dropping a Database, Creation of a collection and some more operations related to the collection.', 'link-6', '2021-03-21 16:00:00'),
(6, 'Python Flask Load content Dynamically in Bootstrap Modal with Jquery AJAX and Mysqldb', 'Python Flask Load content Dynamically in Bootstrap Modal with Jquery AJAX and Mysqldb', 'link-6', '2021-03-20 16:00:00'),
(7, 'AutoComplete Textbox with Image using jQuery Ajax PHP Mysql and JqueryUI', 'AutoComplete Textbox with Image using jQuery Ajax PHP Mysql and JqueryUI', 'link-7', '2021-03-14 16:00:00'),
(8, 'PHP Mysql Registration Form Validation using jqBootstrapValidation with Jquery Ajax', 'PHP Mysql Registration Form Validation using jqBootstrapValidation with Jquery Ajax', 'link-8', '2021-03-20 16:00:00'),
(9, 'Python Flask Registration Form Validation using jqBootstrapValidation with Jquery Ajax and Mysql', 'Python Flask Registration Form Validation using jqBootstrapValidation with Jquery Ajax and Mysql', 'link-9', '2021-03-19 16:00:00'),
(10, 'Displaying Popups data on mouse hover using Jquery Ajax and PHP Mysql database', 'Displaying Popups data on mouse hover using Jquery Ajax and PHP Mysql database', 'link-10', '2021-03-15 16:00:00'),
(11, 'Displaying Popups data on mouse hover using Jquery Ajax and Python Flask Mysql database', 'Displaying Popups data on mouse hover using Jquery Ajax and Python Flask Mysql database', 'link-11', '2021-03-14 16:00:00');


ALTER TABLE `posts`
  ADD PRIMARY KEY (`id`);

ALTER TABLE `posts`
  MODIFY `id` int(11) NOT NULL AUTO_INCREMENT, AUTO_INCREMENT=12;

CREATE TABLE `like_unlike` (
  `id` int(11) NOT NULL,
  `userid` int(11) NOT NULL,
  `postid` int(11) NOT NULL,
  `type` int(2) NOT NULL,
  `timestamp` timestamp NOT NULL DEFAULT CURRENT_TIMESTAMP ON UPDATE CURRENT_TIMESTAMP
) ENGINE=InnoDB DEFAULT CHARSET=latin1;

ALTER TABLE `like_unlike`
  ADD PRIMARY KEY (`id`);

ALTER TABLE `like_unlike`
  MODIFY `id` int(11) NOT NULL AUTO_INCREMENT, AUTO_INCREMENT=1;
index.php
//index.php
<!doctype html>
<html>
<head>
<title>Like Unlike using PHP Mysqli and jQuery AJAX</title>
<link rel="stylesheet" href="https://maxcdn.bootstrapcdn.com/bootstrap/3.3.6/css/bootstrap.min.css" />	
<script src="https://ajax.googleapis.com/ajax/libs/jquery/3.1.0/jquery.min.js"></script>
<script type='text/javascript'>
$(document).ready(function(){
    $(".like, .unlike").click(function(){
        var id = this.id;   
        var split_id = id.split("_");
        var text = split_id[0];
        var postid = split_id[1]; 
        var type = 0;
        if(text == "like"){
            type = 1;
        }else{
            type = 0;
        }
        $.ajax({
            url: 'likeunlike.php',
            type: 'post',
            data: {postid:postid,type:type},
            dataType: 'json',
            success: function(data){
                var likes = data['likes'];
                var unlikes = data['unlikes'];
                $("#likes_"+postid).text(likes);       
                $("#unlikes_"+postid).text(unlikes);   
                if(type == 1){
                    $("#like_"+postid).css("color","#ffa449");
                    $("#unlike_"+postid).css("color","lightseagreen");
                }
                if(type == 0){
                    $("#unlike_"+postid).css("color","#ffa449");
                    $("#like_"+postid).css("color","lightseagreen");
                }
            }
        });
    });
});
</script>
</head>
<body >
<div class="container" >
    <div class="row" style="padding:50px;">
		<p><h1>Like Unlike using PHP Mysqli and jQuery AJAX</h1></p>
        <div class="content">
            <?php
			include "dbcon.php";
                $userid = 5;
                $query = "SELECT * FROM posts";
                $result = mysqli_query($conn,$query);
                while($row = mysqli_fetch_array($result)){
                    $postid = $row['id'];
                    $title = $row['title'];
                    $conntent = $row['content'];
                    $type = -1;

                    $status_query = "SELECT count(*) as cntStatus,type FROM like_unlike WHERE userid=".$userid." and postid=".$postid;
                    $status_result = mysqli_query($conn,$status_query);
                    $status_row = mysqli_fetch_array($status_result);
                    $count_status = $status_row['cntStatus'];
                    if($count_status > 0){
                        $type = $status_row['type'];
                    }

                    $like_query = "SELECT COUNT(*) AS cntLikes FROM like_unlike WHERE type=1 and postid=".$postid;
                    $like_result = mysqli_query($conn,$like_query);
                    $like_row = mysqli_fetch_array($like_result);
                    $total_likes = $like_row['cntLikes'];

                    $unlike_query = "SELECT COUNT(*) AS cntUnlikes FROM like_unlike WHERE type=0 and postid=".$postid;
                    $unlike_result = mysqli_query($conn,$unlike_query);
                    $unlike_row = mysqli_fetch_array($unlike_result);
                    $total_unlikes = $unlike_row['cntUnlikes'];

            ?>
                    <div class="post">
                        <h1><?php echo $title; ?></h1>
                        <div class="post-text">
                            <?php echo $conntent; ?>
                        </div>
                        <div class="post-action">
                            <input type="button" value="Like" id="like_<?php echo $postid; ?>" class="like" style="<?php if($type == 1){ echo "color: #ffa449;"; } ?>" /> (<span id="likes_<?php echo $postid; ?>"><?php echo $total_likes; ?></span>) 
                            <input type="button" value="Unlike" id="unlike_<?php echo $postid; ?>" class="unlike" style="<?php if($type == 0){ echo "color: #ffa449;"; } ?>" /> (<span id="unlikes_<?php echo $postid; ?>"><?php echo $total_unlikes; ?></span>)
                        </div>
                    </div>
            <?php
                }
            ?>
        </div>
   </div>
</div>
<style>
.content{
    border: 0px solid black;
    border-radius: 3px;
    padding: 5px;
    margin: 0 auto;
    width: 70%;
}
.post{
    border-bottom: 1px solid black;
    padding: 10px;
    margin-top: 10px;
    margin-bottom: 10px;
}
.post:last-child{
    border: 0;
}
.post h1{
    font-weight: normal;
    font-size: 30px;
}
.post-text{
    letter-spacing: 1px;
    font-size: 15px;
    font-family: serif;
    color: gray;
    text-align: justify;
}
.post-action{
    margin-top: 15px;
    margin-bottom: 15px;
}
.like,.unlike{
    border: 0;
    background: none;
    letter-spacing: 1px;
    color: lightseagreen;
}
.like,.unlike:hover{
    cursor: pointer;
}
</style>
</body>
</html>
likeunlike.php
//likeunlike.php
<?php
include "dbcon.php";
$userid = 7;
$postid = $_POST['postid'];
$type = $_POST['type'];

$query = "SELECT COUNT(*) AS cntpost FROM like_unlike WHERE postid=".$postid." and userid=".$userid;

$result = mysqli_query($conn,$query);
$fetchdata = mysqli_fetch_array($result);
$count = $fetchdata['cntpost'];

if($count == 0){
    $insertquery = "INSERT INTO like_unlike(userid,postid,type) values(".$userid.",".$postid.",".$type.")";
    mysqli_query($conn,$insertquery);
}else {
    $updatequery = "UPDATE like_unlike SET type=" . $type . " where userid=" . $userid . " and postid=" . $postid;
    mysqli_query($conn,$updatequery);
}

$query = "SELECT COUNT(*) AS cntLike FROM like_unlike WHERE type=1 and postid=".$postid;
$result = mysqli_query($conn,$query);
$fetchlikes = mysqli_fetch_array($result);
$totalLikes = $fetchlikes['cntLike'];

$query = "SELECT COUNT(*) AS cntUnlike FROM like_unlike WHERE type=0 and postid=".$postid;
$result = mysqli_query($conn,$query);
$fetchunlikes = mysqli_fetch_array($result);
$totalUnlikes = $fetchunlikes['cntUnlike'];

$return_arr = array("likes"=>$totalLikes,"unlikes"=>$totalUnlikes);

echo json_encode($return_arr);
?>
dbcon.php
//dbcon.php
<?php
$conn = new mysqli('localhost','root','','testingdb');
if ($conn->connect_error) {
    die('Error : ('. $conn->connect_errno .') '. $conn->connect_error);
}
?>

Tuesday, April 13, 2021

How to use jQuery UI slider to filter records using Jquery Ajax and Python Flask Mysql

How to use jQuery UI slider to filter records using Jquery Ajax and Python Flask Mysql

In this tutorial list records from the MySQL database table and filter the list on salary basis using the slider widget.

jQuery UI slider. https://jqueryui.com/slider/


CREATE TABLE `employee` (
  `id` int(11) NOT NULL,
  `name` varchar(100) NOT NULL,
  `position` varchar(100) NOT NULL,
  `office` varchar(100) NOT NULL,
  `age` int(11) NOT NULL,
  `salary` int(11) NOT NULL,
  `photo` varchar(150) NOT NULL
) ENGINE=InnoDB DEFAULT CHARSET=latin1;

INSERT INTO `employee` (`id`, `name`, `position`, `office`, `age`, `salary`, `photo`) VALUES
(1, 'Tiger Wood', 'Accountant', 'Tokyo', 36, 5689, '01.jpg'),
(2, 'Mark Oto Ednalan', 'Chief Executive Officer (CEO)', 'London', 56, 5648, '02.jpg'),
(3, 'Jacob thompson', 'Junior Technical Author', 'San Francisco', 23, 5689, '03.jpg'),
(4, 'cylde Ednalan', 'Software Engineer', 'Olongapo', 23, 54654, '04.jpg'),
(5, 'Angelica Ramos', 'Software Engineer', 'San Francisco', 26, 5465, '05.jpg'),
(6, 'Airi Satou', 'Integration Specialist', 'New York', 53, 56465, '06.jpg'),
(8, 'Tiger Nixon', 'Software Engineer', 'London', 45, 456, '07.jpg'),
(9, 'Airi Satou', 'Pre-Sales Support', 'New York', 25, 4568, '08.jpg'),
(10, 'Angelica Ramos', 'Sales Assistant', 'New York', 45, 456, '09.jpg'),
(11, 'Ashton updated', 'Senior Javascript Developer', 'Olongapo', 45, 54565, '01.jpg'),
(12, 'Bradley Greer', 'Regional Director', 'San Francisco', 27, 5485, '02.jpg'),
(13, 'Brenden Wagner', 'Javascript Developer', 'San Francisco', 38, 65468, '03.jpg'),
(14, 'Brielle Williamson', 'Personnel Lead', 'Olongapo', 56, 354685, '04.jpg'),
(15, 'Bruno Nash', 'Customer Support', 'New York', 36, 65465, '05.jpg'),
(16, 'cairocoders', 'Sales Assistant', 'Sydney', 45, 56465, '06.jpg'),
(17, 'Zorita Serrano', 'Support Engineer', 'San Francisco', 38, 6548, '07.jpg'),
(18, 'Zenaida Frank', 'Chief Operating Officer (COO)', 'San Francisco', 39, 545, '08.jpg');

ALTER TABLE `employee`
  ADD PRIMARY KEY (`id`);

ALTER TABLE `employee`
  MODIFY `id` int(11) NOT NULL AUTO_INCREMENT, AUTO_INCREMENT=19;
app.py
 
#app.py
from flask import Flask, request, render_template, jsonify
from flaskext.mysql import MySQL #pip install flask-mysql
import pymysql
 
app = Flask(__name__)
   
mysql = MySQL()
  
app.config['MYSQL_DATABASE_USER'] = 'root'
app.config['MYSQL_DATABASE_PASSWORD'] = ''
app.config['MYSQL_DATABASE_DB'] = 'testingdb'
app.config['MYSQL_DATABASE_HOST'] = 'localhost'
mysql.init_app(app)
 
@app.route('/')
def home():
    try:
        conn = mysql.connect()
        cursor = conn.cursor(pymysql.cursors.DictCursor)
        cursor.execute("SELECT * from employee order by name asc")
        employeelist = cursor.fetchall()
        return render_template('index.html',employeelist=employeelist)
    except Exception as e:
        print(e)
    finally:
        cursor.close() 
        conn.close()

@app.route("/fetchdeta",methods=["POST","GET"])
def fetchdeta():
    try:
        conn = mysql.connect()
        cursor = conn.cursor(pymysql.cursors.DictCursor)
        if request.method == 'POST':
            min = request.form['min']
            max = request.form['max']
            cursor.execute("SELECT * from employee WHERE salary>=(%s) AND salary<=(%s)", [min,max])
            employeelist = cursor.fetchall()
            return jsonify({'htmlresponse': render_template('response.html',employeelist=employeelist)})
    except Exception as e:
        print(e)
    finally:
        cursor.close() 
        conn.close()

if __name__ == "__main__":
    app.run()
templates/index.html
//templates/index.html
<!doctype html>
<html>
<head>
<title>How to use jQuery UI slider to filter records using Jquery Ajax and Python Flask Mysql</title>
<link rel="stylesheet" href="https://code.jquery.com/ui/1.12.1/themes/base/jquery-ui.css">
<script src="https://code.jquery.com/jquery-1.12.4.js"></script>
<script src="https://code.jquery.com/ui/1.12.1/jquery-ui.js"></script>
<script type='text/javascript'>
        $(document).ready(function(){

            // Initializing slider
            $( "#slider" ).slider({
                range: true,
                min: 100,
                max: 360000,
                values: [ 100, 360000 ],
                slide: function( event, ui ) {
                    // Get values
                    var min = ui.values[0];
                    var max = ui.values[1];
                    $('#range').text(min+' - ' + max);

                    // AJAX request
                    $.ajax({
                        url: '/fetchdeta',
                        type: 'post',
                        data: {min:min,max:max},
                        success: function(response){

                            // Updating table data
                            $('#emp_table tr:not(:first)').remove();
                            $('#emp_table').append(response.htmlresponse);    
                        }      
                    });
                }
            });
        });
        </script>
    </head>
    <body >
        <div class="container" >
        <div class="row" style="padding:50px;">
			<p><h1>How to use jQuery UI slider to filter records using Jquery Ajax and Python Flask Mysql</h1></p>
            <!-- slider --> 
            <div id="slider"></div><br/>
            Range: <span id='range'></span>

            <table id='emp_table' class="alternate" width='100%'>
                <tr>
                    <th>Name</th>
                    <th>Position</th>
                    <th>Office</th>
                    <th>Salary</th>
                    </tr>
                    {% for row in employeelist %}  
                    <tr>
                      <td>{{row.name}}</td>
                      <td>{{row.position}}</td>
                      <td>{{row.office}}</td>
                      <td>{{row.salary}}</td>
                    </tr>
                    {% endfor %} 
            </table>
        </div>
        </div>
<style>
.alternate tr:nth-child(2n) {
  background-color: silver;
}
.alternate tr {
  background-color: white;
}
.alternate tr td {padding: 8px;}
.alternate tr:nth-child(2n):hover, .alternate tr:hover {
  background-color: grey;
}
</style>  
</body>
</html>
templates/response.html
//templates/response.html
{% for row in employeelist %}
<tr>
    <td>{{row.name}}</td>
    <td>{{row.position}}</td>
    <td>{{row.office}}</td>
    <td>{{row.salary}}</td>
</tr>
{% endfor %} 

Monday, April 12, 2021

How to use jQuery UI slider to filter records using Jquery Ajax and PHP mysql

How to use jQuery UI slider to filter records using Jquery Ajax and PHP mysql

In this tutorial list records from the MySQL database table and filter the list on salary basis using the slider widget.

jQuery UI slider. https://jqueryui.com/slider/


CREATE TABLE `employee` (
  `id` int(11) NOT NULL,
  `name` varchar(100) NOT NULL,
  `position` varchar(100) NOT NULL,
  `office` varchar(100) NOT NULL,
  `age` int(11) NOT NULL,
  `salary` int(11) NOT NULL,
  `photo` varchar(150) NOT NULL
) ENGINE=InnoDB DEFAULT CHARSET=latin1;

INSERT INTO `employee` (`id`, `name`, `position`, `office`, `age`, `salary`, `photo`) VALUES
(1, 'Tiger Wood', 'Accountant', 'Tokyo', 36, 5689, '01.jpg'),
(2, 'Mark Oto Ednalan', 'Chief Executive Officer (CEO)', 'London', 56, 5648, '02.jpg'),
(3, 'Jacob thompson', 'Junior Technical Author', 'San Francisco', 23, 5689, '03.jpg'),
(4, 'cylde Ednalan', 'Software Engineer', 'Olongapo', 23, 54654, '04.jpg'),
(5, 'Angelica Ramos', 'Software Engineer', 'San Francisco', 26, 5465, '05.jpg'),
(6, 'Airi Satou', 'Integration Specialist', 'New York', 53, 56465, '06.jpg'),
(8, 'Tiger Nixon', 'Software Engineer', 'London', 45, 456, '07.jpg'),
(9, 'Airi Satou', 'Pre-Sales Support', 'New York', 25, 4568, '08.jpg'),
(10, 'Angelica Ramos', 'Sales Assistant', 'New York', 45, 456, '09.jpg'),
(11, 'Ashton updated', 'Senior Javascript Developer', 'Olongapo', 45, 54565, '01.jpg'),
(12, 'Bradley Greer', 'Regional Director', 'San Francisco', 27, 5485, '02.jpg'),
(13, 'Brenden Wagner', 'Javascript Developer', 'San Francisco', 38, 65468, '03.jpg'),
(14, 'Brielle Williamson', 'Personnel Lead', 'Olongapo', 56, 354685, '04.jpg'),
(15, 'Bruno Nash', 'Customer Support', 'New York', 36, 65465, '05.jpg'),
(16, 'cairocoders', 'Sales Assistant', 'Sydney', 45, 56465, '06.jpg'),
(17, 'Zorita Serrano', 'Support Engineer', 'San Francisco', 38, 6548, '07.jpg'),
(18, 'Zenaida Frank', 'Chief Operating Officer (COO)', 'San Francisco', 39, 545, '08.jpg');

ALTER TABLE `employee`
  ADD PRIMARY KEY (`id`);

ALTER TABLE `employee`
  MODIFY `id` int(11) NOT NULL AUTO_INCREMENT, AUTO_INCREMENT=19;

index.php
//templates/index.php
<!doctype html>
<html>
<head>
<title>How to use jQuery UI slider to filter records using Jquery Ajax and PHP mysql</title>
<link rel="stylesheet" href="https://maxcdn.bootstrapcdn.com/bootstrap/3.3.6/css/bootstrap.min.css" />	
<link rel="stylesheet" href="https://code.jquery.com/ui/1.12.1/themes/base/jquery-ui.css">
<script src="https://code.jquery.com/jquery-1.12.4.js"></script>
<script src="https://code.jquery.com/ui/1.12.1/jquery-ui.js"></script>
<script type='text/javascript'>
        $(document).ready(function(){

            // Initializing slider
            $( "#slider" ).slider({
                range: true,
                min: 100,
                max: 360000,
                values: [ 100, 360000 ],
                slide: function( event, ui ) {

                    // Get values
                    var min = ui.values[0];
                    var max = ui.values[1];
                    $('#range').text(min+' - ' + max);
                    
                    // AJAX request
                    $.ajax({
                        url: 'getData.php',
                        type: 'post',
                        data: {min:min,max:max},
                        success: function(response){

                            // Updating table data
                            $('#emp_table tr:not(:first)').remove();
                            $('#emp_table').append(response);    
                        }      
                    });
                }
            });
        });
        </script>
    </head>
    <body >
        <div class="container" >
        <div class="row" style="padding:50px;">
			<p><h1>How to use jQuery UI slider to filter records using Jquery Ajax and PHP mysql</h1></p>
            <!-- slider --> 
            <div id="slider"></div><br/>
            Range: <span id='range'></span>

            <table id='emp_table' class="table table-hover" width='100%'>
                <tr>
                    <th>Name</th>
                    <th>Position</th>
                    <th>Office</th>
                    <th>Salary</th>
                </tr>
                <?php 
				include "dbcon.php";
				$query = $conn->query("select * from employee order by name asc");
				while ($row = $query ->fetch_object()) {
                    $fullname = $row->name; 
                    $position = $row->position;
                    $office = $row->office; 
                    $salary = $row->salary; 
					$salaryformat = number_format($salary);
                ?>
                    <tr>
                        <td><?php echo $fullname; ?></td>
                        <td><?php echo $position; ?></td>
                        <td><?php echo $office; ?></td>
                        <td>$ <?php echo $salaryformat; ?></td>
                    </tr>
                <?php    
                }
                ?>
            </table>
        </div>
        </div>
    </body>
</html>
templates/getData.php
//templates/getData.php
<?php
include('dbcon.php');
$min = $_POST['min']; 
$max = $_POST['max']; 
$query = $conn->query("select * from employee where salary>=$min and salary<=$max");
$html = '';
while ($row = $query ->fetch_object()) {
    $fullname =  $row->name;
    $position = $row->position;
    $office = $row->office; 
    $salary = $row->salary;
	$salaryformat = number_format($salary);
    $html .='<tr>';
    $html .='<td>'.$fullname.'</td>';
    $html .='<td>'.$position.'</td>';
    $html .='<td>'.$office.'</td>';
    $html .='<td>$ '.$salaryformat.'</td>';
    $html .='</tr>';
}

echo $html;
templates/dbcon.php
//templates/dbcon.php
<?php
$conn = new mysqli('localhost','root','','testingdb');
if ($conn->connect_error) {
    die('Error : ('. $conn->connect_errno .') '. $conn->connect_error);
}
?>

Saturday, April 10, 2021

Python Flask Mysql Display Loading Image when AJAX call is in Progress

Python Flask Mysql Display Loading Image when AJAX call is in Progress

In the demonstration, I am displaying a loading image when sending an AJAX request.

beforeSend and complete

1. beforeSend
This executes before AJAX request is called.
Syntax –
$.ajax({
 beforeSend: function(){
  // Statement
 }
});

2. complete
This executes when AJAX request is finished whether it successfully callback or not.
Syntax –
$.ajax({
 complete: function(){
  // Statement
 }
});


CREATE TABLE `posts` (
  `id` int(11) NOT NULL,
  `title` varchar(100) NOT NULL,
  `content` text NOT NULL,
  `link` varchar(255) NOT NULL,
  `timestamp` timestamp NOT NULL DEFAULT CURRENT_TIMESTAMP ON UPDATE CURRENT_TIMESTAMP
) ENGINE=InnoDB DEFAULT CHARSET=latin1;

INSERT INTO `posts` (`id`, `title`, `content`, `link`, `timestamp`) VALUES
(1, 'Yes, except the Dave Matthews Band doesn\'t rock.', 'The alien mothership is in orbit here. If we can hit that bullseye, the rest of the dominoes will fall like a house of cards. Checkmate. If rubbin\' frozen dirt in your crotch is wrong, hey I don\'t wanna be right.', 'link-1', '2021-03-21 05:41:54'),
(2, 'Saving the world with meals on wheels.', 'You know how I sometimes have really brilliant ideas? Heh-haa! Super squeaky bum time! I\'m the Doctor. Well, they call me the Doctor. I don\'t know why. I call me the Doctor too. I still don\'t know why.', 'link-2', '2021-03-21 05:42:02'),
(3, 'Tell him time is of the essence.', 'This man is a knight in shining armor. Watching ice melt. This is fun. Tell him time is of the essence. This man is a knight in shining armor. You look perfect. He taught me a code. To survive.', 'link-3', '2021-03-21 05:42:08'),
(4, 'What is AngularJS', 'AngularJS is a JavaScript MVC framework  developed by Google that lets you build well structured, easily testable,  declarative and maintainable front-end applications which provides solutions to  standard infrastructure concerns.', 'link-5', '2021-03-20 16:00:00'),
(5, 'What is MongoDB', 'It is a quick tutorial on MongoDB and how you can install it on your Windows OS. We will also learn some basic commands in MongoDB for example, creating and dropping a Database, Creation of a collection and some more operations related to the collection.', 'link-6', '2021-03-21 16:00:00'),
(6, 'Python Flask Load content Dynamically in Bootstrap Modal with Jquery AJAX and Mysqldb', 'Python Flask Load content Dynamically in Bootstrap Modal with Jquery AJAX and Mysqldb', 'link-6', '2021-03-20 16:00:00'),
(7, 'AutoComplete Textbox with Image using jQuery Ajax PHP Mysql and JqueryUI', 'AutoComplete Textbox with Image using jQuery Ajax PHP Mysql and JqueryUI', 'link-7', '2021-03-14 16:00:00'),
(8, 'PHP Mysql Registration Form Validation using jqBootstrapValidation with Jquery Ajax', 'PHP Mysql Registration Form Validation using jqBootstrapValidation with Jquery Ajax', 'link-8', '2021-03-20 16:00:00'),
(9, 'Python Flask Registration Form Validation using jqBootstrapValidation with Jquery Ajax and Mysql', 'Python Flask Registration Form Validation using jqBootstrapValidation with Jquery Ajax and Mysql', 'link-9', '2021-03-19 16:00:00'),
(10, 'Displaying Popups data on mouse hover using Jquery Ajax and PHP Mysql database', 'Displaying Popups data on mouse hover using Jquery Ajax and PHP Mysql database', 'link-10', '2021-03-15 16:00:00'),
(11, 'Displaying Popups data on mouse hover using Jquery Ajax and Python Flask Mysql database', 'Displaying Popups data on mouse hover using Jquery Ajax and Python Flask Mysql database', 'link-11', '2021-03-14 16:00:00');

ALTER TABLE `posts`
  ADD PRIMARY KEY (`id`);

ALTER TABLE `posts`
  MODIFY `id` int(11) NOT NULL AUTO_INCREMENT, AUTO_INCREMENT=12;
app.py
 
#app.py
from flask import Flask, request, render_template, jsonify
from flask_mysqldb import MySQL,MySQLdb #pip install flask-mysqldb https://github.com/alexferl/flask-mysqldb
 
app = Flask(__name__)
         
app.secret_key = "caircocoders-ednalan"
         
app.config['MYSQL_HOST'] = 'localhost'
app.config['MYSQL_USER'] = 'root'
app.config['MYSQL_PASSWORD'] = ''
app.config['MYSQL_DB'] = 'testingdb'
app.config['MYSQL_CURSORCLASS'] = 'DictCursor'
mysql = MySQL(app) 

@app.route('/')
def home():
	return render_template('index.html')

@app.route("/fetchdeta",methods=["POST","GET"])
def fetchdeta():
    cur = mysql.connection.cursor(MySQLdb.cursors.DictCursor)
    if request.method == 'POST':
        search = request.form['search']
        print(search)
        query = "SELECT * from posts WHERE title LIKE '{}%' LIMIT 10".format(search)
        cur.execute(query)
        postslist = cur.fetchall() 
        cur.close()
    return jsonify({'htmlresponse': render_template('response.html',postslist=postslist)})
			
if __name__ == "__main__":
    app.run()
templates/index.html
//templates/index.html
<html>
 <head>
  <title>Python Flask Mysql Display Loading Image when AJAX call is in Progress</title>
<link rel="stylesheet" href="https://maxcdn.bootstrapcdn.com/bootstrap/3.3.6/css/bootstrap.min.css" />		
<script src="https://ajax.googleapis.com/ajax/libs/jquery/3.1.0/jquery.min.js"></script>
 </head>
 <body>
  <div class="container">
  <div class="row">
   <h3 align="center">Python Flask Mysql Display Loading Image when AJAX call is in Progress</h3>
    Search : 
	<input type='text' id='search' class="form-control" style="width:40%;"><br/>
	<input type='button' id='but_search' value='Search' class="btn btn-default"><br/>
	<!-- Image loader -->
	<div id='loader' style='display: none;'>
	  <img src='/static/img/loader.gif'> <b>Loading..</b>
	</div>
	<br/>
	<!-- Image loader -->
	<div class='response'></div>
   </div>
  </div>
<script type='text/javascript'>

$(document).ready(function(){
 
 $("#but_search").click(function(){
  var search = $('#search').val();

  $.ajax({
   url: '/fetchdeta',
   type: 'post',
   data: {search:search},
   beforeSend: function(){
    // Show image container
    $("#loader").show();
   },
   success: function(response){
    $('.response').empty();
    $('.response').append(response.htmlresponse);
   },
   complete:function(data){
    // Hide image container
    $("#loader").hide();
   }
  });
 
 });
});
</script>
<style>
.post{
    width: 97%;
    min-height: 200px;
    padding: 5px;
    border: 1px solid gray;
    margin-bottom: 15px;
}
.post h1{
    letter-spacing: 1px;
    font-weight: normal;
    font-family: sans-serif;
}
.post p{
    letter-spacing: 1px;
    text-overflow: ellipsis;
    line-height: 25px;
}
</style>
 </body>
</html>
templates/response.html
//templates/response.html
{% for row in postslist %}
<div class="post" id="post_{{row.id}}">
<h1>{{row.title}}</h1>
<p>{{row.content}}</p>
<a href="{{row.link}}" class="more" target="_blank">More</a>
</div>
{% endfor %} 

Friday, April 9, 2021

PHP mysql Display Loading Image when AJAX call is in Progress

PHP mysql Display Loading Image when AJAX call is in Progress

In the demonstration, I am displaying a loading image when sending an AJAX request.

beforeSend and complete

1. beforeSend
This executes before AJAX request is called.
Syntax –
$.ajax({
 beforeSend: function(){
  // Statement
 }
});

2. complete
This executes when AJAX request is finished whether it successfully callback or not.
Syntax –
$.ajax({
 complete: function(){
  // Statement
 }
});


CREATE TABLE `posts` (
  `id` int(11) NOT NULL,
  `title` varchar(100) NOT NULL,
  `content` text NOT NULL,
  `link` varchar(255) NOT NULL,
  `timestamp` timestamp NOT NULL DEFAULT CURRENT_TIMESTAMP ON UPDATE CURRENT_TIMESTAMP
) ENGINE=InnoDB DEFAULT CHARSET=latin1;

INSERT INTO `posts` (`id`, `title`, `content`, `link`, `timestamp`) VALUES
(1, 'Yes, except the Dave Matthews Band doesn\'t rock.', 'The alien mothership is in orbit here. If we can hit that bullseye, the rest of the dominoes will fall like a house of cards. Checkmate. If rubbin\' frozen dirt in your crotch is wrong, hey I don\'t wanna be right.', 'link-1', '2021-03-21 05:41:54'),
(2, 'Saving the world with meals on wheels.', 'You know how I sometimes have really brilliant ideas? Heh-haa! Super squeaky bum time! I\'m the Doctor. Well, they call me the Doctor. I don\'t know why. I call me the Doctor too. I still don\'t know why.', 'link-2', '2021-03-21 05:42:02'),
(3, 'Tell him time is of the essence.', 'This man is a knight in shining armor. Watching ice melt. This is fun. Tell him time is of the essence. This man is a knight in shining armor. You look perfect. He taught me a code. To survive.', 'link-3', '2021-03-21 05:42:08'),
(4, 'What is AngularJS', 'AngularJS is a JavaScript MVC framework  developed by Google that lets you build well structured, easily testable,  declarative and maintainable front-end applications which provides solutions to  standard infrastructure concerns.', 'link-5', '2021-03-20 16:00:00'),
(5, 'What is MongoDB', 'It is a quick tutorial on MongoDB and how you can install it on your Windows OS. We will also learn some basic commands in MongoDB for example, creating and dropping a Database, Creation of a collection and some more operations related to the collection.', 'link-6', '2021-03-21 16:00:00'),
(6, 'Python Flask Load content Dynamically in Bootstrap Modal with Jquery AJAX and Mysqldb', 'Python Flask Load content Dynamically in Bootstrap Modal with Jquery AJAX and Mysqldb', 'link-6', '2021-03-20 16:00:00'),
(7, 'AutoComplete Textbox with Image using jQuery Ajax PHP Mysql and JqueryUI', 'AutoComplete Textbox with Image using jQuery Ajax PHP Mysql and JqueryUI', 'link-7', '2021-03-14 16:00:00'),
(8, 'PHP Mysql Registration Form Validation using jqBootstrapValidation with Jquery Ajax', 'PHP Mysql Registration Form Validation using jqBootstrapValidation with Jquery Ajax', 'link-8', '2021-03-20 16:00:00'),
(9, 'Python Flask Registration Form Validation using jqBootstrapValidation with Jquery Ajax and Mysql', 'Python Flask Registration Form Validation using jqBootstrapValidation with Jquery Ajax and Mysql', 'link-9', '2021-03-19 16:00:00'),
(10, 'Displaying Popups data on mouse hover using Jquery Ajax and PHP Mysql database', 'Displaying Popups data on mouse hover using Jquery Ajax and PHP Mysql database', 'link-10', '2021-03-15 16:00:00'),
(11, 'Displaying Popups data on mouse hover using Jquery Ajax and Python Flask Mysql database', 'Displaying Popups data on mouse hover using Jquery Ajax and Python Flask Mysql database', 'link-11', '2021-03-14 16:00:00');

ALTER TABLE `posts`
  ADD PRIMARY KEY (`id`);

ALTER TABLE `posts`
  MODIFY `id` int(11) NOT NULL AUTO_INCREMENT, AUTO_INCREMENT=12;

index.php
//index.php
<html>
 <head>
  <title>PHP mysql Display Loading Image when AJAX call is in Progress</title>
<link rel="stylesheet" href="https://maxcdn.bootstrapcdn.com/bootstrap/3.3.6/css/bootstrap.min.css" />		
<script src="https://ajax.googleapis.com/ajax/libs/jquery/3.1.0/jquery.min.js"></script>
 </head>
 <body>
  <div class="container">
  <div class="row">
   <h3 align="center">PHP mysql Display Loading Image when AJAX call is in Progress</h3>
    Search : 
	<input type='text' id='search' class="form-control" style="width:40%;"><br/>
	<input type='button' id='but_search' value='Search' class="btn btn-default"><br/>
	<!-- Image loader -->
	<div id='loader' style='display: none;'>
	  <img src='img/loader.gif'> <b>Loading..</b>
	</div>
	<br/>
	<!-- Image loader -->
	<div class='response'></div>
   </div>
  </div>
<script type='text/javascript'>

$(document).ready(function(){
 
 $("#but_search").click(function(){
  var search = $('#search').val();

  $.ajax({
   url: 'fetch_deta.php',
   type: 'post',
   data: {search:search},
   beforeSend: function(){
    // Show image container
    $("#loader").show();
   },
   success: function(response){
    $('.response').empty();
    $('.response').append(response);
   },
   complete:function(data){
    // Hide image container
    $("#loader").hide();
   }
  });
 
 });
});
</script>
<style>
.post{
    width: 97%;
    min-height: 200px;
    padding: 5px;
    border: 1px solid gray;
    margin-bottom: 15px;
}
.post h1{
    letter-spacing: 1px;
    font-weight: normal;
    font-family: sans-serif;
}
.post p{
    letter-spacing: 1px;
    text-overflow: ellipsis;
    line-height: 25px;
}
</style>
 </body>
</html>
fetch_deta.php
//fetch_deta.php
<?php
sleep(5); // sleep for 5 seconds
include 'config.php';
$search = $_POST['search'];
$query = "SELECT * FROM posts WHERE title LIKE '%".$search."%' ORDER BY title ASC";
$result = mysqli_query($con,$query);
$html = '';
while($row = mysqli_fetch_array($result)){
    $id = $row['id'];
    $title = $row['title'];
    $content = $row['content'];
    $shortcontent = substr($content, 0, 160)."...";
    $link = $row['link'];
 
    $html .= '<div id="post_'.$id.'" class="post">';
    $html .= '<h1>'.$title.'</h1>';
    $html .= '<p>'.$shortcontent.'</p>';
    $html .= '<a href="'.$link.'" class="more" target="_blank">More</a>';
    $html .= '</div>';
}
echo $html;
?>

Python Flask Upload and display image

Python Flask Upload and display image
app.py
#app.py
from flask import Flask, flash, request, redirect, url_for, render_template
import urllib.request
import os
from werkzeug.utils import secure_filename

app = Flask(__name__)

UPLOAD_FOLDER = 'static/uploads/'

app.secret_key = "secret key"
app.config['UPLOAD_FOLDER'] = UPLOAD_FOLDER
app.config['MAX_CONTENT_LENGTH'] = 16 * 1024 * 1024

ALLOWED_EXTENSIONS = set(['png', 'jpg', 'jpeg', 'gif'])

def allowed_file(filename):
	return '.' in filename and filename.rsplit('.', 1)[1].lower() in ALLOWED_EXTENSIONS
	

@app.route('/')
def home():
	return render_template('index.html')

@app.route('/', methods=['POST'])
def upload_image():
	if 'file' not in request.files:
		flash('No file part')
		return redirect(request.url)
	file = request.files['file']
	if file.filename == '':
		flash('No image selected for uploading')
		return redirect(request.url)
	if file and allowed_file(file.filename):
		filename = secure_filename(file.filename)
		file.save(os.path.join(app.config['UPLOAD_FOLDER'], filename))
		#print('upload_image filename: ' + filename)
		flash('Image successfully uploaded and displayed below')
		return render_template('index.html', filename=filename)
	else:
		flash('Allowed image types are - png, jpg, jpeg, gif')
		return redirect(request.url)

@app.route('/display/<filename>')
def display_image(filename):
	#print('display_image filename: ' + filename)
	return redirect(url_for('static', filename='uploads/' + filename), code=301)

if __name__ == "__main__":
    app.run()
templates/index.html
//templates/index.html
<html>
<head>
<title>Python Flask Upload and display image</title>
<link rel="stylesheet" href="https://maxcdn.bootstrapcdn.com/bootstrap/3.3.6/css/bootstrap.min.css" />		
<script src="https://ajax.googleapis.com/ajax/libs/jquery/3.1.0/jquery.min.js"></script>
</head>
<body>
<p><h1 align="center">Python Flask Upload and display image</h1></p>
<div class="container">
<div class="row">
    <h2>Select a file to upload</h2>
    <p>
        {% with messages = get_flashed_messages() %}
          {% if messages %}
            <ul>
            {% for message in messages %}
              <li>{{ message }}</li>
            {% endfor %}
            </ul>
          {% endif %}
        {% endwith %}
    </p>
    {% if filename %}
        <div>
            <img src="{{ url_for('display_image', filename=filename) }}">
        </div>
    {% endif %}
    <form method="post" action="/" enctype="multipart/form-data">
        <dl>
            <p>
                <input type="file" name="file" class="form-control" autocomplete="off" required>
            </p>
        </dl>
        <p>
            <input type="submit" value="Submit" class="btn btn-info">
        </p>
    </form>
</div>
</div>
</body>
</html>

Thursday, April 8, 2021

Python Flask Autosave data after specific time with jQuery AJAX and Mysql database

Python Flask Autosave data after specific time with jQuery AJAX and Mysql database

Database Table

CREATE TABLE `post` (
  `id` int(11) NOT NULL,
  `title` varchar(100) NOT NULL,
  `content` text NOT NULL
) ENGINE=InnoDB DEFAULT CHARSET=latin1;

ALTER TABLE `post`
  ADD PRIMARY KEY (`id`);

ALTER TABLE `post`
  MODIFY `id` int(11) NOT NULL AUTO_INCREMENT, AUTO_INCREMENT=1;

The setTimeout() method calls a function or evaluates an expression after a specified number of milliseconds.

1000 ms = 1 second.

In this tutorial set an interval of 5 seconds
app.py
 
#app.py
from flask import Flask, request, jsonify, render_template
from flaskext.mysql import MySQL #pip install flask-mysql
import pymysql

app = Flask(__name__)
  
mysql = MySQL()
 
app.config['MYSQL_DATABASE_USER'] = 'root'
app.config['MYSQL_DATABASE_PASSWORD'] = ''
app.config['MYSQL_DATABASE_DB'] = 'testingdb'
app.config['MYSQL_DATABASE_HOST'] = 'localhost'
mysql.init_app(app)

@app.route('/')
def home():
	return render_template('index.html')

@app.route('/autosave', methods=['POST'])
def autosave():
	try:
		conn = mysql.connect()
		cursor = conn.cursor(pymysql.cursors.DictCursor)
		if request.method == 'POST':
			postid = request.form['postid']	
			title = request.form['title']	
			content = request.form['content']
			cursor.execute("SELECT count(*) as cntpost FROM post WHERE id=%s", postid)
			row = cursor.fetchone()
			count = row['cntpost']
			print(count)

			if count == 0:
				sql = "INSERT INTO post(title, content) VALUES(%s, %s)"
				data = (title, content)
				conn = mysql.connect()
				cursor = conn.cursor()
				cursor.execute(sql, data)
				postid = cursor.lastrowid
				print(postid)
				conn.commit()
			else:
				sql = "UPDATE post SET title=%s, content=%s WHERE id=%s"
				data = (title, content, postid)
				conn = mysql.connect()
				cursor = conn.cursor()
				cursor.execute(sql, data)
				conn.commit()

			resp = jsonify(postid)
			resp.status_code = 200
			return resp
	except Exception as e:
		print(e)
	finally:
		cursor.close() 
		conn.close()

if __name__ == "__main__":
    app.run()
templates/index.html
//templates/index.html
<html>
<head>
<title>Python Flask Autosave data after specific time with jQuery AJAX and Mysql database</title>
<link rel="stylesheet" href="https://maxcdn.bootstrapcdn.com/bootstrap/3.3.6/css/bootstrap.min.css" />		
<script src="https://ajax.googleapis.com/ajax/libs/jquery/3.1.0/jquery.min.js"></script>
</head>

<body>
<p><h1 align="center">Python Flask Autosave data after specific time with jQuery AJAX and Mysql database</h1></p>
<div class="container">
<div class="row">
	<b>Title :</b> <input type='text' id='postTitle' class="form-control" placeholder='Enter post title'><br><br>
	<b>Content :</b> <textarea id='postContent' class="form-control" placeholder='Enter content' rows="5"></textarea><br><br>
	<input type='button' class="btn btn-default" id='submit' value='Submit'>
	<input type='hidden' id='postid' value='0' >
</div>
</div>
<script>
//setTimeout(function(){ alert("Hello"); }, 3000); //Display an alert box after 3 seconds (3000 milliseconds):
$(document).ready(function(){
 var timer;
 var timeout = 5000; // Timout duration 1000 ms = 1 second.
 $('#postTitle,#postContent').keyup(function(){
 
  if(timer) {
   clearTimeout(timer);
  }
  timer = setTimeout(saveData, timeout); 
 
 });
 
 $('#submit').click(function(){
  saveData();
 });
});

// Save data
function saveData(){
 
 var postid = $('#postid').val();
 var title = $('#postTitle').val().trim();
 var content = $('#postContent').val().trim();

 if(title != '' || content != ''){
  // AJAX request
  $.ajax({
   url: '/autosave',
   type: 'post',
   data: {postid:postid,title:title,content:content},
   success: function(response){
    $('#postid').val(response); 
	alert('Save Success');
   } 
  });
 } 
}
</script>
</body>
</html>

PHP Mysqli Autosave data after specific time with jQuery AJAX

PHP Mysqli Autosave data after specific time with jQuery AJAX

--
-- Table structure for table `post`
--

CREATE TABLE `post` (
  `id` int(11) NOT NULL,
  `title` varchar(100) NOT NULL,
  `content` text NOT NULL
) ENGINE=InnoDB DEFAULT CHARSET=latin1;

--
-- Dumping data for table `post`
--

INSERT INTO `post` (`id`, `title`, `content`) VALUES
(1, 'dfsdf', 'sdf'),
(2, 'sfdf', 'sdasdasd'),
(3, 'PHP Mysqli Autosave data after specific time with jQuery AJAX', 'PHP Mysqli Autosave data after specific time with jQuery AJAX');

--
-- Indexes for dumped tables
--

--
-- Indexes for table `post`
--
ALTER TABLE `post`
  ADD PRIMARY KEY (`id`);

--
-- AUTO_INCREMENT for dumped tables
--

--
-- AUTO_INCREMENT for table `post`
--
ALTER TABLE `post`
  MODIFY `id` int(11) NOT NULL AUTO_INCREMENT, AUTO_INCREMENT=1;

The setTimeout() method calls a function or evaluates an expression after a specified number of milliseconds.

1000 ms = 1 second.

In this tutorial set an interval of 5 seconds 

//index.php
<html>
<head>
<title>PHP Mysqli Autosave data after specific time with jQuery AJAX</title>
<link rel="stylesheet" href="https://maxcdn.bootstrapcdn.com/bootstrap/3.3.6/css/bootstrap.min.css" />		
<script src="https://ajax.googleapis.com/ajax/libs/jquery/3.1.0/jquery.min.js"></script>
</head>
<body>
<p><h1 align="center">PHP Mysqli Autosave data after specific time with jQuery AJAX</h1></p>
<div class="container">
<div class="row">
	<b>Title :</b> <input type='text' id='postTitle' class="form-control" placeholder='Enter post title'><br><br>
	<b>Content :</b> <textarea id='postContent' class="form-control" placeholder='Enter content' rows="5"></textarea><br><br>
	<input type='button' class="btn btn-default" id='submit' value='Submit'>
	<input type='hidden' id='postid' value='0' >
</div>
</div>
<script>
//setTimeout(function(){ alert("Hello"); }, 3000); //Display an alert box after 3 seconds (3000 milliseconds):
$(document).ready(function(){
 var timer;
 var timeout = 5000; // Timout duration 1000 ms = 1 second.
 $('#postTitle,#postContent').keyup(function(){
 
  if(timer) {
   clearTimeout(timer);
  }
  timer = setTimeout(saveData, timeout); 
 
 });
 
 $('#submit').click(function(){
  saveData();
 });
});

// Save data
function saveData(){
 
 var postid = $('#postid').val();
 var title = $('#postTitle').val().trim();
 var content = $('#postContent').val().trim();

 if(title != '' || content != ''){
  // AJAX request
  $.ajax({
   url: 'autosave.php',
   type: 'post',
   data: {postid:postid,title:title,content:content},
   success: function(response){
    $('#postid').val(response); 
	alert('Save Success');
   } 
  });
 } 
}
</script>
</body>
</html>
autosave.php
//autosave.php
<?php
include "dbcon.php";

$postid = $_POST['postid'];
$title = $_POST['title'];
$content = $_POST['content'];

$stmt = $conn->prepare("SELECT count(*) as cntpost FROM post WHERE id=?");
$stmt->bind_param("i", $postid);
$stmt->execute();
$fetchdata = $stmt->get_result()->fetch_assoc();
$count = $fetchdata['cntpost'];

if($count == 0){

    $stmt = $conn->prepare("INSERT INTO post(title,content) VALUES (?, ?)");
    $stmt->bind_param("ss", $title, $content);
    $stmt->execute();
    $postid = $stmt->insert_id;
  
}else {
    $stmt = $conn->prepare("UPDATE post SET title=?,content=? where id=?");
    $stmt->bind_param("ssi", $title, $content,$postid); 
    $stmt->execute();
}

echo $postid;
dbcon.php
//dbcon.php
<?php
$conn = new mysqli('localhost','root','','testingdb');
if ($conn->connect_error) {
    die('Error : ('. $conn->connect_errno .') '. $conn->connect_error);
}
?>

Wednesday, April 7, 2021

Python Flask Generate PDF Report from MySQL

Python Flask Generate PDF Report from MySQL


--
-- Table structure for table `employee`
--

CREATE TABLE `employee` (
  `id` int(11) NOT NULL,
  `name` varchar(100) NOT NULL,
  `position` varchar(100) NOT NULL,
  `office` varchar(100) NOT NULL,
  `age` int(11) NOT NULL,
  `salary` int(11) NOT NULL,
  `photo` varchar(150) NOT NULL
) ENGINE=InnoDB DEFAULT CHARSET=latin1;

--
-- Dumping data for table `employee`
--

INSERT INTO `employee` (`id`, `name`, `position`, `office`, `age`, `salary`, `photo`) VALUES
(1, 'Tiger Wood', 'Accountant', 'Tokyo', 36, 5689, '01.jpg'),
(2, 'Mark Oto Ednalan', 'Chief Executive Officer (CEO)', 'London', 56, 5648, '02.jpg'),
(3, 'Jacob thompson', 'Junior Technical Author', 'San Francisco', 23, 5689, '03.jpg'),
(4, 'cylde Ednalan', 'Software Engineer', 'Olongapo', 23, 54654, '04.jpg'),
(5, 'Angelica Ramos', 'Software Engineer', 'San Francisco', 26, 5465, '05.jpg'),
(6, 'Airi Satou', 'Integration Specialist', 'New York', 53, 56465, '06.jpg'),
(8, 'Tiger Nixon', 'Software Engineer', 'London', 45, 456, '07.jpg'),
(9, 'Airi Satou', 'Pre-Sales Support', 'New York', 25, 4568, '08.jpg'),
(10, 'Angelica Ramos', 'Sales Assistant', 'New York', 45, 456, '09.jpg'),
(11, 'Ashton updated', 'Senior Javascript Developer', 'Olongapo', 45, 54565, '01.jpg'),
(12, 'Bradley Greer', 'Regional Director', 'San Francisco', 27, 5485, '02.jpg'),
(13, 'Brenden Wagner', 'Javascript Developer', 'San Francisco', 38, 65468, '03.jpg'),
(14, 'Brielle Williamson', 'Personnel Lead', 'Olongapo', 56, 354685, '04.jpg'),
(15, 'Bruno Nash', 'Customer Support', 'New York', 36, 65465, '05.jpg'),
(16, 'cairocoders', 'Sales Assistant', 'Sydney', 45, 56465, '06.jpg'),
(17, 'Zorita Serrano', 'Support Engineer', 'San Francisco', 38, 6548, '07.jpg'),
(18, 'Zenaida Frank', 'Chief Operating Officer (COO)', 'San Francisco', 39, 545, '08.jpg');

--
-- Indexes for dumped tables
--

--
-- Indexes for table `employee`
--
ALTER TABLE `employee`
  ADD PRIMARY KEY (`id`);

--
-- AUTO_INCREMENT for dumped tables
--

--
-- AUTO_INCREMENT for table `employee`
--
ALTER TABLE `employee`
  MODIFY `id` int(11) NOT NULL AUTO_INCREMENT, AUTO_INCREMENT=19;

install from fpdf import FPDF #pip install fpdf 
app.py
#app.py
from flask import Flask, render_template, url_for, Response
from flaskext.mysql import MySQL #pip install flask-mysql
import pymysql
from fpdf import FPDF #pip install fpdf 

app = Flask(__name__)
  
mysql = MySQL()
 
app.config['MYSQL_DATABASE_USER'] = 'root'
app.config['MYSQL_DATABASE_PASSWORD'] = ''
app.config['MYSQL_DATABASE_DB'] = 'testingdb'
app.config['MYSQL_DATABASE_HOST'] = 'localhost'
mysql.init_app(app)

@app.route('/')
def home():
	return render_template('index.html')

@app.route('/download/report/pdf')
def download_report():
	conn = None
	cursor = None
	try:
		conn = mysql.connect()
		cursor = conn.cursor(pymysql.cursors.DictCursor)
		
		cursor.execute("SELECT * FROM employee")
		result = cursor.fetchall()

		pdf = FPDF()
		pdf.add_page()
		
		page_width = pdf.w - 2 * pdf.l_margin
		
		pdf.set_font('Times','B',14.0) 
		pdf.cell(page_width, 0.0, 'Employee Data', align='C')
		pdf.ln(10)

		pdf.set_font('Courier', '', 12)
		
		col_width = page_width/4
		
		pdf.ln(1)
		
		th = pdf.font_size
		
		for row in result:
			pdf.cell(col_width, th, str(row['id']), border=1)
			pdf.cell(col_width, th, row['name'], border=1)
			pdf.cell(col_width, th, row['position'], border=1)
			pdf.cell(col_width, th, row['office'], border=1)
			pdf.ln(th)
		
		pdf.ln(10)
		
		pdf.set_font('Times','',10.0) 
		pdf.cell(page_width, 0.0, '- end of report -', align='C')
		
		return Response(pdf.output(dest='S').encode('latin-1'), mimetype='application/pdf', headers={'Content-Disposition':'attachment;filename=employee_report.pdf'})
	except Exception as e:
		print(e)
	finally:
		cursor.close() 
		conn.close()
		

if __name__ == "__main__":
    app.run()
templates/index.html
//templates/index.html
<!DOCTYPE html>
<html>
<head>
	<meta charset="UTF-8">
	<title>Python Flask Generate PDF Report from MySQL</title>
</head>
<body>
	<div style="margin: 10px 0 0 10px;width: 600px">
	<h2>Python Flask Generate PDF Report from MySQL</h2>
<p>
	<a href="{{ url_for('.download_report') }}">Generate Pdf Report</a>
</p>
	</div>
</body>
</html>

Python Flask Show Data on Google Pie Chart

Python Flask Show Data on Google Pie Chart

Pie charts are used to show percentage or proportional data and the percentage represented by each category is provided next to the corresponding slice of pie.


app.py
 
#app.py
from flask import Flask, render_template

app = Flask(__name__)
  
@app.route('/')
def google_pie_chart():
	data = {'Task' : 'Hours per Day', 'Work' : 22, 'Eat' : 4, 'Commute' : 6, 'Watching TV' : 5, 'Sleeping' : 15}
	return render_template('index.html', data=data)

if __name__ == "__main__":
    app.run()
templates/index.html
//templates/index.html
<!DOCTYPE html>
<html>
<head>
	<meta charset="UTF-8">
	<title>Python Flask Show Data on Google Pie Chart</title>
	<script type="text/javascript" src="https://www.gstatic.com/charts/loader.js"></script>
    <script type="text/javascript">
      google.charts.load("current", {packages:["corechart"]});
      google.charts.setOnLoadCallback(drawChart);
      function drawChart() {
        var data = google.visualization.arrayToDataTable([
			{% for key, value in data.items() %}
				{% if value is string %}
					['{{ key }}', '{{ value }}'],
				{% else %}
					['{{ key }}', {{ value }}],
				{% endif %}
			{% endfor %}
        ]);

        var options = {
          title: 'My Daily Activities',
          is3D: true,
		  //pieHole: 0.5
		  pieStartAngle: 100
		  /*slices: {  
			2: {offset: 0.2},
            3: {offset: 0.3}
          }*/
		  /*slices: {
            1: { color: 'transparent' }
          }*/
        };

        var chart = new google.visualization.PieChart(document.getElementById('piechart_3d'));
        chart.draw(data, options);
      }
    </script>
</head>
<body>
	<div style="margin: 10px 0 0 10px;width: 1000px">
		<h3>Python Flask Show Data on Google Pie Chart</h3>
		<div id="piechart_3d" style="width: 900px; height: 500px;"></div>
	</div>
</body>
</html>

Tuesday, April 6, 2021

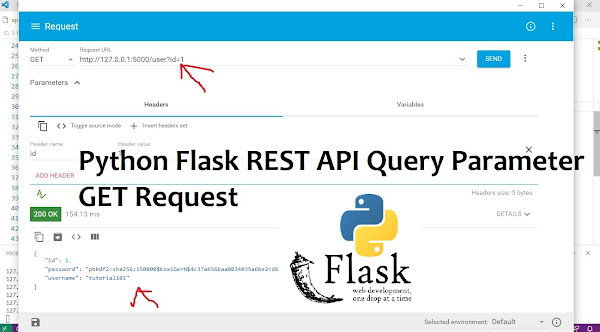
Python Flask REST API Query Parameter GET Request

Python Flask REST API Query Parameter GET Request


--
-- Table structure for table `user`
--

CREATE TABLE `user` (
  `id` int(11) NOT NULL,
  `username` varchar(45) COLLATE utf8mb4_unicode_ci DEFAULT NULL,
  `password` varchar(255) COLLATE utf8mb4_unicode_ci DEFAULT NULL
) ENGINE=InnoDB DEFAULT CHARSET=utf8mb4 COLLATE=utf8mb4_unicode_ci;

--
-- Dumping data for table `user`
--

INSERT INTO `user` (`id`, `username`, `password`) VALUES
(1, 'tutorial101', 'pbkdf2:sha256:150000$KxxiGerN$4c37a656baa0034035a6be2cd698b5da8b036ae63eef3ab0b08b9c18b9765648');

--
-- Indexes for dumped tables
--

--
-- Indexes for table `user`
--
ALTER TABLE `user`
  ADD PRIMARY KEY (`id`);

--
-- AUTO_INCREMENT for dumped tables
--

--
-- AUTO_INCREMENT for table `user`
--
ALTER TABLE `user`
  MODIFY `id` int(11) NOT NULL AUTO_INCREMENT, AUTO_INCREMENT=2;

http://127.0.0.1:5000/user?id=1
app.py
 
#app.py
from flask import Flask, jsonify, request
from flask_mysqldb import MySQL,MySQLdb #pip install flask-mysqldb https://github.com/alexferl/flask-mysqldb
from werkzeug.security import generate_password_hash, check_password_hash

app = Flask(__name__)
  
app.config['MYSQL_HOST'] = 'localhost'
app.config['MYSQL_USER'] = 'root'
app.config['MYSQL_PASSWORD'] = ''
app.config['MYSQL_DB'] = 'testingdb'
app.config['MYSQL_CURSORCLASS'] = 'DictCursor'
mysql = MySQL(app) 
 
@app.route('/')
def home():
    passhash = generate_password_hash('cairocoders')
    print(passhash)
    return 'Homepage'

@app.route('/user') 
def get_user():
	cursor = None;
	id = request.args.get('id')
	if id:
		cursor = mysql.connection.cursor(MySQLdb.cursors.DictCursor)
		cursor.execute("SELECT * FROM user WHERE id=%s", id)
		row = cursor.fetchone()
		resp = jsonify(row)
		resp.status_code = 200
		cursor.close() 
		return resp
	else:
		resp = jsonify('User "id" not found in query string')
		resp.status_code = 500
		return resp

if __name__ == "__main__":
    app.run()

Python Flask REST API Files Upload

Python Flask REST API Files Upload


#app.py
from flask import Flask, json, request, jsonify
import os
import urllib.request
from werkzeug.utils import secure_filename

app = Flask(__name__)

app.secret_key = "caircocoders-ednalan"

UPLOAD_FOLDER = 'static/uploads'
app.config['UPLOAD_FOLDER'] = UPLOAD_FOLDER
app.config['MAX_CONTENT_LENGTH'] = 16 * 1024 * 1024

ALLOWED_EXTENSIONS = set(['txt', 'pdf', 'png', 'jpg', 'jpeg', 'gif'])

def allowed_file(filename):
	return '.' in filename and filename.rsplit('.', 1)[1].lower() in ALLOWED_EXTENSIONS

@app.route('/')
def main():
    return 'Homepage'

@app.route('/upload', methods=['POST'])
def upload_file():
	# check if the post request has the file part
	if 'files[]' not in request.files:
		resp = jsonify({'message' : 'No file part in the request'})
		resp.status_code = 400
		return resp

	files = request.files.getlist('files[]')
	
	errors = {}
	success = False
	
	for file in files:		
		if file and allowed_file(file.filename):
			filename = secure_filename(file.filename)
			file.save(os.path.join(app.config['UPLOAD_FOLDER'], filename))
			success = True
		else:
			errors[file.filename] = 'File type is not allowed'

	if success and errors:
		errors['message'] = 'File(s) successfully uploaded'
		resp = jsonify(errors)
		resp.status_code = 500
		return resp
	if success:
		resp = jsonify({'message' : 'Files successfully uploaded'})
		resp.status_code = 201
		return resp
	else:
		resp = jsonify(errors)
		resp.status_code = 500
		return resp

if __name__ == '__main__':
    app.run(debug=True)

Friday, April 2, 2021

Python Flask REST API Login Logout

Python Flask REST API Login Logout


--
-- Table structure for table `user`
--

CREATE TABLE `user` (
  `id` int(11) NOT NULL,
  `username` varchar(45) COLLATE utf8mb4_unicode_ci DEFAULT NULL,
  `password` varchar(255) COLLATE utf8mb4_unicode_ci DEFAULT NULL
) ENGINE=InnoDB DEFAULT CHARSET=utf8mb4 COLLATE=utf8mb4_unicode_ci;

--
-- Dumping data for table `user`
--

INSERT INTO `user` (`id`, `username`, `password`) VALUES
(1, 'tutorial101', 'pbkdf2:sha256:150000$KxxiGerN$4c37a656baa0034035a6be2cd698b5da8b036ae63eef3ab0b08b9c18b9765648');

--
-- Indexes for dumped tables
--

--
-- Indexes for table `user`
--
ALTER TABLE `user`
  ADD PRIMARY KEY (`id`);

--
-- AUTO_INCREMENT for dumped tables
--

--
-- AUTO_INCREMENT for table `user`
--
ALTER TABLE `user`
  MODIFY `id` int(11) NOT NULL AUTO_INCREMENT, AUTO_INCREMENT=2;

Username : tutorial101
password : cairocoders

Testing Rest API

REST API Testing is open-source web automation testing technique that is used for testing RESTful APIs for web applications. The purpose of rest api testing is to record the response of rest api by sending various HTTP/S requests to check if rest api is working fine or not. Rest api testing is done by GET, POST, PUT and DELETE methods.

Rest stands for Representational State Transfer. It is an architectural style and an approach for communication used in the development of Web Services. REST has become a logical choice for building APIs. It enables users to connect and interact with cloud services efficiently.

An API or Application Programming Interface is a set of programming instructions for accessing a web-based software application.

API is a set of commands used by an individual program to communicate with one another directly and use each other's functions to get information.

Install the Advanced Rest Client
1. Go to Google Chrome's Web Store
2. Search for "Advanced Rest Client" https://chrome.google.com/webstore/detail/advanced-rest-client/hgmloofddffdnphfgcellkdfbfbjeloo and Install the extension
app.py
 
#app.py
from flask import Flask, jsonify, request, session
from flask_mysqldb import MySQL,MySQLdb #pip install flask-mysqldb https://github.com/alexferl/flask-mysqldb
from werkzeug.security import generate_password_hash, check_password_hash
from flask_cors import CORS #pip install -U flask-cors
from datetime import timedelta

app = Flask(__name__)

app.config['SECRET_KEY'] = 'cairocoders-ednalan'

app.config['PERMANENT_SESSION_LIFETIME'] =  timedelta(minutes=10)
CORS(app)
 
app.config['MYSQL_HOST'] = 'localhost'
app.config['MYSQL_USER'] = 'root'
app.config['MYSQL_PASSWORD'] = ''
app.config['MYSQL_DB'] = 'testingdb'
app.config['MYSQL_CURSORCLASS'] = 'DictCursor'
mysql = MySQL(app) 

@app.route('/')
def home():
	passhash = generate_password_hash('cairocoders')
	print(passhash)
	if 'username' in session:
		username = session['username']
		return jsonify({'message' : 'You are already logged in', 'username' : username})
	else:
		resp = jsonify({'message' : 'Unauthorized'})
		resp.status_code = 401
		return resp

@app.route('/login', methods=['POST'])
def login():
	_json = request.json
	_username = _json['username']
	_password = _json['password']
	print(_password)
	# validate the received values
	if _username and _password:
		#check user exists			
		cursor = mysql.connection.cursor(MySQLdb.cursors.DictCursor)
		
		sql = "SELECT * FROM user WHERE username=%s"
		sql_where = (_username,)
		
		cursor.execute(sql, sql_where)
		row = cursor.fetchone()
		username = row['username']
		password = row['password']
		if row:
			if check_password_hash(password, _password):
				session['username'] = username
				cursor.close()
				return jsonify({'message' : 'You are logged in successfully'})
			else:
				resp = jsonify({'message' : 'Bad Request - invalid password'})
				resp.status_code = 400
				return resp
	else:
		resp = jsonify({'message' : 'Bad Request - invalid credendtials'})
		resp.status_code = 400
		return resp
		
@app.route('/logout')
def logout():
	if 'username' in session:
		session.pop('username', None)
	return jsonify({'message' : 'You successfully logged out'})
		
if __name__ == "__main__":
    app.run()

AJAX File(s) Upload using Python Flask and jQuery

AJAX File(s) Upload using Python Flask and jQuery

In this tutorial I will show how to upload single file or multiple files using AJAX and jQuery with python flask
app.py
 
#app.py
from flask import Flask, request, render_template, jsonify
import os
#import magic
import urllib.request
from werkzeug.utils import secure_filename

app = Flask(__name__)

UPLOAD_FOLDER = 'static/uploads'
app.config['UPLOAD_FOLDER'] = UPLOAD_FOLDER

app.secret_key = "cairocoders-tutorial101"
app.config['UPLOAD_FOLDER'] = UPLOAD_FOLDER
app.config['MAX_CONTENT_LENGTH'] = 16 * 1024 * 1024

ALLOWED_EXTENSIONS = set(['txt', 'pdf', 'png', 'jpg', 'jpeg', 'gif'])

def allowed_file(filename):
	return '.' in filename and filename.rsplit('.', 1)[1].lower() in ALLOWED_EXTENSIONS

@app.route('/')
def upload_form():
	return render_template('index.html')
    
@app.route('/upload', methods=['POST'])
def upload_file():
	# check if the post request has the file part
	if 'files[]' not in request.files:
		resp = jsonify({'message' : 'No file part in the request'})
		resp.status_code = 400
		return resp
	
	files = request.files.getlist('files[]')
	
	errors = {}
	success = False
	
	for file in files:
		if file and allowed_file(file.filename):
			filename = secure_filename(file.filename)
			file.save(os.path.join(app.config['UPLOAD_FOLDER'], filename))
			success = True
		else:
			errors[file.filename] = 'File type is not allowed'
	
	if success and errors:
		errors['message'] = 'File(s) successfully uploaded'
		resp = jsonify(errors)
		resp.status_code = 206
		return resp
	if success:
		resp = jsonify({'message' : 'Files successfully uploaded'})
		resp.status_code = 201
		return resp
	else:
		resp = jsonify(errors)
		resp.status_code = 400
		return resp

if __name__ == '__main__':
    app.run(debug=True)
templates/index.hmtl
//templates/index.hmtl
<!doctype html>
<html>
<head>
	<title>AJAX File(s) Upload using Python Flask and jQuery</title>
	<script type="text/javascript" src="https://code.jquery.com/jquery-3.4.1.min.js"></script>
	<script type="text/javascript">
		$(document).ready(function (e) {
			$('#upload').on('click', function () {
				var form_data = new FormData();
				var ins = document.getElementById('multiFiles').files.length;
				
				if(ins == 0) {
					$('#msg').html('<span style="color:red">Select at least one file</span>');
					return;
				}
				
				for (var x = 0; x < ins; x++) {
					form_data.append("files[]", document.getElementById('multiFiles').files[x]);
				}
				
				$.ajax({
					url: '/upload', // point to server-side URL
					dataType: 'json', // what to expect back from server
					cache: false,
					contentType: false,
					processData: false,
					data: form_data,
					type: 'post',
					success: function (response) { // display success response
						$('#msg').html('');
						$.each(response, function (key, data) {							
							if(key !== 'message') {
								$('#msg').append(key + ' -> ' + data + '<br/>');
							} else {
								$('#msg').append(data + '<br/>');
							}
						})
					},
					error: function (response) {
						$('#msg').html(response.message); // display error response
					}
				});
			});
		});
	</script>
</head>
<body>
	<h2>Python Flask File(s) Upload - Select file(s) to upload</h2>
	<dl>
		<p>
			<p id="msg"></p>
			<input type="file" id="multiFiles" name="files[]" multiple="multiple"/>
			<button id="upload">Upload</button>
		</p>
	</dl>
</body>

Related Post